Friday, February 6, 2015

How to Play Our MTS (AVCHD) Movies on WDTV?

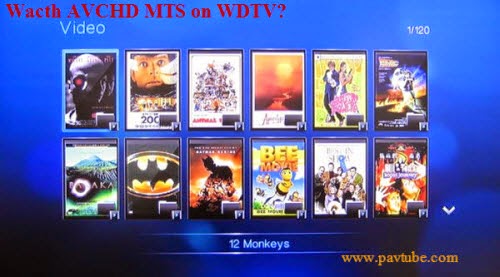
Though it is said that WDTV can support a wide variety of popular file formats, for the high definition AVCHD MTS recordings, we may got some troubles for playback. So in the following article, we are going to discuss the topic on how to play the AVCHD MTS movies smoothly on WDTV. 

‘I have read a lot about media players like Roku and WDTV but it appears that almost every piece of hardware out there soed not support MTS(AVCHD) files, which is insane to think Canon sells HD camcorder that saves in a format that isn’t supported anywhere….maybe we should get through this situation in another way’


As we know the issues we met above when working with WDTV, we also suggest you to know more details on WDTV supported file formats:

Video: MP4/MOV (MPEG4, h.264)
AVI (Xvid, AVC, MPEG1/2/4)
MPG/MPEG, VOB, M2TS, WMV9, FLV
TS/TP/M2T (MPEG1/2/4, AVC, VC-1)
MKV (h.264, x.264, AVC, MPEG1/2/4, VC-1)
Photo JPEG, GIF, TIF/TIFF, BMP, PNG
Audio MP3, WAV/PCM/LPCM, WMA, AAC, FLAC
MKA, AIF/AIFF, OGG, Dolby Digital, DTS
Playlist PLS, M3U, WPL
Subtitle SRT, ASS, SSA, SUB, SMI
File systems FAT32, NTFS, HFS+

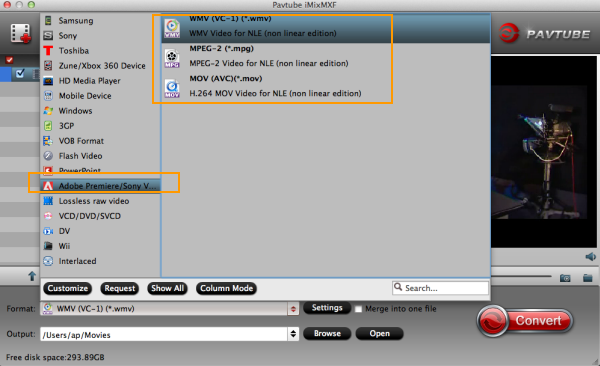
As we see above, AVCHD MTS is not included on the list above, so here we recommend the best AVCHD to WD TV Live Hub Converter---Pavtube MTS/M2TS Converter for Windows/Mac, which enables you to convert/transcode AVCHD MTS files to WDTV compatible format easily, and then you can import/join/stream AVCHD to WD TV Live Hub without any trouble. Additionally for some NLEs like Sony Vegas or via iTunes, AVCHD MTS can be available too. What’s more, this program adopted the advanced NVIDIA CUDA that makes the conversion task finished at up to 6x faster speed.

Specific Guide on how to convert AVCHD MTS to HD MP4 for playing smoothly on WDTV:
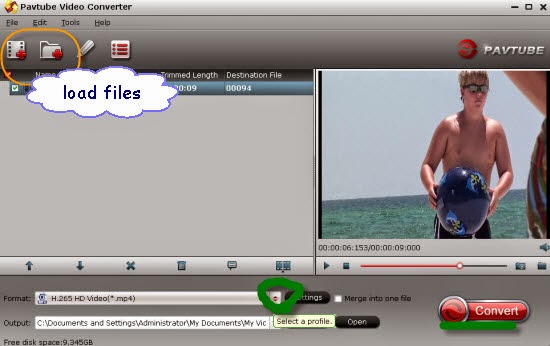
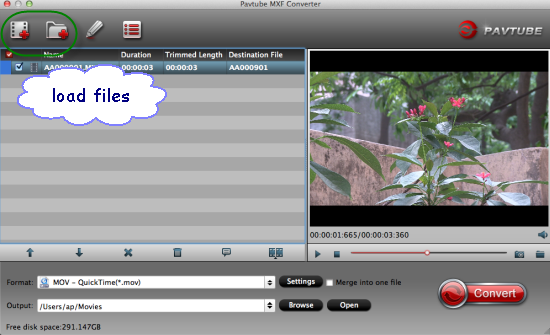
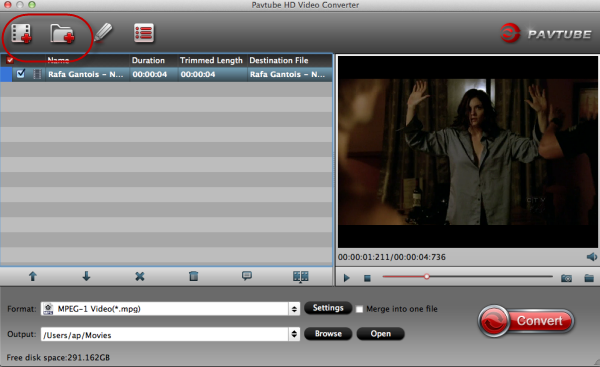
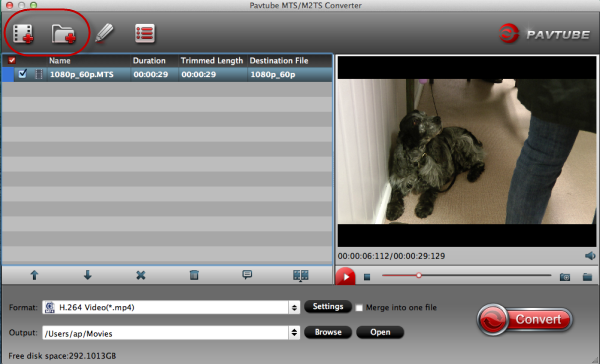
Step 1: Import AVCHD to the best AVCHD to WD TV converter. You can transfer the files into this program with the USB capable or open the main interface, we can click the ‘Add videos’ or ‘Add from folder’ to add them in.

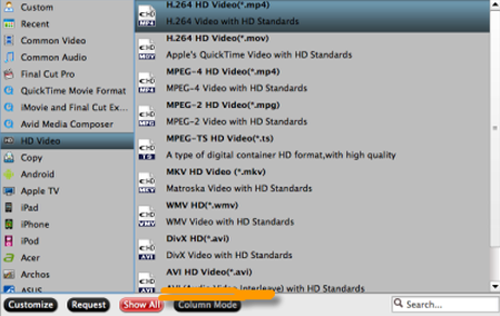
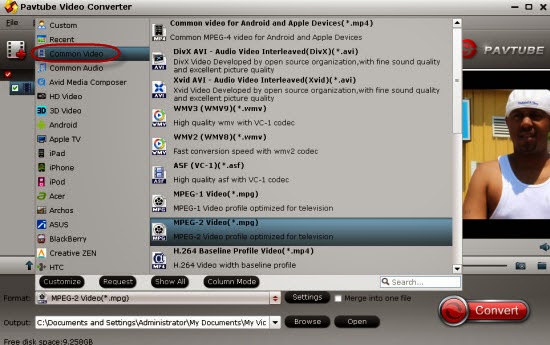
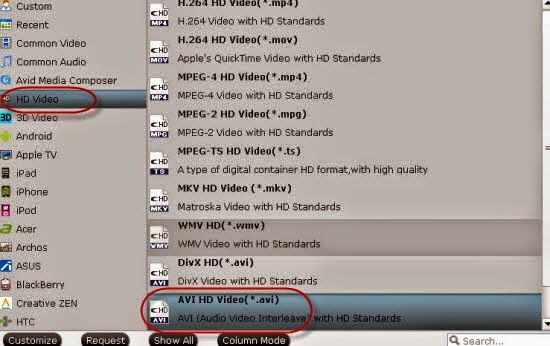
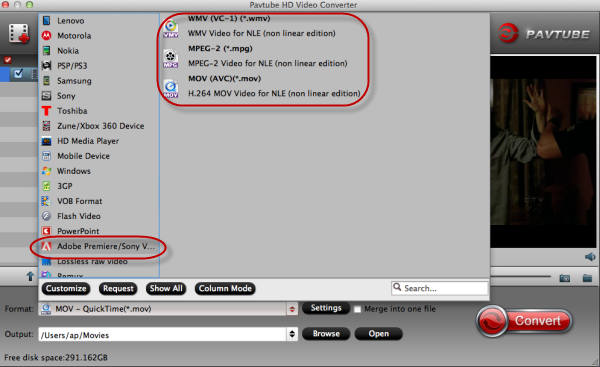
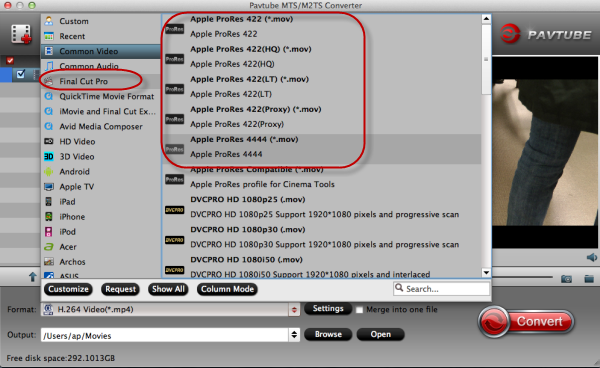
Step 2.Select an output format for WD TV? Yes! Just come to the output list we suggest you to choose the ‘HD Video’>>’H.264 HD Video (*.mp4)’ as our best. 


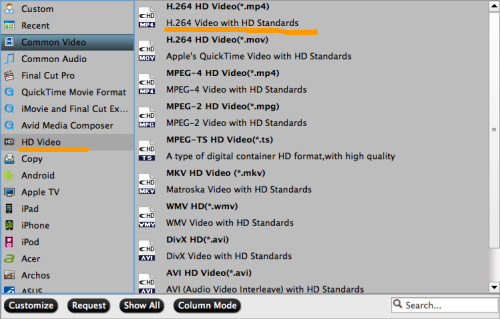
Notes: With the latest version of this Windows program, we have to tell you it can support the H.265/HEVC encode and decode right well. Also, there are three format standards of H.264 we can choose individually for different output devices. You won’t be disappointed here.

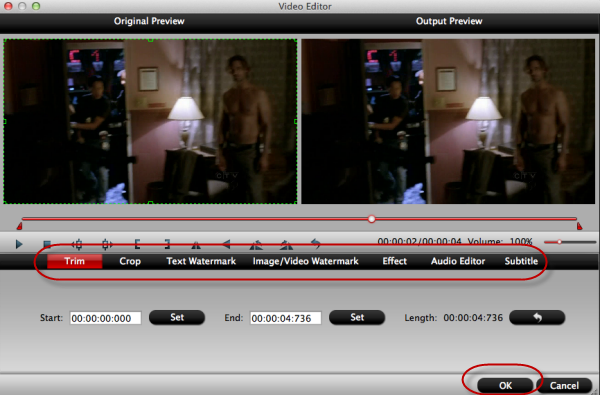
Step 3. Wanna adjust your audio and video parameters? Click the “Settings” icon and you will go into a new interface, here we adjust codec, bit rate, frame rate, sample rate and audio channel in the interface according to your needs and optimize the output file quality. 


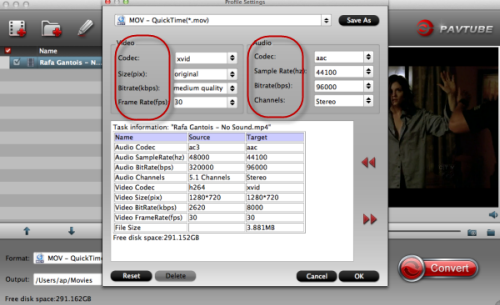
Tips: You’d better to adjust Bit rate to high quality, Audio bit rate to 640000, Frame rate to 24, Video Size to 1920 x 1080, and audio channel to 5.1 channel to make a good output quality. 

After that, it’s time to press on the big icon ‘Convert’ to start our conversion job, with the easy operation and faster conversion speed, are you still worrying about the troubles in importing AVCHD MTS files to WDTV for nice enjoyment?

More guides:

Wednesday, February 4, 2015

Top 5 Best AVCHD MTS to AVI Converter We Should Learn Well

Hey guys! How do you usually import your AVCHD MTS recordings to other media players for editing? Have you ever solved the issues smoothly when troubled in the format limitations? Today here, we would like to introduce you several professional AVCHD MTS Video Converter you can take a good reference below. Let’s be good readers!


Where did you usually receive the AVCHD MTS files?
Where we could get the AVCHD MTS files? As usual for those camcorder lovers, no matter for Sony, Canon or Panasonic, we are fond of uploading the AVCHD recordings to YouTube for sharing or enjoy our video on Apple device via iTunes. On the other way, AVCHD MTS cannot also played in Windows Media Player, you know which is the most popular player that we are working with. Thus we need to convert MTS to AVI, that’s the key point! 

As there are countless software available for this purpose, choosing the right one gets a bit tricky. With the help of internet, you can get innumerable suggestions, but to make the work easier for you, we bring you the top 5 recommended ones from the net.

Top 1 Pavtube MTS/M2TS Converter for Windows/Mac
As a professional MTS/M2TS converting program, this guy is especially designed for MTS or M2TS files. It is a marvelous conversion software, which can convert MTS, M2TS, M2T, TS, TP, TRP, formats to other video formats like TOD, MOD, FLV, SWF, MPEG, MP4, VOB, WMV, 3GP, AVI, MP4, MP3, and other popular formats to support playback video files on portable players such as iPod, iPhone, Zune, Apple TV, PSP, Xbox 360, iRiver, Creative Zen, Pocket PC, Mobile Phone and etc.

Powerful functions compared with other product:

1. Fully support AVCHD/AVCHD Lite footage Convert interlaced/progressive AVCHD/AVCHD Lite files at resolution of 1920*1080, 1280*720, and 1440*1080. 
2. Various output video formats supported Output multiple video formats such as H.264/MPEG-4, DivX, XviD, MKV, MP4, AVI, MPEG, WMV, FLV, SWF, F4V, MOV, Quick Time HD Video (*.mov), WMV HD Video (*.wmv), etc. 
3. Video conversion for better editing in NLE programs Ouput Apple ProRes for Final Cut Pro, Apple InterMediate Codec for iMovie/Final Cut Express, DNxHD for Avid Media Composer, etc. 
4. Multiple mobile devices for end use You’re free to enjoy output videos on devices such as Apple products, Android tablets/smartphones, game consoles, media players, Windows Phone 7/8/8.1 or later version, etc. 
5.Powerful editing functions by trimming, cropping, splitting, merging, and more.

Top 2.Pavtube Video Converter for Windows/Mac
As the old famous video studio on the market, Pavtube studio has a good reputation among our users’ hearts. It’s an all-in-one media conversion program that can almost handle all videos nicely here. With Pavtube Video Converter for Mac, you’ll have free access to watching SD videos (e.g. YouTube FLV/F4V, MP4, AVI, MPG, WMV, etc), digital camcorder recordings (e.g. MXF, MTS AVCHD, MOV, MP4, MVI, etc), DVR videos (Tivo), audio files (e.g. MP3, MP2, WMA, FLAC) on devices such as Apple/Android/Windows series, media players, game consoles, etc.

Main features you will be interested in:
1.Convert all popular media formats
2. Choose from dozens of smart presets for mobile devices
3. Edit and enhance your video before converting

Top 3.Pavtube HD Video Converter for Windows/ Mac
As an outstanding video conversion tool that specially for Mac OS X users, this perfect converting assistant can handle all different HD videos shot such from Panasonic, Sony, Canon or JVC, etc. including MKV, MP4, VOB, MPG, MOV, AVI, DV, MTS, TS, MXF, FLV, 3GP, 3G2, MP3, FLAC, MKA, OGG, WAV, etc. or DVR files (*.tivo) to other file types for editing in FCP X/6/7, Aperture 3, DaVinci Resolve Lite(DaVinci Resolve 11), iMovie, FCE, Avid Studio, Adobe Premiere Pro/CC, After Effects CC, etc.

Unique Advantages:
With a 6X conversion speed, you can save a lot of time
Both SD and HD videos you can handle well
Good settings you can adjust on your own
Perfect customer service you can enjoy all the time

Top 4 Pavtube Video Converter Ultimate for Windows/Mac

It is an all-in-one converter which is able to backup, rip, convert and transcode Blu-rays, DVDs and videos to any video/audio format. Also as a video editor, you are allowed to make your own favorite videos for entertainment. 

Key features you should know well:
1.Wide range of conversion objects
2. Simple transfer of converted video
3.Functional editing and settings items you can adjust well

Top 5. Pavtube Free MTS/M2TS Converter for Mac
It is a professional Mac AVCHD Converter designed for all MTS or M2TS footage which shot by Canon, Sony, Panasonic and JVC cameras. It can convert recorded AVCHD videos to various video formats for easily editing in editing software, like FCP, iMovie, FCE, Adobe Premiere, Sony Vegas, Cyberlink PowerDirector, Avid, Magix Movie Edit Pro, Windows Movie Maker and so on.

Key Features: 
*Fully Support interlaced and progressive AVCHD 1920*1080, 1440*1080, 1280*720 videos shot with Sony, Panasonic, Canon, JVC, etc. 
*Freely customize output video/audio settings, including Codec, Size(Resolution),Bitrate, Frame Rate to export your desired video 
* Convert AVCHD (.mts/m2ts) footages to editable video formats, like DVCPRO HD (*.mov), HDV (*.mov), Avid DNxHD(*.mov) for easily editing in FCP, AVID and so on.
*Provide optimised presets for Apple devices and Android Tablets/phones. 
*Simply merge multiple AVCHD footages into big one just with one click 

Additional Steps are allowed here to teach you how to converting AVCHD MTS to AVI with this professional MTS/M2TS Converter for Windows:

Step 1. Load AVCHD video files
Click Add Files button to load the video files from your computer or camcorder (or other devices like USB, cell phone, etc). You can also directly drag the video files into the program directly.


Step 2.Select the output video format and destination folder
You can choose the output format in the format drop-down list according to your needs. If you are planning to transfer the output videos to devices for enjoyment, you can choose the corresponding device as the output format. For example: we can select the ‘AVI HD Video(*.avi)’ as we mentioned above.


Step 3.Functional items: You can tick "Merge all videos into one file" on the right bottom of the interface. And click "Edit" on the right of the selected video, you can make changes to the video effects as you wish. In the editing window, you can trim your favorite part from the video, crop the frame size, adjust the visual effects, or add watermarks or subtitles. If you want to change the video parameters, go back to the main interface and click "settings" on the right bottom, you can select the video encoder, resolution, audio channel, and more.

Finally, go back to the main interface and hit the ‘Convert’ item, we can easily get the AVI files as output for watching on Windows Media Player. Such as easy job that I’m sure everyone can handle it well, right? 

Read More:

Monday, February 2, 2015

Let’s Deinterlace 1080i AVCHD MTS, AVI, DV, MPG Videos on Windows/Mac

If you are seeking for the solutions to the problems of deinterlacing various 1080i videos, you have come to the right place! Sometimes, in order to make all the recordings played well on different media players, it is necessary for us to deinterlace all these various video footage to suitable ones for playback on Windows/Mac or upload to Vimeo for a nice sharing? Fortunately, in the following article, we can solve the issues in deinterlacing 1080i AVCHD MTS, AVI, DV, or MPG video files.


Why we need to deinterlace our videos?

Interlacing only looks right on an old tube TV (Cathode Ray Tube, or CRT). If you have an LCD or a plasma, interlaced video looks horrible. For example if you interlaced movies causes lines, color fuzzing specks, and blurriness when an object is moving when played back on a pixel discreet monitor such as the LCD screen.

Here are some related situations you need to deinterlace your files
When I try play deintelaced DV AVI files, I get sound but no picture. Deinterlace works fine for me with other formats, like MP4, and I can play interlaced (no filter) AVI files fine also.
My EOS C100 camcorder does not support 720p recordings. It only captures 1920 x 1080 or 1440 x 1080 file at 60i in .mts file extension. So how to convert the recordings to MP4 in 720p?
After I converted XAVC 1080P to Apple ProRes, only to find the converted ProRes video are in 1080i, so how to make the converted video deintelaced?

Best Video Deinterlacer to help you deinterlace your video files on Windows/Mac
No worries about deinterlacing your original videos anymore! Here we are going to offer you a professional video converter called Pavtube Video Converter for Windows/Mac, which besides converting various incompatible videos to suitable ones for editing or playback, it can also deinterlace a variety of video files on Mac or Windows. Read therelated review you will get more.

Step-by-step on deinterlacing our 1080i AVCHD MTS/AVI/DV/MPG videos on Windows/Mac
Step 1. Download and install this program as the first step, open the main interface and click the ‘Add video’ or ‘Add from folder’ to load your 1080i files in.


Step 2(Optional) If you have the additional need for converting your video formats, we here can introduce your various output videos if you want. Just come to the ‘Common Video’ on the output list and select one as your favorite.


Step 3. Necessary step for everyone. Click the ‘Edit’ button there and get into the interface, in the ‘Effect’ item we can tick on the ‘Deinterlace’ button to meet our requirements. Just see the screen shot below.


Then we come to the ending step, just go back to the main interface to hit the big button ‘Convert’ to start our job is the final action. To achieve the wonderful playback effect on Windows and Mac, let’s enjoy deinterlacing our 1080p AVCHD MTS/AVI/DV/MPG videos here.

Others?

Friday, January 30, 2015

Edit MXF Commercial Production Movies for Uploading to YouTube/Vimeo

Looking for some efficient solution on uploading your MXF recordings shot by Canon XF300 camera to YouTube and Vimeo? However it seems that this job could be a litter hard for us to complete, right? Without the professional MXF assistant to help us to convert and edit these MXF recordings with the suitable formats, we will be trapped in this situation. Let’s see why and how.


‘Our company has shot some commercial production movies by Canon XF300 camera and we planned to advertise them on YouTube and Vimeo to do a good promotion. However, cause the recordings are encoded by MXF, some errors like ‘refused’ appeared on the screen. We are now seeking some solutions to this workflow;

While we have known that MXF is a prevalent audio & video container format mainly applied in some digital camcorders like Cannon XF300. On the other hand, YouTube is the most popular website where we can upload our favorite to it for sharing online with more other people. However, the YouTube only supports videos in AVI, FLV, MPEGPS, MPEG4, MOV, 3GP and WebM formats for uploading. So in this way, besides for MXF, such as MTS is not available for YouTube/Vimeo. 

Professional MXF converting assistat----Pavtube MXF Converter for Mac
With it, you can easily transcode the MXF files to any YouTube compatible format you need in a rather high quality and speed. Once gained such a MXF converter, uploading your MXF files to YouTube is never a headache to you. It is also available for Sony footage, etc. Windows version is also allowed here!

Some specific steps of converting MXF to compatible ones for YouTube/Vimeo are allowed here:
Step 1.Load our source MXF files
When you download and install the MXF program, open the main interface and choose the ‘Add video’ to load you files in. For the multiple video clips we can hit the ‘Merge into one file’ to combine them into a complete one.


Step 2 Choose individual output ones for YouTube and Vimeo

Stepping into the output list and on the output list, you can choose the ‘Flash Video’>>’FLV H.264 (*.flv)’ for YouTube like this:


While for Vimeo, you should select this item, ‘HD Video’>>’AVI HD Video(*.avi)’ as the most compatible one.


Notes: For other usage of these MXF footage? Why not take the following MXF Video Converter Review as good references?

Step 3. Make your movies more enjoyable with ‘Edit’ here.
Most of you guys must have the desire of a further editing with your output videos, right? On the main interface, ‘Edit’ is waiting for you. ‘Trim’ to decide where to start and where to end, ‘Crop’ to cut some unwanted clips, ‘Subtitles’ to add some explanations to your audience.

At the end, after you have finished your preparation job, just go back to the main interface to click the ‘Convert’ button, you can start your conversion job. Both for converting and editing MXF files, this program can handle the job well. What are you waiting for?

More:

Wednesday, January 28, 2015

Edit Panasonic Lumix GH4 4K Videos in Premier Pro CC

Panasonic Lumix GH4, as a new flagship mirrorless camera, it is the first kind to offer 4K video recordings. The new GH4 comes-in at a higher level to satisfy video professionals who want to film in 4k using a relatively affordable interchangeable lens camera. From some users who love adventure said, due to Panasonic Lumix GH4 camera’s feature, they can usually take some short amazing instants. They can show these moments to public after editing iniMovie/FCE, etc or play on media players such as the popular Xbox one 

 
That is a really cool idea! Right? While some users are confused in troubles of editing 4K videos in Premiere Pro, they wanna some help to solve this problem. GH4 4K camera has mainly the format are MTS which is unfriendly with Premiere Pro. Indeed we need get the Pavtube HD Video Converter for Mac to edit 4K videos in Premiere Pro CC well.

Take the following steps below to convert 4K MTS to WMV, MPG or MOV---three best formats supported by Premiere Pro CC.

Step 1.Launch the program and open the main interface to hit the ‘Add videos’ and ‘Add from folder’ to load our original 4K videos


Step 2.Chooose the best supported formats for Premiere Pro on the output list, ‘Adobe Premiere Pro/Sony Vegas’>>’MPEG-2 (*.mpg)’ as the good one. For other teo alternative ones you can also take a try.


Step 3.Do some simple editing if you like? Click the ‘Edit’ item on the main interface, here we can choose to set the our output video bitrates, frame rates or audio channels, etc.


Finally, just go back to the main interface to hit the red big button ‘Convert’ to start our conversion work. Then it’s time to transfer our 4K files to Adobe Premiere Pro CC nicely for editing. Now, still more questions?

Guides:

Tuesday, January 27, 2015

New Workflow: Panasonic AG AC-130A AVCHD to FCP X for Editing

‘I just got a new Panasonic AG-AC130A camcorder that shoots AVCHD onto a SD card. I shot some video with it set to record at 1080/60i. When I open my FCP X on Mac, the footages cannot be recognized in FCP X. I searched the method and tried the Log and Transfer, but still failed. Any help? ---Someone asked on Panasonic forum.


If you are professional editors who usually work with FCP, you must find it is common that the issues appeared above, right? Cause the video codec with Final Cut Pro limitation, we may be trapped in importing AVCHD MTS files in FCP X for editing. Panasonic AG AC-130A AVCHD recordings can be the typical one. While this high resolution AVCHD MTS format, it seems not only be refused by FCP, for other like Sony VegasAvid MC, or play AVCHD movies on PC? Maybe all these questions you can find best answers in the following article.

Cause Final Cut Pro doesn’t support AG-AC130A 1080P AVCHD well, for editing AG-AC130A AVCHD video in FCP X, you can convert AG-AC130A AVCHD video files to Final Cut Pro friendly editing video format via a professional AVCHD to FCP X converter on Mac. Fortunately, Pavtube MTS/M2TS Converter for Mac is such a good assistant which can easily help you convert AVCHD MTS to ProRes MOV for smoothly editing in FCP X. Also, it is available for other NLEs. Let’s get a further learning below.

Lessons on how to convert AVCHD MTS to ProRes MOV for nice editing in FCP X
Step 1.  Load Panasonic AG-AC130 MTS files
Run Pavtube MTS to ProRes Converter and then click “Add video” button to load 1080p MTS files from Panasonic AG-AC130 AVCHD camcorder to the Mac program. You can tick the box in front of the file you want to convert.


Step 2. Set ProRes MOV as output
Come to the output list when you clicking the ‘Format’ bar, drop down the list and you can easily find the item ‘Final Cut Pro’>>’Apple ProRes Codec 422 (*.mov)’ as the best output one.


Step 3. Optional function for output 
If you need, you can click ‘Settings’to set the video parameters like bit rate, resolution, frame rate, etc. Remember the file size and video quality is based more on bitrate than resolution which means bitrate higher results in big file size, and lower visible quality loss

At the end, don’t forget to go back to the main interface to hit the ‘Convert’ button to start your work. Aftertransferring files into FCP X, you can enjoy editing your AVCHD MTS recordings from Panasonic AG AC-130 camcorder. It will not take you a lot of time of waiting the conversion work with the fast speed.

More Related:

Tuesday, January 20, 2015

Can Premiere Pro CS6 Work Friendly with Canon MXF Files?

Premiere Pro CS6 no longer handles Canon MXF files? Read this post to know it is true or not and how to overcome the difficulties.

‘Can Premiere Pro CS6 handle with Canon MXF files still?’ 
This is a question that frequently appears on Canon column online buy some media fans or other video editors. As the following example you can see:’ I’m a creative cloud subscriber and download the lasted version of Premiere Pro. In the past, there’s no trouble when I import Canon files but today I get a ‘generic error’ here. It doesn't matter if I import video shot today, or video shot last month and successfully edited in Premiere Pro in the past. What gives?


Tips: Though Adobe Premiere Pro CS6 has upgraded form CS4/CS5, it still has no ability of working some incompatible formats, such as Common MP4Panasonic MXF recordings, etc. That’s the reason why we need to find some MXF converters to make our MXF files smoothly edit in Premiere Pro CS6. Let’s move on!

To search for the causes, some answers may be listed on the Internet such like ‘error sequence’, with the non-royalty bearing mode in Premiere Pro CS6, or the project contained a sequence that could not be opened. But for Premiere Pro best supported video formats , MPG, MOV or WMV is the traditional way for different versions of Premiere Pro. To suit for the stability of Premiere Pro, what other measures can we take?  

Canon MXF to Premiere Converter for Mac/Win---such a perfect converting tool that can make Premiere friendly with Canon MXF files. During a short conversion process, just get rid of the worries of such ‘error sequence’ or ‘non-native formats’. Why not take the following steps to have a try?

Note: Biggest high-light of this program: can convert MXF files with output multi-track audio just in your personal settings. No worries about missing your audio any more.

Add your Canon MXF files directly with USB cable connected with your Canon camera or in another way, click the ‘Add video’ or ‘Add from folder’ to load source files. For Premiere Pro CS6, special choosing items we can select here:’Adobe Premiere’>>’WMV VC-1 (*.wmv), MPEG-2 (*.mpg) or MOV AVC (*.mov).


Additionally for multi-track output videos, easily find the ‘Multi-track Video’ to ‘Multi-track MOV (*.mov) to get your wanted files in a convenient way as the picture below:


‘Settings’ for output video before you click the ‘Convert’ button. Both for video and audio items, you can adjust what you want here, such as video size, bitrate, or frame rate, etc. More, how to transfer files in Premiere Pro in a correct way here may help those who are going to work with this editing tool for first time.

More guides: