Summary: Does Premiere Pro have native support for Sony AX-100 4K XAVC S files? If you are trying to import 4K XAVC S to Premiere Pro for editing, you may wish to read this post.
 The Sony AX-100 camcorder records 4K and HD movies in XAVC S, a consumer friendly format based on the XAVC codec developed for 4K/HD and professional use, which uses MPEG-4 AVC/H.264 for video compression and linear PCM for audio compression, while saving files in a MP4 wrapper. However, if you want to import the XAVC S videos from Sony AX-100 to Premiere Pro for editing, you may encounter incompatibility issues.“I can not get Premiere Pro CS6 to recognize the 4K XAVC S files from AX-100. I get the ‘generic error’ message all the time. is there a way to get it to work?”To be clear, Adobe Premiere Pro CS5, CS5.5, CS6 and the latest PPro CC don’t have native support for Sony XAVC S footage wrapped in MP4 recording format. If you are searching for a plug-in to help you open Sony AX-100 4K XAVC S video in Premiere Pro, the searching results may let you down, that’s because presently there is no such a kind of plug-ins available for viewing and editing XAVC S MP4 footage in Premiere Pro and other mainstream editing programs like Avid Media Composer, FCP X and Vegas Pro.Since XAVC S codec is a new one, and is not widely supported. For those who stick with Premiere Pro, a quick fix is to convert AX-100 4K XAVC S to Premiere editable format such as MPEG-2 before editing. Pavtube HD Video Converter for Mac is the solid tool to help users make the 4K XAVC S to Premiere Pro transcoding on Mac OS X Yosemite.
 How to convert Sony AX-100 4K XAVC S to Premiere Pro for editing?Step 1: Install and import AX-100 4K videos.Backup your 4K XAVC S videos from your AX-100 camcorder to hard drive. Install and launch 4K HD Video Converter for Mac. Drag and drop 4K video files to the software. You can import multiple files at once thanks to batch conversion.
 Step 2: Set Premiere Pro friendly format.Click the drop-down list in the format line to get the format box. Then choose “Adobe Premiere/Sony Vegas>>MPEG-2 (*.mpg)” as output format.Tips: WMV (VC-1) (*.wmv) and MOV (AVC) (*.mov) are both supported. Generally, MPEG-2 is a well-accepted file format for its ability to keep up the video quality and its popularity.
 Step 3: Do some simple edit work.De-interlace: By default the 4K HD Video Converter for Mac will apply de-interlacing facility to some clips that are interlaced. Just click “Edit” to enter the video editor, switch to “Effect” tab, and check the “Deinterlacing” box.Trim: Basically, video hosting sites restrict video clips to be in certain file size and length. For example, YouTube stated that “videos can be up to 2GB in size and 10 minutes long”. You can trim the video to desired length with this HD Video Converter for Mac. Simply click “Edit” menu>>”Trim” tab and set start and end time point.Merge: To join multiple videos together, just select them in file list, and tick off the checkbox “Merge into one file” on the main interface.Step 4: Start to convert AX-100 4K XAVC S to Premiere friendly format.You can preview to check the final result. Once you are satisfied with it, click the “Convert” button to start converting AX-100 4K XAVC S to MPEG-2 .mpg format. It will take you a little while.Conclusion: After conversion, you’ll get no troubles in editing AX-100 4K XAVC S in Premiere Pro. Follow the steps and have a try!Further Reading:
Summary: Have issues with importing PJ275 1080/60p AVCHD MTS files to iMovie on your Mac? Just follow the steps below to convert 1080/60p AVCHD to iMovie compatible format AIC MOV to solve it.
 The Sony HDR-PJ275 is the least expensive Handycam with a projector (13 lumens). The camera records in exquisitely rich 1920 x1080/60p Full HD video and Internet ready MP4. It's not easy to ingest Sony HDR-PJ275 AVCHD to iMovie. Though Apple claims that iMovie 09/11 supports most commonly-used video codecs which including AVCHD format, there are always all kinds of problems. The time-consuming rendering process, the astonishing enlarged file size when iMovie automatically encode AVCHD to AIC and the quality degradation that can not be ignored, are really a pain when we desperately want to bring AVCHD to iMovie for post production.I guess many guys have the experiences with free converters, such as Handbrake. But free product seems have limits. The multiple steps make me confused when I need to preset profile. And once, after conversion, I get only video but no audio from Sony AVCHD MTS files. In the Apple forum, many posts are about no audio or unsynchronized problem. Pavtube MTS/M2TS Converter for Mac is the best to keep audio and video sync without rendering time and file size enlargement when bring 1080/60p AVCHD progressive to iMovie. For 60i/50i AVCHD files, the problem may be the thin horizontal lines radiating from all moving objects or wild flickering on still images containing thin horizontal lines. The program can easily remove and deinterlace the bad interlace if you need.Find it's difficulty to keep or change frame rate as you want after try many conversion tools? The program we mentioned above allows you easily to set video frame rate with one click. And the built-in editor tool will help you trim, crop, add watermark, add effecting, join video and capture pictures, etc. Now since the 3D camera are emerging after CES 2014, it is able to convert AVCHD to 3D video in MKV, MP4, MOV, WMV, and AVI with HD quality. Here is a step-by-step tutorial for you to figure out your AVCHD MTS to iMovie problem:Step 1: Import Sony HDR-PJ275 files to Mac MTS Converter. Run it as the best Mac MTS Converter, and click the “Add video” button to load your original files. You may also directly drag and drop files to application UI for importing files.
 Step 2: Click the “Format” option and navigate the mouse cursor to “iMovie and Final Cut Express>>Apple InterMediate Codec (AIC) (*.mov)” as output format.
 Step 3: Click “Settings” button to customize the output video and audio settings by yourself. But if you are not good at it, you’d better use the default parameters, they will ensure you a good balance between file size and image quality basically. You can change the resolution, bit rate, frame rate as you need.Step 4: When everything is ready, click “Convert” to start converting PJ275 AVCHD MTS to AIC MOV. This Mac MTS/M2TS Converter supports batch conversion so you may load multiple files and convert them at one time.Conclusion: After converting, you can get the generated files by clicking “Open” button. Now, you can edit PJ275 1080/60p AVCHD MTS in iMovie freely.Further Reading:
Summary: Have a lot of Sony HDV files at hands? Before uploading them to Vimeo for sharing with others, do you want to polish Sony HDV files with the help of FCP 7? Move on to find out how to edit Sony HDV files in FCP 7.
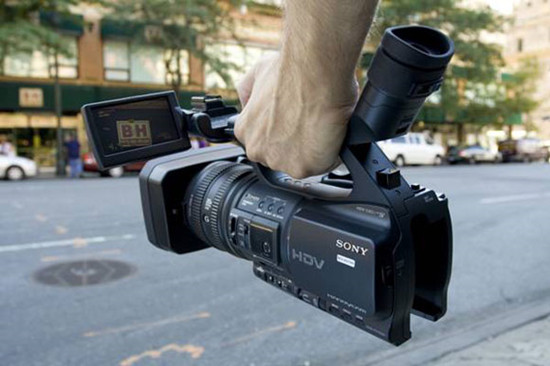 HDV is a format for recording of high-definition video on DV cassette tape. The format was originally developed by JVC and supported by Sony, Canon, and Sharp. Conceived as an affordable high definition format for digital camcorders, HDV quickly caught on with many amateur and professional videographers due to its low cost, portability, and image quality acceptable for many professional productions. It is also possible to record M2TS file to any media that offers enough capacity, like a DVD, external HDD drive or a memory card.As default editing software on Mac, FCP must be the first choice. It’s suitable for both amateur and professional videographers. On the other hand, problems have shown up: “Hi, all, I’m trying to import Sony HDV files to FCP 7 for editing. Unfortunately, FCP 7 seems not to recognize my Sony HDV files as import. I’ve visited Apple’s website, but couldn’t find a remedy for my issue. ”From online technical datas, we know that FCP supported file formats are as follows:Video Formats: Apple Animation codec, Apple Intermediate codec, Apple ProRes(all versions), AVC-intra, AVCHD (including AVCCAM, AVCHD Lite, and NXCAM), DV (including DVCAM, DVCPRO, and DVCPRO50), DVCPRO HD, H.264, HDV, iFrame, Motion JPEG(OpenDML only), MPEG IMX(D-10), REDCODE RAW (R3D), Uncompressed 10-bit 4:2:2, Uncompressed 8-bit 4:2:2, XAVC, XDCAM HD/EX/HD422, QuickTime formats.Audio Formats: AAC, AIFF, BWF, CAF, MP3, MP4, WAVContainer Format: 3GP, AVI, MP4, MXF, QuickTimeIt’s obviously that HDV is in the video formats that supported by FCP. However, we couldn’t get clear the container format of your original Sony HDV files. Only the container format and the video format are both supported by FCP can you edit files in FCP 7 smoothly.Generally, we can use Log and Transfer or Log and Capture to import Sony HDV files to FCP 7 for editing, but don’t expect it to result in top quality. From Apple official website or the information we mentioned above, you will know that FCP best supported video codec is Apple ProRes codec, which is native codec for Final Cut Pro editing on Mac. So we could depend on Pavtube MTS/M2TS Converter for Mac. The one used here can meet your demands with its simple interface but rich functions. How to edit Sony HDV files in FCP 7?Step 1: Import Sony HDV files to Mac MTS Converter. Run it as the best Mac MTS Converter, and click the “Add video” button to load your original files. You may also directly drag and drop files to application UI for importing files.Step 2: Click the “Format” option and navigate the mouse cursor to “Final Cut Pro>>Apple ProRes 422 (*.mov)” as output format.
 Step 3: Click “Settings” button to customize the output video and audio settings by yourself. But if you are not good at it, you’d better use the default parameters, they will ensure you a good balance between file size and image quality basically. You can change the resolution, bit rate, frame rate as you need.Step 4: When everything is ready, click “Convert” to start converting Sony HDV to ProRes. This Mac MTS/M2TS Converter supports batch conversion so you may load multiple files and convert them at one time.Conclusion: Now, you can edit Sony HDV files in FCP 7 freely. After polishing, you can uploading them to Vimeo for sharing.Further Reading:
Summary: FFmpeg is a free refined piece of conversion tool for Windows and Linux and it is a command-line tool that allows you to convert virtually any video and audio formats to another format.
 How does this “FFmpeg” work?
The good news for Linux users is that the H.265 codec is available in the popular encoding suite “ffmpeg”. Although “ffmpeg” probably exists in your distro’s repositories, it might be out of date or it might not have support for H.265 compiled in. Download either the 32-bit or 64-bit .tar.xz file. If you are unsure which one to download, then use the 32-bit one. In the directory where you downloaded the file, run the following command to unpack the archive file. Although it is realizable to convert video to M3U8 with FFmpeg, the whole process is a bit difficult for our green hands.
Another popular video converter- works well on Windows operation.
Pavtube Video Converter (version 4.8.6.2), which also named as the M3U8 Converter that specially designed for M3U8. In this upgraded version, we will find several obvious changes there, such as supporting M3U8 output and etc. With M3U8 output, it’s fast to drag the video. There is no extra datas and no need for buffering. In other words, you can drag the video to any point for smoothly playing immediately. What’s more? The original supporting effect is good. You can know more about M3U8 upgrade news from Pavtube official website. It’s better than FFmpeg because several steps are enough for this program. It’s indeed easy to use!
Tips: Convert video to M3U8 with FFmpeg Alternatives for Mac OS X
How does this “FFmpeg” work?
The good news for Linux users is that the H.265 codec is available in the popular encoding suite “ffmpeg”. Although “ffmpeg” probably exists in your distro’s repositories, it might be out of date or it might not have support for H.265 compiled in. Download either the 32-bit or 64-bit .tar.xz file. If you are unsure which one to download, then use the 32-bit one. In the directory where you downloaded the file, run the following command to unpack the archive file. Although it is realizable to convert video to M3U8 with FFmpeg, the whole process is a bit difficult for our green hands.
Another popular video converter- works well on Windows operation.
Pavtube Video Converter (version 4.8.6.2), which also named as the M3U8 Converter that specially designed for M3U8. In this upgraded version, we will find several obvious changes there, such as supporting M3U8 output and etc. With M3U8 output, it’s fast to drag the video. There is no extra datas and no need for buffering. In other words, you can drag the video to any point for smoothly playing immediately. What’s more? The original supporting effect is good. You can know more about M3U8 upgrade news from Pavtube official website. It’s better than FFmpeg because several steps are enough for this program. It’s indeed easy to use!
Tips: Convert video to M3U8 with FFmpeg Alternatives for Mac OS X

 How to convert video to M3U8 for smoothly and immediately playing?
Step 1: Download and install the program. Click “Add video” on the main interface to load your files to the program. You can also drag the files to the program’s window list directly. This program can also support the batch video clips.
How to convert video to M3U8 for smoothly and immediately playing?
Step 1: Download and install the program. Click “Add video” on the main interface to load your files to the program. You can also drag the files to the program’s window list directly. This program can also support the batch video clips.
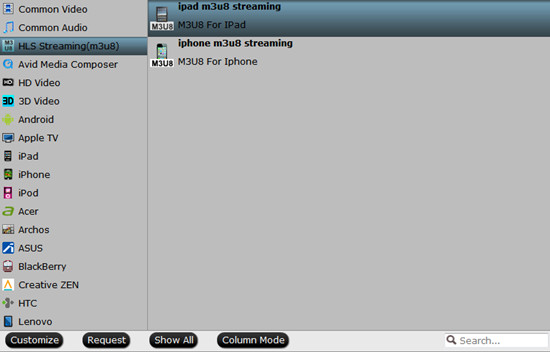
 Step 2: Click the “Format” bar to get the drop-down menu and you can get “HLS Streaming (m3u8)”. Choose “ipad m3u8 streaming” or “iphone m3u8 streaming” as best output format. Any media player supporting TS format are all available for playing M3U8 format files.
 Step 3: Click “Settings” button to customize the output video and audio settings by yourself. Video codec is the default H.264 and audio codec is the default AAC. You can change the resolution, bit rate, frame rate as you need. But if you are not good at it, you’d better use the default parameters, they will ensure you a good balance between file size and image quality basically.
Step 4: When everything is done, you can take a preview by hitting “Play” button. If you are satisfied with the final result, you can click “Convert” button to finish the conversion work.
Conclusion: From the two measures we mentioned above, I don’t know which one you will like as the best. But frankly speaking, if you are not familiar with video to M3U8 conversion, I suggest you to choose the easiest one. Pavtube Video Converter can do you a big favor. Such an easy operation that all of us can do well.
Further Reading:
Step 3: Click “Settings” button to customize the output video and audio settings by yourself. Video codec is the default H.264 and audio codec is the default AAC. You can change the resolution, bit rate, frame rate as you need. But if you are not good at it, you’d better use the default parameters, they will ensure you a good balance between file size and image quality basically.
Step 4: When everything is done, you can take a preview by hitting “Play” button. If you are satisfied with the final result, you can click “Convert” button to finish the conversion work.
Conclusion: From the two measures we mentioned above, I don’t know which one you will like as the best. But frankly speaking, if you are not familiar with video to M3U8 conversion, I suggest you to choose the easiest one. Pavtube Video Converter can do you a big favor. Such an easy operation that all of us can do well.
Further Reading:
Summary: With the Phantom 2 Vision+, you can records MP4 formats, but most users may find a problem when converting DJI Phantom 2 Vision+ MP4 to iMovie for editing. These MP4 files are clunky to edit requiring much rendering when in an iMovie timeline.
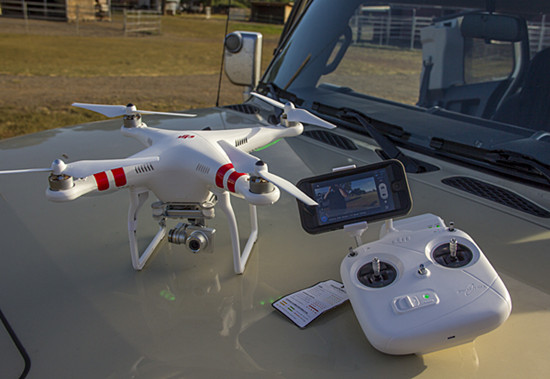 The Phantom 2 Vision+ Quadcopter with Gimbal-Stabilized 14MP, 1080p Camera from DJI is based on the same air frame as the Phantom 2 and Phantom 2 Vision. Unlike its siblings, however, it features a 14 MP camera that is stabilized and controlled with an integrated 3-axis gimbal. Gimbal stabilization makes the Phantom 2 Vision+ ideal for shooting aerial footage and photos. The camera can take 14 MP, Adobe DNG RAW photos, and can record video in 1080p Full HD at 30 fps or 720p at 60 fps for creating slow motion effects.As we know, MP4 is widely used for saving media datum. And it can be found in lots of places, such as camcorders (GoPro/Sony or other camcorders), websites (YouTube/Fox or other Video websites) and even the newly aerial apparatus like DJI Phantom 2 Vision+. It is a common video format for users to share.Although MP4 is in the supported file formats of iMovie, sometimes, you will find it's not easy to import MP4 to iMovie for editing. There are some video or audio codec problems when you try to use a MP4 file in iMovie. Actually, this is due to the MP4 files codec. While, MP4 is a container format which hold various video and audio codecs and that's why you will encounter problems when you attempt to edit MP4 videos in iMovie.Some main formats that iMovie supported are allowed below:
 List of iMovie exported video formats:
 Afterwards, when you got a pile of DJI Phantom 2 Vision+ H.264 MP4 videos, there’s no luck iMovie can support all of your MP4 media. If you are not a technical guy and have no idea about what to do temporarily, you can take H.264 MP4 to AIC MOV, iMovie best accepted format, into consideration. The conversion is darn easy to be finished with only several clicks without loss of video quality. On this occasion, to achieve that, you are highly recommended to ask a professional program for help- Pavtube HD Video Converter for Mac. It has a built-in preset for iMovie so that users can directly select it to get iMovie files. How to import DJI Phantom 2 Vision+ Video to iMovie for editing?Step 1: Download and have a quick installation. The trial version will have a watermark on your converted files. Except for that, there are no time limitation, no virus, and no unnecessary bundle apps while downloading. After that, click “Add Video” button to load DJI Phantom 2 Vision+ H.264 MP4 videos. You can load several files at once thanks to “Add from folder” button.
 Step 2: Here, you need to choose what you want the output to be. Click “Format” drop-down list, and then select “iMovie and Final Cut Express>>Apple InterMediate Codec (AIC) (*.mov)” as the best output format.Step 3: Click “Settings” button to customize the output video and audio settings by yourself. But if you are not good at it, you’d better use the default parameters, they will ensure you a good balance between file size and image quality basically. You can change the resolution, bit rate, frame rate as you need.Step 4: When everything is done, you can take a preview by hitting “Play” button. If you are satisfied with the final result, you can click “Convert” button to finish the conversion work.Conclusion: Once the conversion process is complete, you can click “Open Folder” button to get the generated files for editing DJI Phantom 2 Vision+ H.264 MP4 video in iMovie with optimum performance. Let’s have a try!
Read More:
Summary: In mention of iMovie, we all know that it makes viewing and working with video as simple as organizing your photos. Importing MP4 to iMovie is not a strange thing for most Mac users, and we can easily edit MP4 in iMovie in most cases. What’s the matter on earth that iMovie doesn’t allow you to select the MP4 file sometimes?
 “iMovie won't import MP4, why? Sometimes, I can edit MP4 file in it successfully, but it also happens MP4 cannot added into iMovie. What's the solution?”iMovie is one of the best video editing tools for Mac. With it, you can beautify your videos simply by cutting, cropping, merging, adding effects etc. to them. It works stable on Mac computer, so it's loved by millions of users. On the official site, it says iMovie 11 can support DV, MPEG-4, MPEG-2, MOV and M4V file types. According to this, you are enabled to import MP4 to iMovie. Thus, why iMovie 11 fails to recognize some MP4 videos? You'd better to know the reason clearly in order to avoid stumbling upon the same trouble repeatedly.First and foremost, I wanna tell you that iMovie only accepts MP4 file which contains MPEG-4 and H.264 codecs. While, the audio, subtitle or other media source that embed in MP4 might have different codecs. In this case, we cannot judge the video format by examining the file extension name only. So it is impossible for the MP4 file to determine the type of streams in an MPEG-4 file based on its filename extension alone. Therefore, you may have some clues that why people using Mac always meet difficulty in importing MP4 to iMovie.All in all, to smoothly import MP4 files to iMovie, you'd better to convert these MP4 files to iMovie totally compatible formats as we searched above. To get the job well done, we need to use an all-in-one program-Pavtube Video Converter for Mac. Besides converting MP4 files to iMovie, it can also convert other video formats including AVI, WMV, MPEG, VOB, MOV, AVCHD, MTS, M2T, M2TS, TOD, MOD, XAVC, FLV, MKV, SWF, 3GP, MVI, ASF and etc to iMovie video format. A simple guide about how to import MP4 files to iMovie:Step 1: Download and have a quick installation. The trial version will have a watermark on your converted files. Except for that, there are no time limitation, no virus, and no unnecessary bundle apps while downloading. After that, click “Add Video” button to load MP4 files. You can load several files at once thanks to “Add from folder” button.
 Step 2: Click the “Format” bar to get the drop-down menu and you can get “iMovie and Final Cut Express”. Choose “Apple InterMediate Codec (AIC) (*.mov)” as best output format.Step 3: Click “Settings” button to customize the output video and audio settings by yourself. But if you are not good at it, you’d better use the default parameters, they will ensure you a good balance between file size and image quality basically. You can change the resolution, bit rate, frame rate as you need.Step 4: When everything is done, you can take a preview by hitting “Play” button. If you are satisfied with the final result, you can click “Convert” button to finish the conversion work.Conclusion: When the conversion is done, you can click “Open” to get your generated files. Now, you can edit MP4 files in iMovie without any hassles.Further Reading:
Summary: “Has anyone worked with AVCHD MTS files from the Sony Alpha 77 Mark II camera? Looking for some tips regarding post workflow and getting the recorded AVCHD to FCP X for further editing. I have 1080p AVCHD of the footage which doesn’t always get along with FCP X. Any and all advice is welcome and appreciated.”
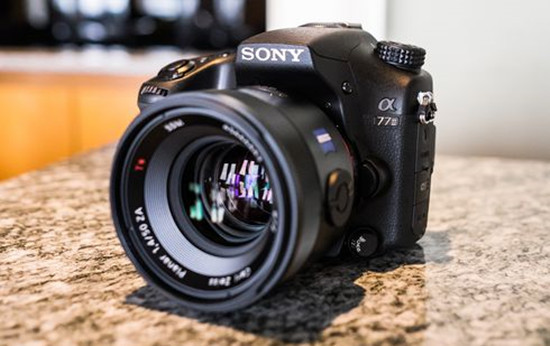 The Sony Alpha 77 Mark II is an extraordinary high spec enthusiast / semi-pro digital SLR camera. Designed to ensure you never miss the moment in also has 12fps continuous shooting for amazing action sequences, and 79 AF points for a very sophisticated and accurate focus. The BIONZ X image processor makes sure even with all this information the camera never gets flustered.
Sony Alpha 77 Mark II captures spectacular HD movies in your choice of super-smooth 60p, standard 60i or cinematic 24p, all at Full HD 1920*1080 resolution. AVCHD codec delivers stunning picture quality. MP4 codec offers smaller files for easier upload to the web. But the HD experience also brings a problem to the users who want to edit Sony A77 Mark II AVCHD MTS footages in FCP X as we mentioned at the very beginning.
Here recommended the best Sony A77 Mark II 1080/60p AVCHD MTS to FCP X Converter- Pavtube MTS/M2TS Converter for Mac. It can not only do the conversion from Sony A77 Mark II 1080/60p AVCHD MTS to Apple ProRes, native supported by FCP X, but also is equipped with some simple editing features, such as merging several Sony Alpha 77 Mark II videos into one file, deinterlacing the original footages, cropping video size, trimming video clips, adding special effects and text/image/video watermarks to output videos, thus it will be on the top of your list. If you have the same problem about editing Sony A77 Mark II AVCHD MTS in FCP X, check out the brief guide below.
How to edit Alpha 77 Mark II AVCHD MTS in FCP X?
Step 1: Connect your Sony Alpha 77 Mark II camcorder to Mac via USB cable and find the AVCHD MTS files from the camera folder. Then copy and transfer the AVCHD MTS files from Alpha 77 Mark II to the Apple hard drive disk.
Step 2: Import Alpha 77 Mark II AVCHD MTS files to Mac MTS Converter. Run it as the best Mac MTS Converter, and click the “Add video” button to load AVCHD MTS files. You may also directly drag and drop AVCHD MTS videos to application UI for importing files.
Step 3: Click the “Format” option and navigate the mouse cursor to “Final Cut Pro>>Apple ProRes 422 (*.mov)” as output format.
Step 4: When everything is ready, click “Convert” to start converting Alpha 77 Mark II AVCHD MTS to ProRes. This Mac MTS/M2TS Converter supports batch conversion so you may load multiple files and convert them at one time.
Conclusion: Now, you can edit Alpha 77 Mark II AVCHD MTS files in FCP X freely. Good news! During May 29th to June 1st, you can get our part products 40% off. Why not take a close look at our event and have a try? Happy weekend!
Further Reading:
The Sony Alpha 77 Mark II is an extraordinary high spec enthusiast / semi-pro digital SLR camera. Designed to ensure you never miss the moment in also has 12fps continuous shooting for amazing action sequences, and 79 AF points for a very sophisticated and accurate focus. The BIONZ X image processor makes sure even with all this information the camera never gets flustered.
Sony Alpha 77 Mark II captures spectacular HD movies in your choice of super-smooth 60p, standard 60i or cinematic 24p, all at Full HD 1920*1080 resolution. AVCHD codec delivers stunning picture quality. MP4 codec offers smaller files for easier upload to the web. But the HD experience also brings a problem to the users who want to edit Sony A77 Mark II AVCHD MTS footages in FCP X as we mentioned at the very beginning.
Here recommended the best Sony A77 Mark II 1080/60p AVCHD MTS to FCP X Converter- Pavtube MTS/M2TS Converter for Mac. It can not only do the conversion from Sony A77 Mark II 1080/60p AVCHD MTS to Apple ProRes, native supported by FCP X, but also is equipped with some simple editing features, such as merging several Sony Alpha 77 Mark II videos into one file, deinterlacing the original footages, cropping video size, trimming video clips, adding special effects and text/image/video watermarks to output videos, thus it will be on the top of your list. If you have the same problem about editing Sony A77 Mark II AVCHD MTS in FCP X, check out the brief guide below.
How to edit Alpha 77 Mark II AVCHD MTS in FCP X?
Step 1: Connect your Sony Alpha 77 Mark II camcorder to Mac via USB cable and find the AVCHD MTS files from the camera folder. Then copy and transfer the AVCHD MTS files from Alpha 77 Mark II to the Apple hard drive disk.
Step 2: Import Alpha 77 Mark II AVCHD MTS files to Mac MTS Converter. Run it as the best Mac MTS Converter, and click the “Add video” button to load AVCHD MTS files. You may also directly drag and drop AVCHD MTS videos to application UI for importing files.
Step 3: Click the “Format” option and navigate the mouse cursor to “Final Cut Pro>>Apple ProRes 422 (*.mov)” as output format.
Step 4: When everything is ready, click “Convert” to start converting Alpha 77 Mark II AVCHD MTS to ProRes. This Mac MTS/M2TS Converter supports batch conversion so you may load multiple files and convert them at one time.
Conclusion: Now, you can edit Alpha 77 Mark II AVCHD MTS files in FCP X freely. Good news! During May 29th to June 1st, you can get our part products 40% off. Why not take a close look at our event and have a try? Happy weekend!
Further Reading: