Thursday, June 16, 2016

Play DJI Phantom 4 4K footage on VLC Player

It anwswers the question "Does VLC Play DJI Phantom 4 4K footage" and gives solutions to fix VLC play Phantom 4 4K videos error.

- I am seeking for a free video player to play my Phantom 4 4K footage. How about VLC? Can it play 4K files?

- Phantom 4 will not take useable 4K video for playing on VLC Player, but will do 1080 fine? How to fix VLC play play Phantom 4 4K videos error? Any advice on this matter?


By adding computer vision and fully autonomous capabilities, the Phantom 4 has dramatically raised the bar on what is possible with a consumer caliber camera drone, both for complete amateurs who want to start flying and for professionals who are crafting complex and dangerous shots. Phantom 4 records videos in MOV format up to 4K resolution, but playing those super smooth and high definition videos is a Herculean task and can transform into an agony when you a lack a super computer. If you want to play DJI Phantom 4 4K footage with VLC smoothly, you need to obtain 3 solutions in this page.

Solution 1: Update VLC to 2.1.0 version

As is known, with preparation for Ultra-HD video and a special care to support more formats, 2.1 is a major upgrade for VLC (See 2.1.0 release info). Download it here and re-open your DJI Phantom 4 4K videos in VLC Player for 4K video playback.

Note: Alought version 2.1.0 of VLC offers 4K playback support, it still does not support 4K video from DJI Phantom 4 playback perfectly: there is stutters, not showing audio, etc issues.

Solution 2: Convert DJI Phantom 4 4K footage to VLC for playback

Compared with 4K videos, 1080p MKV, AVI, MOV, MP4 are more compatible with VLC and can be played by VLC more simply. Therefore, do not hesitate to convert Phantom 4 4K to VLC native video formats to play Phantom 4 4K videos with VLC while avoiding sound and stutter problems.

Pavtube Video Converter is an awesome video converter, which concentrates on offering simplest, fastest and all-in-one solution to convert and downscale DJI Phantom 4 4K to VLC within one stop.

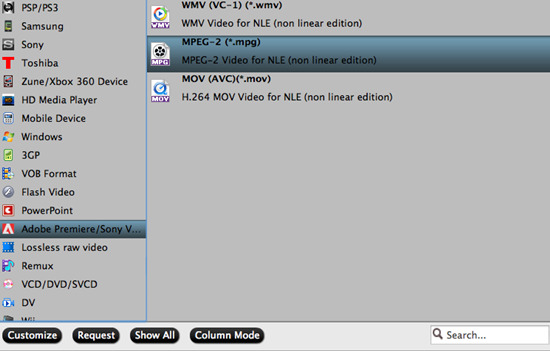
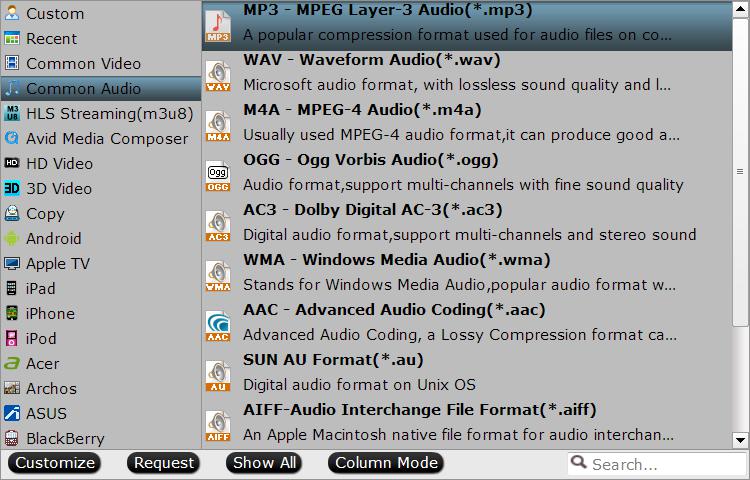
Like the way it is dealing with 1080p videos, it is surely in the support of converting DJI Phantom 4 4K MOV and other SD/HD/4K Ultra HD videos in MKVMP4AVCHDH.265, MXF, TSXAVC, XAVC S, XAVC-L, WMV, AVI, or any other extension to VLC playable format with delivering high video & audio quality. Plus, this 4K video converting software provides the optimal presets for portable devices like iPad, iPhone, Galaxy Tablet, Surface Tablet, Kindle Fire HDX; editing programs like Adobe Premiere Pro, Avid MC, etc for better enjoying, editing 4K files. It is also available to customize the output resolutions to any size the users want. For Mac users, turn to 4K Video Converter for Mac to ensure perfect 4K playback with VLC on Mac.

Now free download the best 4K to VLC converter:


Other Download:
- Pavtube old official address: http://www.pavtube.com/video_converter/
- Amazon Download: http://download.cnet.com/Pavtube-Video-Converter/3000-2194_4-75734821.html
- Cnet Download: http://download.cnet.com/Pavtube-Video-Converter/3000-2194_4-75734821.html

How to Convert the Phantom 4 4K MOV with the Pavtube Video Converter?

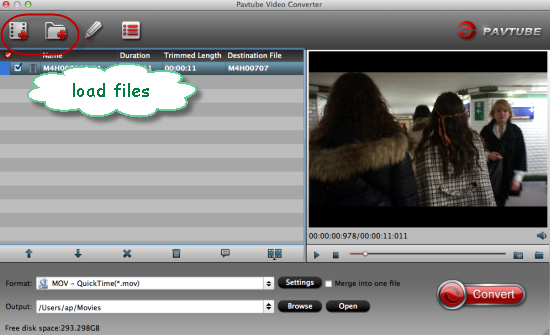
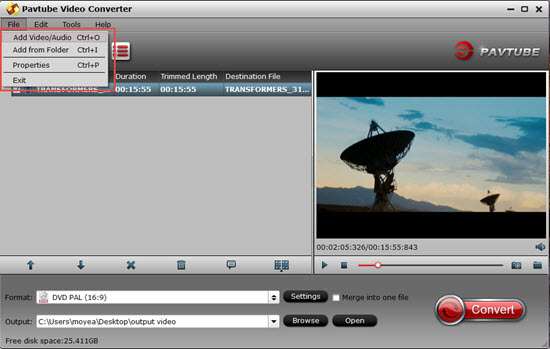
Step 1: Add Phantom 4 4K MOV videos

First of all, start up this program, copy your Phantom 4 4K MOV to hard drive and locate local 4K files, then drag them directly onto this program's conversion pane. All uploaded files will then be displayed on the interface as shown in the screenshot below. The other method you can use to add files is to click "Add Video" button to import the Phantom 4 4K MOV files.


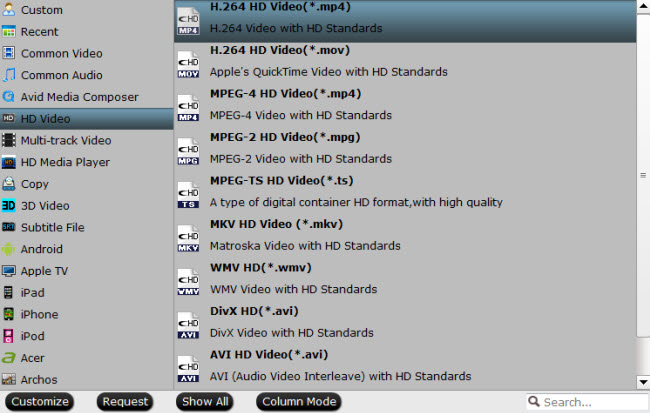
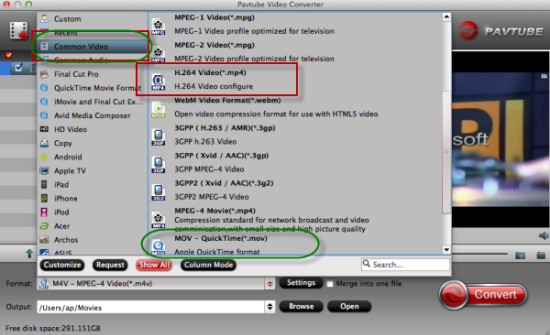
Step 2: Select output format

Click the Format menu, select VLC Player friendly format as your output video format. There, you can take "H.264 HD Video(*.mp4)" from "HD Video" as your output video format. If you are using VLC version 2.1.0 or above, move your mouse pointer to "HD Video" and then choose "H.265 HD Video(*.mp4)".


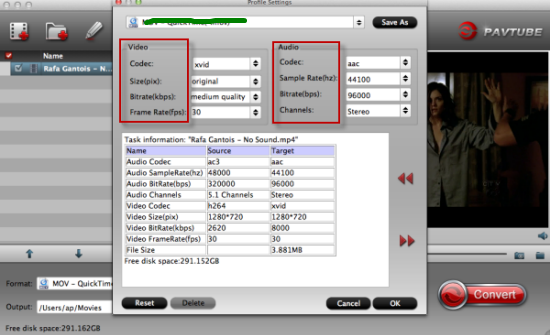
To adjust video and audio parameters like codec, aspect ratio, bit rate, frame rate, sample rate, you could click on "Settings" button. You are allowed to [url=]compress 4K to 1080p[/url] for VLC smoothly playing.

Step 3: Begin the conversion

Click "Start conversion" button to start Phantom 4 4K video conversion for VLC. Once finished, you can get the output files for via clicking on Open button effortlessly. Afterwards, you can import these converted 4K files in your VLC Player for playing without any limits.

If you need to play Phantom 4 4K with VLC for iPhone/iPad, see the transfering tips below:

1. Let's first make sure your VLC app has Wi-fi upload enabled.
  • Open VLC for iOS on your iPhone/iPad
  • Tap on the VLC icon on top
  • Where it says Wi-fi Upload, toggle the switch to ON
  • Note the IP address that's right beneath the option.

2. Let's transfer the file now.
  • Open a web browser on your computer.
  • Type the IP address that goes something like (xx can be any number)
  • You should see an interface as shown in the header of this image.
  • Click on Upload or just drag and drop the video files that you want to transfer to your iPhone/iPad.
  • Wait for the transfer to finish.
The VLC app on your iPhone/iPad should auto-update the media list and show the newly uploaded files. If they're not compatible (like if you add .aac or .mp3 files), they won't show up in the app even if you've got a successful file transfer. So that's about it.Last Solution:

Use VLC Player alternatives- Top 3 4K Video Players

Top 1: Media Player Classic

Media Player Classic is free, and has no toolbars or ads packaged with it. With Media Player Classic, you can load DJI Phantom 4 4K videos in a moment with full screen mode although you play a large sized video.

Note: The key is to also install the K-Lite Codec Pack which provides 4K playback capabilities. K-Lite Codec Pack can only be installed on Windows. For Mac users, it won't work at all.

Top 2: DivX Player

It supports playback any videos with 4k resolutions from Phantom 4 and delivers the highest quality. DivX players boasts some advanced features like various languages options, user-friendly interface, and most importantly, HD and UHD playback capabilities to amaze you with the superb quality of the videos.

Top 3: Sony 4K Ultra HD Media Player

This 4k media player brings much more than its price suggests, with a price of $699.99: you can get many movies in true 4K resolutions, include The Amazing Spider Man, Total Recall, Salt, Bad Teacher etc. It also suppots USB 2.0 media playback from Phantom 4.

Note: In consideration that many 4k video player software runs only on PC and no 4K uhd player for Android, iPhone, iPad is available, users are left with no choice but to seek for other methods to play 4k videos on Android Samsung, HTC, iPhone iPad etc as those devices are incapable to support Phantom 4 4k videos either. Converting 4K is the best choice here.

As a matter of fact, to play videos in 4K resolutions on those devices with superb quality, you'd better convert 4k videos.Conclusion

Overall converting DJI Phantom 4 4K to VLC compatible video is the ultimate solution to solve all 4K playback problems on VLC Player. Try out a few and see which fits your needs. Enjoy your movies!


Read More: 


Monday, June 13, 2016

Load Sony a6300 4K XAVC S to Pinnacle Studio 17/16/15/14

The Sony a6300 is the company's latest mid-range mirrorless camera. Like the a6000 it still offers 24MP resolution but the autofocus ability, video capability, build quality, viewfinder resolution and price have all been increased. As with the previous 6-series E-mount cameras, the a6300 features a flip up/down 16:9 ratio screen. The shape of this screen hints at the 6300's intended uses: video shooting, as well as stills. The a6300's movie features have been considerably uprated. It not only shoots 4K (UHD) at 24p or 25p from its full sensor width (or 30p from a tighter crop). If you have downloaded the editing tool - Pinnacle Studio 17/16/15/14, you can import your Sony a6300 4K files including 4K XAVC S to Pinnacle Studio for some editing for sharing with families and friends.


But you should know Pinnacle Studio does not support the 4K XAVC S videos. So here we list the input formats of Pinnacle Studio:

Import Formats 

Video: MVC, AVCHD, DV, HDV, AVI, MPEG-1/-2/-4, DivX, Flash, 3GP (MPEG-4, H.263), WMV, Non-encrypted DVD titles (incl. DVD-VR/+VR), QuickTime (DV, MJPEG, MPEG-4, H.264), DivX Plus MKV

Audio: MP3, MPA, M4A, WAV, AMR, AC3, AAC, Vorbis, WMA

Graphic: JPS, BMP, GIF, JPG, PCX, PSD, TGA, TIF, WMF, PNG, J2K

As you seen, it is not easy to import the Sony a6300 4K XAVC S to Pinnacle Studio 17/16/15/14. To get rid of the issues, you will need to transcode Sony a6300 4K XAVC S to a more "edit" friendly codec for Pinnacle like MPEG-2, HD AVI.

Pavtube Video Converter (Mac) is a professional tool that can deal with most kind of Sony a6300 4K XAVC S videos regardless of the different codec to MPEG-2 or HD AVI for Pinnacle Studio editing without quality loss. Meanwhile, with the built-in video editor, you can also choose to trim, crop, add watermark to your original videos. it also supports converting H.264, AVI, MKV, MVI, MOV, FLV, MTS, MP4, H.265, etc to Pinnacle Studio editable formats for smooth editing. And it also can convert Sony a6300 4K XAVC S footages to other popular NLEs like Sony Vegas Pro, Avid Media Composer, Adobe Premiere Pro CC, Windows Movie Maker friendly formats. Now just download it and follow the below guide to convert Sony a6300 4K XAVC S for editing or playing in Pinnacle Studio. (read review)


Other Download:
- Pavtube old official address: http://www.pavtube.com/video_converter/
- Amazon Download: http://download.cnet.com/Pavtube-Video-Converter/3000-2194_4-75734821.html
- Cnet Download: http://download.cnet.com/Pavtube-Video-Converter/3000-2194_4-75734821.html

How to Convert the Sony Sony A6300 4K XAVC S to Pinnacle Studio 17/16/15/14 formats?

Step 1: Transfer 4K XAVC S from Sony A6300 camera to computer.

The XAVC S format products are recorded on the fastest SD cards(SDXC), the recorded footage can be transferred to you computer in the following 3 ways:

1. Directly connect the camera/camcorder to the computer via a USB cable.
2. Remove the SDXC card from the camera/camcorder and then plug it into the computer.
3. Fit the computer via the SDXC media adaptor.

Step 2: Load Sony A6300 4K XAVC S files.

Click “File” drop-down “Add Video/Audio” or “Add from folder” option to add the Sony A6300 4k XAVC S files that have been transferred from your camera to your Mac hard drive.


Step 3: Specify output file format.

From “Format” drop-down lists, you can select Avid Media Composer preferable editing codec from “Avid Media Composer” > “Avid DNxHD(*.mov)” as the output format.


Step 3. Start conversion

After all the necessary settings, hit the "Start conversion" button at the bottom right corner. Now your Sony A6300 4K XAVC S files will be converted into AVI which are ready to be imported into Pinnacle Studio smoothly without hassle. After conversion, you can get the generated files under "Open" panel to get the generated files for loading in Pinnacle Studio 17/16/15/14 perfectly.

Now done! Can you image an easier and faster way? Get a free trial of the best Sony to Pinnacle Studio converter.

Read More: 

Sunday, June 12, 2016

2016 Pavtube Video Converter Father's Day Gift

Happy Father’s Day! Have you got any 2016 Father’s Day Gifts idea? Earbuds, ties, cool car stuff, hats, or jerseys? If you think these gifts are too common, why not pick a gifts for your dad from electronics, computers, Tablets or Cameras.


Luckily, to celebrate Father’s Day with you, Pavtube Studio launch a huge Coupon Code on its Video Converter - Pavtube Video Converter/Pavtube Video Converter for Mac as the 2016 Father’s Day Special Offer. Up to 50% off for your beloved dad! Convert your dad’s favorite movie to iOS/Android gadgets, HD TV, home theatre or game console. Even better you can make a father’s day video for your beloved dad on your own! It’s more precious than just picking up something on store casually!

Hot Search: Video to iPad | Video to iPhoneh.265 to FCP | XAVC-S to iMovie 

Pavtube Video Converter (Win/Mac) as Father’s Day Gift 2016

An all-in-one solution to fast convert various video formats to virtually any video/audio format for watching on any Android/iOS/Windows devices and editing with popular editing software. It can freely convert TiVo, MXF, MOV, and other videos to almost all formats. Besides, it is a professional video editing software to assist users with trimming, cropping, splitting, merging, attaching subtitles...to create your own videos.

In a word, the best father day gifts are not about money, they are about your affections and love embodied in them. To pick up a terrific Father's Day gift at for your dad, you have to know what he is into. Then you will find the right father day gift.

What the Pavtube Video Converter/Pavtube Video Converter for Mac Can do?

Platform: Mac OS X 10.5 or above (Mac OS X 10.11 El Capitan included)/ Windows 10/8.1/7
Languages: English, Chinese, Japanese

Pavtube Video Converter is best all-in-one video converter for Mac to convert, edit and preview videos. It has an excellent compatibility of various formats like 4K UHD, H.264, H.265, MKV, MP4, AVI, WMV, MOV, VOB, etc. You can convert any media with this Mac media converter in perfect quality (even in high-definition or 3D) no missing key frames, redraw issues, or crashes. Besides, this best video converter also can encode your media files to a smart TV for streaming and playback directly with Samsung/Sony/Panasonic/LG TV presets supported.

1. Support wide range of video formats including the new M3U8H.265 in 4K UHD/HD/SD.
2. Convert any videos to 200+ hot iPhone iPad Android devices.
3. Create the perfect home movie with this powerful video editor: Trim, Crop, Rotate, Watermark, Subtitle, Change Aspect Ratio, Brightness, Contrast, Deinterlacing, Special Effects, and more.

Download Pavtube Video Converter for Mac


Other Download:
- Pavtube old official address: http://www.pavtube.com/video-converter-mac/
- Amazon Store Download: http://www.amazon.com/Pavtube-Video-Converter-Mac-Download/dp/B00QIBK0TQ
- Cnet Download: http://download.cnet.com/Pavtube-Video-Converter/3000-2194_4-76179460.html

Like our Facbook page to get it Now! Wish you have a nice Father's day!

More reading:

Tuesday, June 7, 2016

Import Sony Cyber-shot DSC-RX10 III 4K XAVC S videos to Adobe Premiere Pro CC

Built around a 1-inch, 20.1 megapixel sensor, the Sony Cyber-shot RX10 III comes equipped with some serious processing power. This not only aids still photography, but it provides a big boost to video capture as well. The new camera not only shoots 4K video at 100mbps, but it can also make use of several pro-style capture modes like S-log2/s-gamut. Additionally, the RX10 III can shoot super-slowmo clips at 960fps with playback speeds of 60, 30, and 24fps. When you got a Sony Cyber-shot DSC-RX10 III camera, you will wanna know the 4K workflow. So, what is currently the best and most efficient way to work with Sony Cyber-shot DSC-RX10 III 4K video files including 4K AVCHD, XAVC-S, MPEG-4 etc in Premiere Pro CC?


4K XAVC-S footage looks amazing but usually it can make video editing a real nightmare. Granted, Premiere Pro CS6, CC 7 can handle (usually) 4K files without much problem, but it is extremely hardware intensive. Thankfully you probably don’t have to buy a new computer… but you do need to convert Sony Cyber-shot DSC-RX10 III 4K XAVC S video to Premiere Pro CC supported formats like using MPEG-2 (1080p) as primary delivery format. The following paragraphs show us how to edit Sony Cyber-shot DSC-RX10 III 4K XAVC-S footage with Premiere Pro CC without bogging down your computer. The process is surprisingly easy and can be done with the help of Pavtube Video Converter. (Read review)

With it you can easily rewrap and transcode Sony Cyber-shot DSC-RX10 III 4k XAVC-S to MPEG-2 which ensures best results for using in Premiere Pro CC/CS6/CS5. The conversion is darn easy to be finished with only three clicks without loss of video quality. Moreover, this ideal converting tool is equipped with basic editing functions including trimming, cropping, adding watermark, removing audio and more. If you are a Mac user, you can turn to Pavtube Video Converter for Mac. Below is the detailed guide on transcoding and downsize Sony Cyber-shot DSC-RX10 III 4K XAVC files to Premiere Pro on Windows.

Hot search: XAVC S 4K to Windows Movie Maker ǀ DJI Phantom 3 4K MP4/MOV to Premiere Pro ǀ MP4 to Adobe Premiere Pro CS3/CS4/CS5/CS6 ǀ Sony Cyber-shot DSC-RX10 III XAVC S to Avid Media Composer ǀ Sony Cyber-shot DSC-RX10 III 4K to Avid Media Composer 

Now free download the best Sony 4K to Premiere Pro Video Converter for Mac:


Other Download:
- Pavtube old official address: http://www.pavtube.com/video_converter/
- Amazon Download: http://download.cnet.com/Pavtube-Video-Converter/3000-2194_4-75734821.html
- Cnet Download: http://download.cnet.com/Pavtube-Video-Converter/3000-2194_4-75734821.html

Efficient Way to Edit Sony Cyber-shot DSC-RX10 III 4K XAVC S in Premiere Pro

Step 1: Load the 4K XAVC S videos to the program

Install and run the 4K Video Converter, and then import the source 4K XAVC S videos to it. To do so, you can directly drag & drop the files onto the main interface, or you can click the “Add video” icon to locate the videos from your local disk.

Step 2: Set output video format

Click “Format” pull down list to select Adobe Premiere/Sony Vegas> MPEG-2(*.mpg) as the best video format for Premiere Pro. WMV, MOV formats are the good choice as well.


Tip: Click the “Settings” button, you are able to enter the “Profile Settings” panel to adjust video and audio parameters for the converted files, including video size, bit rate, frame rate and more.You can keep the original 4K resolution but also can adjust to 2K, 1080p video size just according to your needs.

Step 3. Click the "Start conversion" button on the main interface and the software will start to convert 4K XAVC S to Premiere Pro CC friendly video formats immediately. When the conversion finishes, click "Open" to find the converted video files. Then you can effortless transfer the video files to Premiere Pro CC for playback on the go.

Read More: 

Thursday, June 2, 2016

Best YouTube to MP3 Converter

There are a lot of new movies and videos shared on YouTube, and it is a brilliant idea to save interesting videos on YouTube on your local hard drive as MP3 so you can listen to the songs on any music players and mobile devices. Still being bothered? No, you don't need to! Here we'll show you a worry-free way to extract MP3 Audio From YouTube Videos on Mac with high output quality.

To strip audio from downloaded YouTube movies for convenient playback without ads or loadings, you will find many options available for YouTube to MP3 conversion. But, Pavtube Video Converter for Mac is rated as the best.

It is a trustworthy and efficient program to convert movies from YouTube with different resolution including common YouTube videos or HD videos in 4K Ultra HD, 1080P or 720P and different formats like FLV, Webm, MP4, etc. to literally all digital audio formats like MP3, FLAC, AAC, AC3, WAV, M4A. seamlessly with a proper framerate like 44100. And it also can let you upload your videos like H.265, AVI, MKV, SD.HD/4K to YouTube and others.

Hot search: top 5 YouTube Video Converters for Macconvert audio to mp3top 5 Best Video Converter for Mac Reviewed 2016(updated) 

What's more, with the built-in video editor, it's freely for you to trim your videos to get the part you need. Once you download this tool and follow the instructions, it will be easy for you to convert your YouTube Videos to MP3 or FLAC on Mac. Find a brief guide below.

If you are a Widnows user, just get the Pavtube Video Converter

Free Download or Purchase Pavtube Video Converter for Mac:


Other Download:
- Pavtube old official address: http://www.pavtube.com/video-converter-mac/
- Amazon Store Download: http://www.amazon.com/Pavtube-Video-Converter-Mac-Download/dp/B00QIBK0TQ
- Cnet Download: http://download.cnet.com/Pavtube-Video-Converter/3000-2194_4-76179460.html

Simple steps to extract MP3 Audio From YouTube Videos

Step 1. Load YouTube Videos to the program

After you download the program to your computer, you can click on "Add video" button to add the desired YouTube Videos for conversion. Note that this program supports batch conversion so it's possible to add many files at one time.


Step 2. Select MP3 or FLAC as the output format for the conversion

Click on the format icon and then the drop down list to choose MP3 or FLAC as the output format for storing on music player or Android/Apple devices. Aside from using this software to extract audio to MP3, you can use it to convert video to different formats such as AAC, AC3, M4A, MP4, FLV, MOV, FLV, WMV, AVI, 3GP and more. There are over 200 presets for portable devices like Samsung, iPhone, HTC, iPad, PSP, iPod, Xbox 360 and many more.


Tips:

a. If needed, you could also click on the Settings button in order to customize the details for the output file. You could tweak the settings by changing the bitrate, audio channel and more to enhance your playing needs. All you have to do is play around with the settings option to get what you need.

b. There is also a function available for you to split long videos into a number of clips. You have the option to split freely based on the size or time.
c. If you only want to convert the most exciting part of video in the clip, no need the whole one. Please click "Edit selected task" and turn to "Trim" tab in the video editor to select the region.

Step 3. Start to convert YouTube videos to MP3

At this point, you are now ready to activate the conversion. Once you click the "Start conversion" button to convert, the program will efficiently handle the task to give you converted files that you can enjoy on your MP3 or FLAC device like iPod, Roku 4, iPhone, Samsung phones, etc. at any time. So, sit back, share the audio from the timeless movies on YouTube with your friends and family members and enjoy this year's to the fullest.


Read More: 
Source: http://1080p-video-tool.blogspot ... youtube-to-mp3.html

Monday, May 30, 2016

Store 3D movies to NAS for watching and storing

Now, movies buffs don't have to go to theater to enjoy 3D movies, you can store your 3D movies to NAS to watching them on 3D TV3D VR headsets etc at home. Good News for 3D movie lovers is that, apart from bringing us overwhelming audio-visual banquet, watching 3D movies can boost our brain power according a new study. If you want to backup 3D movies on NAS drive for watching everywhere with family or friends, this guide would be helpful. 

How to Make Your 3D movies Most Suitable for Playing and streaming from NAS drive?

Generally, you may encounter great difficulty in playing 3D movies from a home NAS server. In fact, it is necessarey to change your 3D movies to a playable format like MP4 for smooth enjoying on computer, watching on iPhone/iPad/Android, uploading to YouTube/blog, opening in VLC/QuickTime player, editing on NLEs, etc. before managing and storing them onto NAS drive. 

In such cases, Pavtube Video Converter is a great helper for you. For one thing, it has abundant profiles such that users do not have to make personal settings while getting the best output videos made for main-stream mobile devices, media players, game consoles; for another, this NAS video converter also allows users to select and adjust aspect ratio, change bitrate and other video/audio parameters to get the most ideal output files for any portable device. All your media files including various videos like 2D/3D H.265, 4K, AVI, MKV, AVCHD (.mts, .m2ts), MPEG (.mpg, .mpeg), MOV, MTS, WMV, FLV, VOB, Tivo videos, iMovie files and DVD, Blu-ray, ISO etc all can be converted for playing from NAS in a simple manner. 

For mac users, please turn to Mac version. Now just download the program to learn how to convert 3D movies to correct format like MP4 to store on NAS for streaming. 

Free Download or Purchase Pavtube Video Converter: 


Other Download: 
- Pavtube old official address: http://www.pavtube.com/video_converter/ 
- Amazon Download: http://download.cnet.com/Pavtube-Video-Converter/3000-2194_4-75734821.html 
- Cnet Download: http://download.cnet.com/Pavtube-Video-Converter/3000-2194_4-75734821.html 

Converting 3D movies to NAS Drive streaming with the best 3D video converter: 

1. Add 3D movies 

Run the 3D Video Coverter; click the "Add video" button to load video files. You can also directly drag the video files into the program. 


2. Select the output format 

Hit the Format box and choose your desired format. To store 3D movies on NAS for widely using, you'd better encode your movies to .mp4, .mov, or .avi, etc compressed format. Here, MP4 is highly recommended for its easy availability, high compatibility, great compression rate and especially amazing video quality. 


Tip: If you like, you can click "Settings" to change the video encoder, resolution, frame rate, etc. as you wish. Keep in mind the file size and video quality is based more on bitrate than resolution which means bitrate higher results in big file size, and lower visible quality loss, and vice versa. 

3. Start to convert 3D movies to NAS drive 

Simply click the "Start conversion" button to start encoding 3D movies to MP4 for NAS. Within several minutes, you can find the converted file on your computer by clicking the "Open" button. Afterwards, it’s free to stream 3D movie files from NAS onto Apple TV, PS3, HD TV or other media players. Make sure the wireless network connection is accessible first. 

Read More: 

Monday, May 23, 2016

Decode H.265/HEVC to QuickTime Player on Mac

‘Does apple QuickTime support h.265 on the Mac I've been editing a video and just finished it and encoded it from h.264 to h.265 but when I play it back on QuickTime it doesn't go through any suggestions.’---asked from Apple Support Communities.


Aims to solve all the H.265 troubles on Mac, this article can provide us a professional H.265 tool which can make H.265/HEVC videos accepted by all media devices there, surely including how to decode H.265 videos to QuickTime Player with MOV format.

Best method offered to decode H.265/HEVC to QuickTime Player for Playback:

HEVC, short form for High Efficiency Video Coding, is a video compression standard successor to H.264/MPEG-4 AVC. So HEVC was also known as H.265, which has the higher definition smaller size. Since it is designed for those HDTV displays, we need to decode the format to others for other media players, such as QuickTime on Mac. To decode H.265/HEVC to QuickTime MOV, the upgraded Pavtube Video Converter for Mac can do this job well. As soon as this upgraded version comes out, it has become the best H.265 decoder on Mac.

Main upgraded points:
Perfectly support the H.265/HEVC codec decoding well
Fix some bugs during the importing and preview
Support for the XAVC codec contained from MXF files
Support the VPx series decoder nicely

Key Features attract us a lot:
  • As a professional HEVC decoder, HEVC H.265 converter can decode and convert HEVC H.265 video in various resolution like 4K UHD 4320p, 8k to all most video formats such as convert HEVC to MP4, MOV, AVI, 3GP, FLV, H.264, MKV, WMV, RM, Xvid, DivX, MXF, ASF, WebM, ProRes, WTV, etc., and can extract audio, music from HEVC and save as MP3, M4A, OGG, FLAC, Apple Lossless ALAC, AAC, AC3, WAV, WMA, etc. 
  • Supported Mac OS X System: Mac OS X 10.10 Yosemite, 10.9 Mavericks, 10.8 Mountain Lion, 10.7 Lion, 10.6 Snow Leopard, 10.5 Leopard.

Learning on how to decode H.265/HEVC to MOV for QuickTime Player on Mac:

To add source video to the HEVC Video Converter, you can directly drag and drop them into the program window or go to “File” from menu bar and then choose “Add Files”.


When you come to the output list, here we would like to suggest you to click the ‘Format’ bar to get into the output list. Then drop down the list we can easily find the ‘Common Video’>>’MOV-QuickTime (*.mov)’ item there.


What’s more, before we start our work, why not get into the ’Settings’ to know more? For a nice enjoyment? Just make some changes here! Video codec, video size, frame rate or audio channels, etc we could set on our own.


Finish all the preparation work? Why not go to the main interface to hit the ‘Convert’ to get started? With the faster speed, we will not wait for a long time to play the output MOV files for QuickTime Player. Just enjoy ourselves!

More Reading: