Thursday, July 7, 2016

Load MKV videos to CyberLink’s PowerDirector 14 for editing

About Cyberlink PowerDirector

A simplified yet versatile video editing experience is the foundation of CyberLink’s PowerDirector 14 Deluxe. It topped our evaluation of the best video editing software because it strikes the delicate balance between delivering powerful video editing tools and creating an interface that caters to both casual and advanced users. And it does so by including fully functional professional tools accessible to editors of any skill level. The Full Feature Editor consists of the classic timeline and storyboard editing modes which provide all the granular control more advanced users need to achieve the results they want. It also has easy-to-use Express Projects that walks those new to editing through a series of preprogrammed video templates, which helps newer users learn how to use the Full Feature Editor to its fullest potential.

PowerDirector isn't just video editing software. It's a miniature post-production studio that handles everything from when the film comes off your camera to the moment your finished video is published online or burned onto a disc. This program gives you a lot of options to share your videos on social networks and video-sharing sites, and even export them specifically for mobile devices like smartphones and tablets.

About MKV

The Matroska Multimedia Container is an open standard, free container format, a file format that can hold an unlimited number of video, audio, picture, or subtitle tracks in one file.[1] It is intended to serve as a universal format for storing common multimedia content, like movies or TV shows. Matroska is similar in concept to other containers like AVI, MP4, or Advanced Systems Format (ASF), but is entirely open in specification, with implementations consisting mostly of open source software. Matroska file extensions are .MKV for video (with subtitles and audio), .MK3D for stereoscopic video, .MKA for audio-only files, and .MKS for subtitles only.

Issues about Can’t Open MKV on CyberLink’s PowerDirector 14

Many users found "CyberLink’s PowerDirector 14 can't open this file" error message or some othe errors. The main reason is MKV has different codecs, some of which are not recognized by CyberLink’s PowerDirector 14. MKV is a container format which contain data encoded using various compression and encoding schemes. Cyberlink PowerDirector can support MKV format, but the ability to import the data that they contain is dependent on the codecs (specifically, decoders) installed. To fix the PowerDirector and MKV importing issues, (no matter PowerDirector 13/12/11/10 or other verison), you have to convert MKV files to PowerDirector friendly format first. Cyberlink PowerDirector work with MPEG-2 files perfectly.

Choose a MKV to CyberLink’s PowerDirector 14 Converter

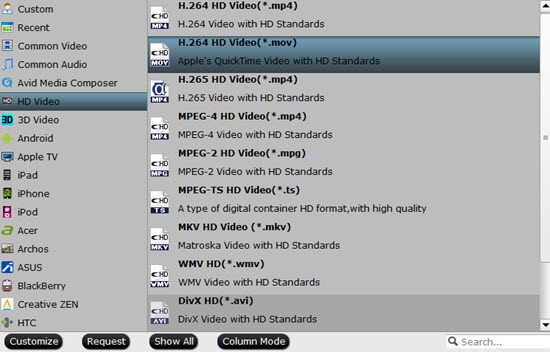
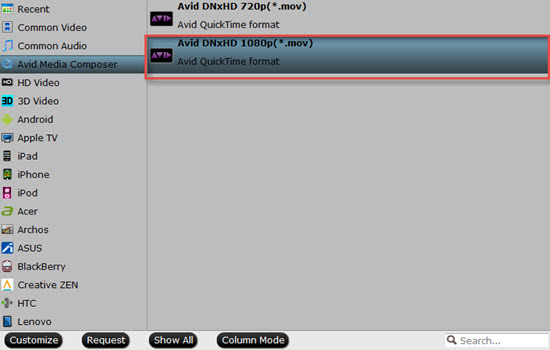
Actually, it's not as difficult as you imagine. To prepare MKV for use in PowerDirector 14, what's need is a just a common video converter like Pavtube Video Converter. It supports creating high quality MPEG-2 video for your PowerDirector, no matter what's the format of your source video files. What's more, it also supports MKV, MP4, AVI, H.265MOVMXF, Apple ProRes, MTS, XAVC etc to CyberLink’s PowerDirector. Also, it also can provide output formats for Sony Vegas, Pinnacle Studio, Adobe Premiere, Avid Media Composer, Windows Movie Maker, etc. editing softwares. Just download it and follow the simple guide to achieve your goal.

Download the MKV to CyberLink’s PowerDirector video converter:


Other Download:
- Pavtube old official address: http://www.pavtube.com/video_converter/
- Amazon Download: http://download.cnet.com/Pavtube-Video-Converter/3000-2194_4-75734821.html
- Cnet Download: http://download.cnet.com/Pavtube-Video-Converter/3000-2194_4-75734821.html

Using Pavtube Video Converter to Convert MKV videos to CyberLink’s PowerDirector 14

Step 1. Click "Add video" button to add your MKV video files to the program. Or directly drag the video you want to convert to the left item bar.


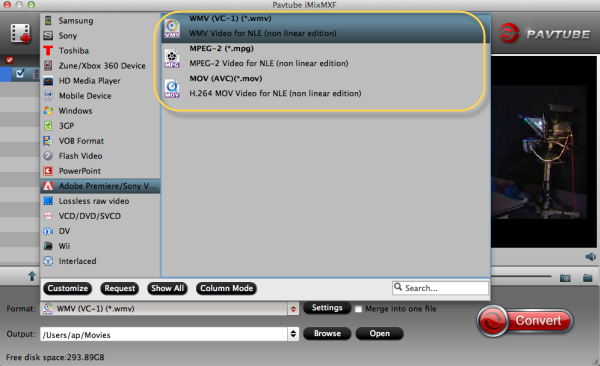
Step 2. Click "Format" menu firstly and then follow "Adobe Premiere/Sony Vegas" > " MPEG-2 (*.mpg)" as the output format. MOV, WMV are also the proper choices.


Tips: The default settings may not satisfy you, and you can click the "Settings" button to change the settings by yourself including video resolution, bit rate, audio sample rate, audio channel etc. for full screen playback smoothly. Or keep no changes, which is also a good choice.

Step 3. Click the "Convert" button on the main interface and the software will start to convert mkv to CyberLink’s PowerDirector 14 friendly video formats immediately. When the conversion finishes, click "Open" to find the converted video files. Then you can effortless transfer the video files to CyberLink’s PowerDirector 14 for editing.

Read More: 

Pavtube Upgraded to Support Blu-ray MKB61

Hot news for Blu-ray collectors!! Are you still upset that you can't rip your new bought Spectre 007,The Martian,The Revenant cause these new Blu-rays now have been encrypted with more complex encryption mechanism MKB61 Now, you are saved by Pavtube in that Pavtube Studio has upgraded his main 3 Blu-ray ripping tools to 4.8.6.7 version to support the new Blu-ray MKB61.


Usually, you perhaps know that Blu-ray is protected by AACS, BD+,UOP,DRM, HDCP, BD-ROM, Region codes, etc. This encryption prevents people from copying, ripping and converting their legally bought Blu-rays even they just rip it for personal use. Normal Blu-ray ripping applications on the market can rip AACS, BD+ schedule but no other difficult encryption mechanism. Even powerful as MakeMKV, supports only Blu-ray encryption up to v60, not including MKB61.

This time, Pavtube upgraded his three top-ranked Blu-ray Ripper BDMagic, ByteCopy, Video Converter Ultimate to the newest 4.8.6.7 version supporting to decrypt new Blu-ray encrypted with AACS, BD+ Region codes, HDCP up to MKB61.Now, let's learn the upgrade and the main features of each Blu-ray ripping tool. What's new?

1. support latest Blu-ray MKB61.

2. fix some bugs. Key features of ByteCopy

- 1:1 backup BD/DVD with original video structure.

- Main title copy BD/DVD with smaller size.

- Copy BD/DVD to MKV?with lossless quality.

- Convert BD/DVD to MP4/MOV/AVI with multiple subtitle/audio streaming.

More functions of ByteCopy is in the review. Key features of BDMagic

- Full copy and directly copy Blu-ray and DVD

- Convert Blu-ray/DVD to SD/HD MP4, MKV, AVI, etc to NASExternal Hard DriveMedia Server, etc.

- Convert 4K Blu-ray to H.265/HEVC 4K MP4/MKV

- Rip Blu-ray preserving AC3, AAC, DTS audio in stereo, 5.1, 7.1 sound.

More functions of BDMagic is in the review. Key features of Video Converter Ultimate

- Decrypt Blu-ray and DVD to virtually any SD/HD video

- Convert 4K Blu-ray to SD/HD MP4, WMV, MOV, QuickTime, ProRes for editing in NLE.

- Copy Blu-ray/DVD to M3U8 for HTTP live streaming

- Convert, shrink, compress Blu-ray, DVD to YouTube, FaceBook, Vimeo, Instagram, Google Plus, etc.

More functions of Video Converter Ultimate is in the review.

The Blu-rays you can Decrypt:

You can use Pavtube Blu-ray Ripper to decrypt some new released Blu-ray including: The RevenantThe MartianHannibal TV Series, Game of Throne (1-6), Spectre 007Zootopia, Harry Potter, Independence Day, The Divergent Series: Allegiant, The WalkAvatarHouse of Cards, Bridge of Spies, Mad Max: Fury Road, Room, Spotlight, By the Sea, The Family Fang, Absolution, Roots, Code of Honor, Now You See, The Adderall Diaries, Arch Angels, Shchedrin: The Left-Hander, Sherlock, Ghost Rider / Hellboy, The Da Vinci Code, The Da Vinci Code, Doro: Strong and Proud, etc.

What's more, Pavtube Studio is holding on Summer Vacation Promotion. Buy Blu-ray Ripper in this period, you may get some surprise:
In addition, Pavtube Studio also upgraded his Video DVD Converter Ultimate to support users to rip any new released commercial DVD discs to MP4, MOV, MKV, 3GP for using on iPad Pro, iPhone 6S, Galaxy S7/S7 Edge, HTC 10, Nexus 6p, Xperia Z6, etc.

Src: http://i-loveshare.com/pavtube-4-8-6-7-upgrade/

Monday, July 4, 2016

Convert MOV to Cyberlink PowerDirector 13 editable formats

CyberLink PowerDirector is a type of computer program called a "non-linear video editing" program. It allows you to take digital video clips and edit them together into something that resembles a real live movie. It provides all the tools you need to transform the footage on your camera into a polished video you can share with family and friends easily. This program is designed to help you learn video editing without compromising the power of the tools it offers. However, there is a big issue about importing/editing MOV videos in Cyberlink PowerDirector 11/12/13/14 because CyberLink PowerDirector does not support .mov format. Read on to to get the solution.

What are the supported file formats for CyberLink PowerDirector 13?


As you seen, the Cyberlink PowerDirector 13 does not support all MOV files. So you will have problems importing MOV files to Cyberlink PowerDirector 13. If you're in such a situation, there is an easy way to fix the issue. Get a MOV converter and transcode MOV files to H.264 MOV, MPEG-2 etc, which will save you both time and trouble, and all you need is to drag the result videos for prompt editing. For this purpose, this article will show you how to convert MOV to MPEG-2 for PowerDirector in detail with this professional MOV video converter - Pavtube Video Converter.

Hot search: 
Free download and purchase this best MOV to Cyberlink PowerDirector video converter:


Other Download:
- Pavtube old official address: http://www.pavtube.com/video_converter/
- Amazon Download: http://download.cnet.com/Pavtube-Video-Converter/3000-2194_4-75734821.html
- Cnet Download: http://download.cnet.com/Pavtube-Video-Converter/3000-2194_4-75734821.html

Step-by-step guide to Convert MOV to Cyberlink PowerDirector 13 for editing

Step 1: Download, install and run Pavtube Video Converter, and then click the “Add” button to load the .mov videos.


Step 2: Here H.264 MOV format is recommended as PowerDirector can load MOV files instantly. Go to the format bar and follow "HD Video">"H.264 HD Video (*.mov)" for your output format.


Tip: Click the Settings icon to adjust video and audio parameters on the Profile Setting as you need to get the best quality video.

Step 3: Simply click the "Convert" button to start converting and everything else will be automated. If you have added quite a bunch of video files, it would take some time to convert. In such case, you can click Option and tick the box “Shut down the computer after conversion”.

After the conversion is completed, get the resulted files via clicking the Open button and then you can import converted MOV files to PowerDirector for further editing without any hassle.

How to Import video files to Cyberlink PowerDirector quickly?

1. Open whichever version of the CyberLink PowerDirector software you have installed on your computer. A shortcut icon for CyberLink PowerDirector will be in the "Programs" folder that you can access through your "Start" menu.

2. Click on the yellow "Import" button toward the top center portion of the main CyberLink PowerDirector software window.

3. Select "Import Media File(s)." This will open a new "Open" dialog box on-screen.

4. Point the "Open" dialog box to the place on your hard drive where the video clip(s) you want to import into CyberLink PowerDirector are held. Once you have done that, click on the icon of a video clip one time to select it.

5. Click "Open." That video file will now be imported into CyberLink PowerDirector.

Tips: This powerful video converter also can convert your Cyberlink PowerDirector exported 2D/3D video like H.265, AVI, MPEG-2 etc to any format you need like Apple ProRes, MP4, H.265, M3U8 etc. Have a try!

Read More: 

Friday, July 1, 2016

Insert Canon EOS Rebel T6 H.264 MOV videos to Premiere Pro CC/CS6/CS5

The Canon EOS Rebel T6, also called the EOS 1300D outside the USA and the Kiss X80 in Japan, is an inexpensive, lightweight DSLR with great performance. It's easy to shoot, shoots well, and the pictures look much better than most other other brands of cameras. It can record MOV files holding H.264 video (1,920 x 1,080 at 29.97, 25 or 23.976 FPS. 1,280 x 720 at 59.94 or 50 FPS. 640 x 480 at 30 or 25 FPS). Maybe you wan to edit them in Premiere Pro CC/CS6/CS5 for editing.


But Adobe Premiere Pro provides support for several audio and video formats, making your post-production workflows compatible with the latest broadcast formats. However, when you add the Canon EOS Rebel T6 H.264 MOV video files to Premiere Pro, you may come across problems.

“Having issues with Premiere Pro CC, I cannot import .MOV files created with my Canon 6D. If I try to import the files, I get a very generic "File format not supported" error msg. This is a new install of Premiere CC on a new computer. I was able to import them using Premiere Pro CC on the old computer.” 

Generally speaking, the Canon EOS Rebel T6 H.264 is a delivery codec and it isn't an ideal codec for editing. That's why you cannot edit H.264 in Premiere Pro smoothly. Luckily, there is an easy solution to fix the problem. The easy workaround is transcoding Canon EOS Rebel T6 H.264 MOV to MPEG-2, a more editing-friendly codec which is compatible with Premiere Pro CC, CS6, CS5.5, CS5, CS4.

To finish the task, Pavtube Video Converter is a highly-recommended H.264 video converting tool for you to convert H.264 to Adobe Premiere Pro compatible MPEG-2 format without loosing quality. The conversion is easy to handle and only with a few simple clicks, you can finish the conversion without facing any glitches. If you're editing in Premiere Pro on Mac, please get Pavtube Video Converter for Mac for help. Below is a step-by-step Mac tutorial to convert H.264 for editing in Premiere Pro smoothly.

Hot search: 

Free download the best H.264 MOV to Premiere Pro converter:


Other Download:
- Pavtube old official address: http://www.pavtube.com/video_converter/
- Amazon Download: http://download.cnet.com/Pavtube-Video-Converter/3000-2194_4-75734821.html
- Cnet Download: http://download.cnet.com/Pavtube-Video-Converter/3000-2194_4-75734821.html

Workflow to Convert and import Canon EOS Rebel T6 H.264 MOV to Adobe Premiere

Step 1. After downloading, install and run this H.264 to Premiere Pro Converter, just import the Canon files to the software for converting.


Step 2. Click "Format" bar to choose the output format. Click and choose "Adobe Premiere/Sony Vegas" > "MEPG-2(*.mpg)". The setting seamlessly fits Premiere Pro CS4/CS5/CS3/CS6 and CC.


Step 3. Finally, hit the "Convert" button at the bottom right corner and the conversion from MP4 to Adobe Premiere Pro will begin immediately on your computer

Read More: 

Monday, June 27, 2016

Edit Sony RX10 III XAVC S/AVCHD/MPEG-4 projects in After Effects CC

The Sony Cyber-shot RX10 III boasts a 24-600mm equivalent F2.4-4 zoom lens, 14 fps continuous stills shooting and 4K video capture. The recorded videos by Sony RX10 III are XAVC S, AVCHD, MPEG-4. However, users find that it is difficult for them to import all Sony RX10 III 4K videos to After Effects CS5/CS6/CC for further editing. In this article, we will discuss deeply on this issue.

The XAVC S is the new codec for After Effects CC. Though After Effects CC supports the XAVC, it does not support the XAVC S. What’s more, the AVCHD/MPEG-4 files are not all supported by After Effects CC without any problems. And the 4K high resolution is still a big problem. So to get your all Sony RX10 III 4K XAVC S/AVCHD/MPEG-4 videos into After Effects CC to play nicely, the quick workaround is to convert Sony RX10 III file to After Effects supported MPEG-2 encoded MPG (the most compatible video format for AE) file format and then transfer the converted Sony RX10 III videos to After Effects for editing.

And then a 3rd party software is needed. Personally, I have used Pavtube HD Video Converter for Mac, and it's a very affordable, fast, easy to use one software. It can help me convert all my Sony RX10 III files to AE compatible format, make Sony RX10 III footage working well in After Effects CS5/CS6/CC. In addition, this program can support various common videos besides XAVC S/AVCHD/MPEG-4, such as MOV, H.265, MKV, AVI, MTS, MXF, WMV, etc to After Effects CS5/CS6/CC formats. Here is how to do it.


Other Download:
Steps of Converting Sony RX10 III (4K)XAVC S/AVCHD/MPEG-4 videos to After Effects supported file formats

1. Load Sony RX10 III files to the program

Launch the program, and open the folder where you have saved the Sony RX10 III files, and then directly drag the files to the program interface, the files will be loaded to the program immediately. Alternatively, you can click "Add video" button to import the Sony RX10 III videos to the program.


2. Select the output format

Click "Format" bar and choose "Adobe Premiere/Sony Vegas > MPEG-2 (*.mpg)" as output format on the drop-down menu. It is also suitable for editing in Premiere Pro.


3. Start Sony RX10 III to AE conversion

Hit the "Convert" button at the bottom right corner, let this smart Video Converter to do the rest for you! If you have added quite a bunch of video files, it would take some time to convert. In such case, you can click Option and tick the box "Shut down the computer after conversion". When the conversion is finished, you can click "Open" button to get the generated MPG files effortlessly. Launch AE on your PC, choose "File > Import" to get converted MPG files into After Effects CS5/CS6/CC for further editing beautifully. Now using your After Effects to edit Sony RX10 III is so easy!

This tutorial is based on Mac OS X. If you are a Windows user, please try this Sony RX10 III to After Effects Converter.

Read More: 

Friday, June 24, 2016

How to Important Sony RX10 III AVCHD/MPEG-4 videos to Avid Media Composer?

Sony has unveiled the Sony RX10 III this year. It will sport 4K UHD video and also record 1080p full HD video. Now suppose that you are a devout Christian. Next you need to do some editing working with your Sony RX10 III recordings like AVCHD or MPEG-4 in Avid Media Composer before posting them onto church web site. This is a tutorial which tells you how to import HD/4K AVCHD/MPEG-4 from Sony RX10 III to Avid MC for using on Mac OS X like El Capitan, Yosemite, Mavericks, Mountain Lion, Lion and Snow Leopard.

We found many users have the problems in importing and editing the Sony RX10 III AVCHD/MPEG-4 videos in Avid MC. In fact if your AVCHD/MPEG-4 files are not accepted by Media Composer, it's probably because of the video or audio codec incompatibility.

Worse still, although Media Composer has already had 4K and "high-resolution" (i.e., higher-than-4K) support via Avid Media Access (AMA) in previous versions and 4K Full Screen Playback are supported within Media Composer, there's actually no way to edit a 4K project natively with Avid. Actually, editing 4K raw in Avid Media Composer is very taxing on your computer. On this occasion, you need to transcode Sony RX10 III AVCHD/MPEG-4 to the Avid MC editing-friendly formats and then transfer the converted video files to your Media Composer for editing.

What is the Best Sony RX10 III AVCHD/MPEG-4 to Avid MC Video Converter?

Pavtube HD Video Converter for Mac, a professional Sony video converter, enjoys a large amount of popularity for its ability to smoothly convert Sony HD/4K AVCHD/MPEG-4 to Avid Media Composer supported DNxHD .mov on Mac fast yet with great quality, enabling you to open and use the AVCHD/MPEG-4 files on Mac's Avid MC. Besides, it also can make you import the Sony RX10 III recorded other videos like 4K XAVC S etc HD/4K videos to Avid MC and other NLEs like Adobe Premiere Pro CCWindows Movie Maker etc.

Other Key Features:

The feature-rich camera HD converter for Sony, Nikon, Canon, Fujifilm, Olympus camera allows you to edit videos, like cropping, trimming, adding subtitle and watermark.
Besides AVCHD/MPEG-4, also available to transcode MP4, MKV, WMV, AVI, MPG, H.265 etc.
Its simple design is also favorable, which requires less experience to control.

For Windows users, here is windows version.

Ok, now follow the guide below to achieve your goal smoothly. Note: The guide uses Mac screenshots as example. The way to transcode Sony RX10 III AVCHD/MPEG-4 to Avid DNxHD in Windows (Windows 8/8.1/10) is almost the same.


Other Download:
Importing Sony RX10 III AVCHD/MPEG-4 video to Avid Media Composer with fast speed

Step 1: Load Sony RX10 III AVCHD/MPEG-4 files

Copy .mov videos from Sony RX10 III from camera to Mac hard drive. Run the best Nikon MOV converter and click the "Add video" button to load Sony RX10 III AVCHD/MPEG-4 files.


Step 2: Set output format for Avid Media Composer

Click "Format" bar to determine output format. Follow "Avid Media Composer" and choose "Avid DNxHD (*.mov)" as the output format. Besides, it provides hundreds of output format presets for NLE system editing programs, such as Apple ProRes for Final Cut Pro, Apple InterMediate Codec for iMovie/FCE, MPEG-2 for Adobe Premiere.


Step 3: Start converting Sony RX10 III videos to Avid MC compatible video

Click "Start conversion" button to transcode Sony RX10 III AVCHD/MPEG-4 to Avid Media Composer. Once the conversion done, you can click "Open" button to get the output files effortlessly. Now you have got converted videos into an acceptable file and you are able to import and use the video files with Avid Media Composer 9/10/11/12/13 at ease.

Read More: 

Monday, June 20, 2016

How to Add Recorded Videos to Your Slides in PowerPoint 2016?

Video doesn't just belong on YouTube. You can easily add video clips to your PowerPoint 2016 presentations and play them at will. Adding a movie motion clip to a slide is similar to adding a sound clip. A crucial difference exists, however, between motion clips and sound bites: Video is meant to be seen (and sometimes heard). An inserted motion clip should be given ample space on your slide.

If you think that sound files are big, wait till you see how big movie clips are. Ha! They consume hard drive space the way an elephant consumes veggies. The whole multimedia revolution is really a conspiracy started by hard drive manufacturers. (Be aware that you may have trouble sending a PowerPoint presentation bloated with large video files to your friends and colleagues via email because many email servers have limits on the size of email attachments.)

The following steps show you how to add a video clip to a slide: 

Find a good movie and, if needed, download it or upload it to your hard drive.

The hardest part about using video in a PowerPoint presentation is finding a video file that's worth showing. Use Google or any other search service to find a video to insert. Then, download the video to your computer. Or, you can create your own videos using a camcorder and video-editing software.

Move to the slide on which you want to insert the movie.

Hopefully, you left a big blank space on the slide to put the movie in. If not, rearrange the existing slide objects to make room for the movie.

Open the Insert tab on the Ribbon, click Video in the Media group, and then choose Video on My PC.

The Insert Video dialog box, shown here, appears.


Inserting a video.

Select the movie that you want to insert.

You may need to scroll the list to find the movie you're looking for or navigate your way to a different folder.

Click the Insert button.

The movie is inserted on the slide, as shown here.


A movie inserted on a slide.

Resize the movie if you want and drag it to a new location on the slide.

When you resize the movie, try to do it by using one of the corner handles. If you drag one of the side handles, you distort the image.

To play the movie while you're working on the presentation in Normal View, double-click the movie. During a slide show, a single click does the trick, unless you set the movie to play automatically. In that case, the movie runs as soon as you display the slide.

You can also insert a video directly from an online source by choosing Online Video rather than Video on My PC in Step 3. Then, you can search for a video online. Note that this option inserts a link to the online video, not the video itself. That means that you must have a working network connection to play the video, and if the owner of the video removes the video, the link won't work.

Related Software: Pavtube Video Converter - Make all videos imported into PowerPoint 2016 perfectly. 

To insert all camera videos to PPT 2016 without any hassle, we need to transform the resource to PowerPoint WMV (with WMV8 codec), AVI (with some ancient codec) or MPG format, which are universal formats among all versions of PowerPoint firstly. To accomplish the task, you need to seek help from a excellent Video converter that supports all videos input and WMV, AVI, MPG output.

Here Pavtube Video Converter is highly recommended to help you achieve your task. This program can help you easily and quickly encode any videos like H.265, MOV, MOV, MP4, MXF, MTS etc by camera or othjers to PowerPoint 2016 friendly WMV, AVI, ASF, and MPG (MPEG-1) to let you insert videos into PowerPoint with ease. Besides, the built-in video editor lets you personalize your video. Besides converting video to PowerPoint supported video format, the above powerful converter can also convert videos for playback on iPad, iPhone, Apple TV, Zune, Xbox 360, PSP, PS3, PS4, mobile phone and more, or import videos to Sony Vegas, Pinnacle Studio, Windows Movie Maker for editing. Enjoying videos and Saving video files is just so simple.


Other Download:
- Pavtube old official address: http://www.pavtube.com/video_converter/
- Amazon Download: http://download.cnet.com/Pavtube-Video-Converter/3000-2194_4-75734821.html
- Cnet Download: http://download.cnet.com/Pavtube-Video-Converter/3000-2194_4-75734821.html

Read More: