Friday, September 2, 2016

MKV to Camtasia Studio - Loading MKV to Camtasia Studio on Mac

Camtasia Studio is professional screen recording and video editing software, it can capture any screen movements and actions, including image, audio, cursor, etc and can directly edit the recorded file, including adding various labels, media library, pan-and-zoom, PIP, voiceover, subtitle effects, etc. We may choose the generally used Camtasia Studio (7, 8) to merge, split, trim, crop, edit and create MKV videos. When we want to edit our MKV videos through Camtasia, it fails. Why? Because Camtasia and many other video editing programs do not support MKV format as the input. What are we supposed to do then?


Camtasia Studio supported formats: 

Camtasia supports AVI, .WMV, MPEG-1, .MP3, .WAV, .WMA, and .MOV (QuickTime) files. It does not support MKV, AVCHD files (.m2ts, .mts, and .m2t), Video_TS, MPEG-2, MOD, Ogg, WebM, .RM (RealPlayer), .FLV (Flash Video), 3GPP, and SWF created outside Techsmith products. It means that those videos incompatible cannot be imported to Camtasia Studio directly and must be converted or re-recorded.

As you seen, Camtasia Studio does not support MKV format. So in order to make a highlight video out of MKV video files, we have to turn to an excellent video converter or codec for help. Here we recommend Pavtube HD Video Converter for Mac which is not only able to convert MKV to Camtasia videos, but also convert MTS/M2TS, MXF, MP4, H.265, VOB etc to Camtasia Studio format. What’s more, this Mac MKV to Camtasia Studio Converte can also help users to transcode MKV to FCP, iMovie, Adobe Premiere Pro with the optimal presets including Apple ProRes, Apple InterMediate Codec, MPEG-2 etc for your easy editing. (read review)

Now follow the step by step guide set out below to convert MKV to Camtasia Studio editable format.

Dwnload the best MKV to Camtasia Studio converter for Mac:


Other Download:

PS: Windows version - Pavtube HD Video Converter

Download the best MKV to Camtasia Studio converter for Windows:


Transcode MKV to Camtasia Studio for editing on Mac (Windows steps are smae with Mac)

Step 1. Now you can click on “Add” button to import MKV files which you want to convert into this program.


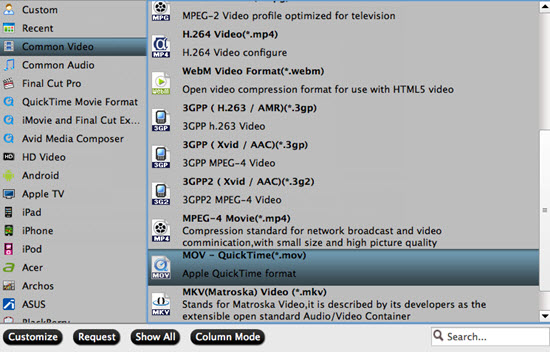
Step 2. Choose MOV as output format > Click Format to choose “Common Video -> MOV – QuickTime (*.mov)” profile in the drop-down menu.


Tips. Set advanced settings > By clicking the Settings icon, you can adjust video and audio parameters like codec, bit rate, frame rate, sample rate, etc., in that way, you can take charge of the size and quality of the output files.

Step 4. As soon as all the above settings are completed, you can press “Convert” button to start conversion. You can follow the conversion process via the pop-up windows.

After conversion is done, simply click “Completed” to back to main interface, and click “Open” button to find generated MOV videos. Afterwards, you can transfer the converted MKV clips into Camtasia studio 8/7/6 for editing smoothly on Mac(macOS Sierra/El Capitan included) with ease.
Now you may successfully edit your any MKV videos in Camtasia Studio without the annoying problems.

Read Guides: 
Related Software:

Pavtube Video Converter for Mac is blazing professional video conversion software, enabling you to convert any video formats like H.265, MP4, MOV, MTS, M2TS, TS, MPEG, FLV, AVI, MKV and more 300+ formats or YouTube/Vimeo/Facebook video, to 4K/HD 1080P video. It possesses high compatibility with portable iPhone, iPad, Apple TV, QuickTime, etc.

Friday, August 26, 2016

Play AVI on Vizio TV from Flash Drive/USB

Many users choose to copy movies to USB flash drive and play on Vizio TV via USB port/Flash Drive. But, Vizio TV can only play limited video formats through USB/Flash Drive. From Vizio TV official website we know that best supported format is H.264 codec MP4 format, if a video in other formats and codecs, it may have video playback issue. Many widely used formats and codecs are not well supported, like AVI, because AVI is a container format which has many different codecs.

Here in order to help you to play AVI on Vizio LED TV & Vizio 4K TV from USB smoothly, we will share the best AVI to Vizio TV converter with you, which will help you to convert AVI files to Vizio TV supported video format, and then you can play converted videos on Vizio TV via USB.

A good video converter will help you to convert videos at fast speed with top quality, now we want to share the best AVI to Vizio TV converter with you, the program is called Pavtube Video Converter, it is a powerful program, it can convert AVI files as well as other HD videos to the video format you need, such as Vizio TV supported H.264 MP4 format, or optimized formats for smartphones, tablets, editing programs and HDTVs. It is compatible with Windows 10, Windows 8.1, Windows 8, Windows 7, Windows XP. You can read review to learn more to help you.

Also see: movies to Vizio HD TV ǀ MP4 to Vizio TV ǀ MKV to Sony TV 

Mac version - Pavtube Video Converter for Mac


Other Download:
- Pavtube old official address: http://www.pavtube.com/video_converter/
- Cnet Download: http://download.cnet.com/Pavtube-Video-Converter/3000-2194_4-75734821.html

Start Convert AVI to Vizio TV format for playing via Flash Drive/USB

Step 1: Load AVI files

Launch best AVI to TV Video Converter. There are two ways to add videos. First, click "Add video" button to choose video files from your hard drive for converting. Second, directly drag the movies you want to convert to the left item bar. To save your time, you can add multiple files for converting at a time since batch conversion is well supported.


Tips:

1. you can just click on the "Merge into one file" box if you wanna combine several video files into single one file.
2. If you want to cut some large video files to several parts, just click on the "Split selected task" icon.

Step 2: Set Vizio TV friendly format

You can get the information about the video format supported on the above picture. In general, MP4 is a well-accepted file format for its ability to save memory storage and keep up the video quality.


Tip: Advanced Video, Audio Settings (optional)

You may get some trouble with the default settings, click the "Settings" button to set files by yourself including video resolution, bit rate, audio sample rate, audio channel etc. for full screen playback smoothly. Remember, do not convert your original files into high qualities, or it may cause the picture distortion. For example, if your original files size is 720*480, you cannot set it to 1280*720.


Step 4: Start AVI to Vizio TV conversion

Tap the "Convert" button at the bottom right corner on the main interface to start transcoding MP4 for Samsung TV. The process will be finished soon. After the conversion, you can easily find the encoded AVI video clips in the destination folder by clicking "Open" button for playing.

Now you may get the video you want. Hope my article can help you and wish you enjoy MP4 movies or TV shows on your Vizio LED/LCD/4K/3D TV from Flash Drive/USB successfully.

Read More: 

Monday, August 22, 2016

Convert Youtube/Vimeo/Facebook Videos on macOS Sierra/El Capitan

Online websites like YouTube/Vimeo/Facebook have been always played an important role in entertainment life. Minutes or hours can go by as you browse through videos uploaded by everyday people like you and me. Other side, you can downloaded some interesting or nice video from Youtube/Vimeo/Facebook Videos for storing and sharing. This article shows you how to make your Youtube/Vimeo/Facebook Videos changed to various popular formats for more usages like playing on Mac computer/iPad/Apple TV or editing in NLEs etc on macOS Sierra/El Capitan.

Best Youtube/Vimeo/Facebook Video Converter for Mac (macOS Sierra/El Capitan)

---- Pavtube Video Converter for Mac

  • Support: macOS Sierra, Mac OS X 10.11 El Capitan, Mac OS X 10.10 Yosemite, 10.9 Mavericks, 10.8 Mountain Lion, 10.7 Lion, 10.6 Snow Leopard, 10.5 Leopard. 
  • Convert Youtube/Vimeo/Facebook Video to H.265, H.264 MP4, MOV, Apple ProRes, AVI, MKV etc 
  • Convert video including SD/HD/4K H.265, MXF, MTS, M2TS, MOV, MP4, XAV, XVAC S etc to Youtube/Vimeo/Facebook best format for smooth uploading 
  • Edit Youtube/Vimeo/Facebook video: Trim video to millisecond, crop video to precise size, adjust video brightness/contrast/saturation, set audio volume, add image/text watermark, rotate video for speical angle. Get a video file with personafications. 
  • Folder-reading function lets you import multiple files at a time, and batch conversion function allows you to convert many files at every turn, saving time and energy. 
  • All-in-one video converter download to convert video and audio at ultra-high speed and guarantees you with top-class output quality, so that you can enjoy media files contentedly. 
Download the best Mac video converter: (Windows version - Pavtube Video Converter)


Other Download:
- Pavtube old official address: http://www.pavtube.com/video-converter-mac/
- Cnet Download: http://download.cnet.com/Pavtube-Video-Converter/3000-2194_4-76179460.html

How to Convert Youtube/Vimeo/Facebook Videos on macOS Sierra/El Capitan?

Step 1. Click "Add video" button to add your Youtube/Vimeo/Facebook video files to the program. Or directly drag the video you want to convert to the left item bar.


Step 2. Click "Format" bar, and select .mp4 from "Common video" or "HD video" or "3D Video" or other "iPhone", "Samsung", "Apple TV", "TV", "FCP" etc according to your needs.


Tips: The default settings may not satisfy you, and you can click the "Settings" button to change the settings by yourself including video resolution, bit rate, audio sample rate, audio channel etc. for full screen playback smoothly. Or keep no changes, which is also a good choice.

Step 3. Click the "Convert" button on the main interface and the software will start to convert Youtube/Vimeo/Facebook Videos to your desire formats immediately. When the conversion finishes, click "Open" to find the converted video files.

Read More: 

Thursday, August 18, 2016

Import Nikon Coolpix A900 4K to Windows Movie Maker

The 20.3-megapixel Nikon COOLPIX A900 is a NIKKOR 35x optical zoom compact camera with 4K UHD movies. It's wonderful to use a Nikon DSLR to take photos and record 4K videos when you travel. As a Nikon user, you may usually encounter some importing issues when attempting to edit Nikon MOV in Windows Movie Maker. This is a frequently asked question on some forum:

I have some video clips from Nikon Coolpix A900) with a file extension .MOV with 4K resolution. When I open windows movie maker and click "import" I browse to my file and select one of the video clips and try to import it. I get a message that says "cannot import as movie maker does not recognize the codec".

As you see, many folks are talking about how to import Nikon Coolpix A900 4K MOV filesinto Windows Movie Maker for editing without problems. Well, although Movie Maker can support MOV, the highly compressed H.264 encoded .mov is not ideal for editing yet. So the best way is to convert Nikon Coolpix A900 4K MOV to Windows Movie Maker best editable format like WMV etc.

Then, Pavtube Video Converter (read review) will be the best solution here. With this ideal 4K MOV to Windows Movie Maker Converter, you can convert Nikon Coolpix A900 4K to WMM most compatible format like WMV, AVI easily and fast. The video quality won't be reduced through conversion. This powerful video converter also can convert other videos including MKV, AVI, MOV, MXF, MTS, etc to Windows Movie Maker, Vegas Pro, Pinnacle Studio, Avid Media Composer, Adobe Premiere Pro and more NLE supported format on Windows (Windows 10 included). Besides, with its built-in Editor, you can crop, trim, add effects, subtitles to your Nikon Coolpix A900 4K files as you need.

Hot search: Nikon Coolpix A900 4K to iMovie/FCE ǀ Nikon Coolpix A900 4K to Premiere Pro CC 2015.3 ǀ Nikon Coolpix A900 4K with FCP X 

Download the tool and follow the guide below, you will be able to turn Nikon Coolpix A900 4K MOV to Windows Movie Maker recognized formats in few minutes.


Other Download:
- Pavtube old official address: http://www.pavtube.com/video_converter/
- Cnet Download: http://download.cnet.com/Pavtube-Video-Converter/3000-2194_4-75734821.html

How to Convert Nikon Coolpix A900 4K to Windows Movie Maker on WIndows

Step 1: Add Nikon Coolpix A900 4K files

Install and launch the MP4 Video Converter, and then click "Add video" button to import your MP4 files to the software. If you wanna combine Nikon Coolpix A900 4K video clips into one file, you can click the "Merge into one file" box.


Step 2: Select output format

Just go to "Format" bar to choose WMV format in "HD Video" or "Common Video" column. (AVI is also an editable format for Windows Movie Maker.)


Step 3: Convert Nikon Coolpix A900 4K to Windows Movie Maker

Click the "Convert" button under the preview window, the converter will start encoding Nikon Coolpix A900 4K clips for importing to Windows Movie Maker.

Read More: 

Monday, August 15, 2016

Edit Blade Chroma 4K in Avid Media Composer with DNxHD codec natively

The Blade Chrom camera gives you several resolutions to choose from for video, the highest being 4K Ultra HD (3,840×2,160 pixels) at 30 frames per second, but it also does high-speed video in full HD (1,920×1,080 pixel) at 120fps for slow-motion. It records video at a high bit rate 50Mbps. The videos look sharp and it shows fine details. If you have recorded some 4K videos from Blade Chroma, you can import them to Avid Media Composer for better editing. But maybe you will encounter some issues. This article will give you the solution of importing and editing Blade Chroma 4K in Avid Media Composer.

Actually, there's actually no way to edit a Blade Chroma 4K project natively with Avid. In most cases, editing Blade Chroma 4K raw in Avid Media Composer is very taxing on your computer. An ultimate solution we found would be to transcode/compress Blade Chroma 4K to DNxHD codec for Avid Media Composer.

Different from 720p/1080p videos, the conversion of Blade Chroma 4K video is in a higher standard, a professional 4K Video Converter is what you need. Featured with the most advanced converting technology, Pavtube 4K Video Converter for Mac is now providing the most reliable and professional 4K solutions to all format issues including 4K XAVC/XAVC S, 4K MP4, 4K MOV, 4K MXF and more. Besides, Pavtube also can convert Blade Chroma 4K to 1080p for other editing software like FCP X, iMovie, FCE, Premiere Pro, Windows Movie Maker, and more. If you are working on Windows(Windows 10 included), please turn to Pavtube 4K Video Converter.

Download and get the best 4K to Avid Media Composer video converter:


Other Download:
Convert Blade Chroma 4K video to DNxHD codec for Avid Media Composer

Step 1. Install the Mac 4K Converter program and run it. Drag the 4K .mov files to the software. Or you can also click "Add" button on the top of the main interface to import video to the program.


Step 2. Set output format, choose Avid Media Composer -> Avid DNxHD (*.mov) as the target format.


Tip: If you'd like to customize advanced audio and video parameters like Video Codec, aspect ratio, bit rate, frame rate, Audio codec, sample rate, audio channels, please turn to "Settings" page. Usually 1080p is the optimal setting for using in Avid Media Composer. You can downscale Blade Chroma 4K to 1080p.

Step 4. Hit the convert button; it will start converting Blade Chroma 4K for importing to Avid MC. Soon after the conversion, just click "Open" button to get the generated files for editing in Avid Meida Composer perfectly.

Read More: 

Friday, August 12, 2016

Converting MTS to After Effects CC 2015.3 (13.8) format

“After updating to 2015.3, can't import AVCHD file, I can't import AVCHD (.mts) files. Yesterday everything worked fine with CC2015.2. Why?” 

After Effects CC 2015.3 (13.8) is now available. This version is focused on performance and how to make the things you touch everyday faster. However, we still found some guys have trouble in editing MTS files with this After Effects CC 2015.3 (13.8) from Google. Although Adobe announced that AVCHD is supported natively in After Effects CC 2015.3 (13.8), and mostly the software allows you to import MTS to After Effects CC 2015.3 (13.8) and edit them, the MTS videos may hop back and forth when you play them.


Firstly, you need to learn a bit about the MTS format .mts is a filename extension used for AVCHD, a high-definition recording format designed by Sony and Panasonic that uses H.264 (conforming to H.264 while adding additional application-specific features and constraints) codec. H.264 encoded MTS video is highly compressed, good for transporting, but poor for editing. By the way, in order to play MTS videos on PC smoothly, your processor must be very powerful. In a word, if you want to make a short film from MTS footage with After Effects CC 2015.3 (13.8) and prefer fluent playback, an MTS to After Effects CC 2015.3 (13.8) Converter definitely helps.

The easy workaround is to convert the MTS files to After Effects friendly video formats. Converting temporally compressed footage to a spatially compressed format is always recommended for performance reasons. To get the work done, Pavtube MTS/M2TS Converter for Mac (read review) is a nice application for you. The program converts MTS footage to editable formats (*.avi, *.mpg, *.f4v, *.mov, *.mp4, *.wmv, etc) and obtain HD quality (1920*1080, 1440*1080, 1280*720). Converted file can be easily imported to After Effects for editing.

Besides After Effects, this Mac MTS to MPEG-2 Converter also generates best editing format/codec for filmmakers and video enthusias ts to use in different NLE apps, such as Adobe Premiere Pro, iMovie, Final Cut Express, Final Cut Pro, DaVinci Resolveand more. It has an equivalent Pavtube MTS/M2TS Converter that brings you fast AVCHD MTS conversion on Windows (Windows 10 included).

Just get the right version according to your computer's operating system and follow the step-by-step guide below to achieve your goal smoothly.


Other Download:
- Pavtube old official address: http://www.pavtube.com/mts-converter-mac/
- Cnet Download: http://download.cnet.com/Pavtube-MTS-M2TS-Converter/3000-2194_4-76177029.html

Step-by-step-Guide to Convert MTS to After Effects CC 2015.3 friendly format

Step 1. Add MTS videos

Install and run the MTS to After Effects CC 2015.3 Converter on your computer, then click "Add Video" button to browse and load your videos.


Step 2. To encode MTS to After Effects, you can select MOV, WMV or MPEG-2 from "Editing Software" as the output format. All output videos will keep the original quality of MTS video and seamlessly fit 2015.3, After Effects CC, CS6, CS5.5, CS5, CS4 and more. Here you're recommended to choose "MPEG-2".


Tips: The default settings may not satisfy you, and you can click the "Settings" button to change the settings by yourself including video resolution, bit rate, audio sample rate, audio channel etc. for full screen playback smoothly. Or keep no changes, which is also a good choice.

Step 3. Click the "Convert" button on the main interface and the software will start to convert MTS to After Effects CC 2015.3 friendly video formats immediately. When the conversion finishes, click "Open" to find the converted video files. Then you can effortless transfer the MTS video files to After Effects CC 2015.3 for nice editing.

Read Video to After Effects CC Guides: 
Read MTS to Editor Gudies: 

Monday, August 8, 2016

Transcode MP4 to Premiere Pro CC 2015.3 for editing

About Premiere Pro CC 2015.3

The Adobe Premiere Pro CC 2015.3 release (June 2016) delivers easy proxy media creation that allows you to switch seamlessly between original high-resolution and proxy low-resolution clips. Get your work done faster with the Premiere Pro family of apps, connected to each other and to your creative assets by Creative Cloud, providing a more streamlined way to create. Premiere Pro also now offers powerful support for VR Video workflows. Color and light have never been more important and with new enhancements to the Lumetri Color tools, creative possibilities are greatly expanded. Thanks to CreativeSync, all your creative assets — your media, looks, images, and Stock content — are available in Premiere Pro CC

If you have some MP4 videos in hand, you can import them to Premiere Pro CC 2015.3. But sometimes you will emcounter the issues importing MP4 to Premiere Pro CC 2015.3 like “No sound for certain mp4 clips?”, “MP4's Green won't import”. Why the new Premiere Pro CC 2015.3 can’t support MP4? It is officially stated that MP4 is supported by Adobe Premiere Pro CC 2015.3. The reason is that MP4 is a format container with different codecs. Your MP4 file codec isn't compatible with Adobe Premiere Pro CC 2015.3.

To easily solve your problem, you can convert this MP4 video to other Premiere Pro CC 2015.3 friendly movie format like MOV, MPEG-2, FLV and more (Note: it applies to all kinds of Adobe Premiere including Adobe Premiere Pro CC 2015.3, Adobe Premiere Pro, Adobe Premiere Pro CS3/ CS4/ CS5/ CS6)..

Best MP4 to Premiere Pro CC 2015.3 Encoder - Pavtube Video Converter for Mac

  • Support converting MP4 and other video like MKV, H.265, MOV, MTSTSMXF, XAVC, XAVC S, XAVC L, GoPro video etc to Premiere Pro CC 2015.3 friendly format. 
  • Transcode MP4 to Premiere Pro CC 2015.3 and any popular editing software like iMovieFCP, Avid Media Composer, DaVinci Resolve, Windows Movie Maker, Sony Movie StudioSony Vegas Pro and more. 
  • Convert videos at 6X fastest speed and retain 100% original video quality, no video quality loss. 
  • Supported: Mac OS X 10.11 (El Capitan), 10.10, 10.9, 10.8, 10.7, 10.6, (Windows version)Windows 10/8/7/XP/Vista 


Other Download:
- Pavtube old official address: http://www.pavtube.com/video-converter-mac/
- Cnet Download: http://download.cnet.com/Pavtube-Video-Converter/3000-2194_4-76179460.html

Simple Steps to Convert MP4 to Premiere Pro CC 2015.3 for editing

Step 1. Import MP4 video file

After the program installed, you will come to an impressive interface. Now add your MP4 video files. Two options:
  • Drag and drop the MP4 file to left item tray directly. 
  • Click "Add Files" to add MP4 files. 


Step 2. Click "Format" bar to choose the output format. Click and choose "Adobe Premiere/Sony Vegas" > "MEPG-2(*.mpg)". The setting seamlessly fits Premiere Pro CS4/CS5/CS3/CS6 and CC.


Step 3. Finally, hit the "Convert" button at the bottom right corner and the conversion from MP4 to Adobe Premiere Pro will begin immediately on your Mac.

Plus: FAQs about Importing MP4 to Adobe Premiere Pro CC 2015.3

Question 1: What video formats are supported by Adobe Premiere Pro? 

Adobe Premiere Pro supports many video formats, like MP4, MPEG, MPE, MPG (MPEG-1, MPEG-2), M2V (DVD-compliant MPEG-2), MTS (avchd), MOV, FLV, AVI. For more information, please check here.


Question 2: My video is supported by Adobe Premiere Pro CC 2015.3, but it is still can't be imported into it? 

For some video formats, it is the codec issue. You need to convert your video format to Adobe Premiere Pro CC 2015.3 friendly codec, like MPEG-2 which is the best codec with best results when working with Adobe.

Read More: