Showing posts with label edit mts in fcp x. Show all posts

Monday, April 13, 2015

Import HC-X1000 4K AVCHD MTS to FCP X for Editing


Viewing through the FCP X forum online, we can find so many importing issues related to HC-X1000 4K AVCHD MTS: “I can’t import 4K AVCHD MTS to FCP X, why?” “How do I edit MTS in FCP X?” “What should I do in order to convert MTS to FCP X for smooth editing?” Read this guide below, we can solve your problems nicely.


Panasonic announces the HC-X1000, a consumer-level 4K camcorder that incorporates a host of professional features that belies its consumer classification. This is a camcorder capable of recording 4K video straight to SD cards, but it also comes packed to the gills with the kind of high-end controls that pros would demand of a true cinema camera.

Versatile formats and bit rates make the X1000 unbeatable in a wide range of applications. Its AVCHD, MOV and MP4 formats make editing quick and easy. But, if import the 4K video from Panasonic HC-X1000 to FCP X for editing on Mac, you will be in trouble.

Learn from Apple official site, Final Cut Pro X natively supports 4K ProRes, Sony XAVC and REDCODE RAW. However, you can't edit Panasonic HC-X1000 4K AVCHD MTS files in FCP X directly. For importing MTS to FCP X for editing better, you are advised to convert MTS to FCP X best accepted ProRes first.

To meet the needs of so many HC-X1000 users, here we recommend the best Pavtube MTS/M2TS Converter for Mac for you with which it’s easy for you to convert MTS to Apple ProRes codec compatible with FCP X. Furthermore, it’s available for you to set the video size, frame rate, bit rate, and audio channel to make a perfect parameter for Panasonic HC-X1000 with the best quality for FCP X.


How to import HC-X1000 4K AVCHD MTS to FCP X for editing?

Step 1: Connect your Panasonic HC-X1000 camcorder to Mac via USB cable and find the AVCHD files from the camera folder. Then copy and transfer the 4K AVCHD MTS from HC-X1000 to the Apple hard drive disk.

Step 2: Import HC-X1000 4K AVCHD MTS files to Mac MTS Converter. Run it as the best MTS Converter, and click the "Add video" button to load 4K AVCHD MTS videos. You may also directly drag and drop HC-X1000 4K AVCHD MTS videos to application UI for importing files.


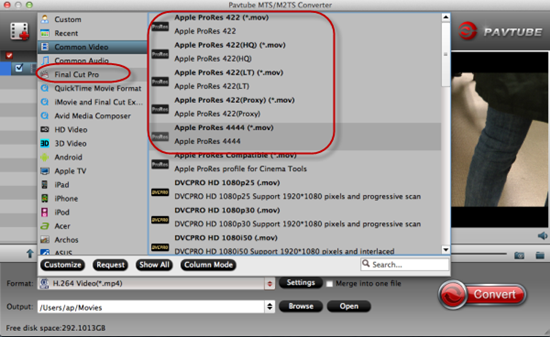
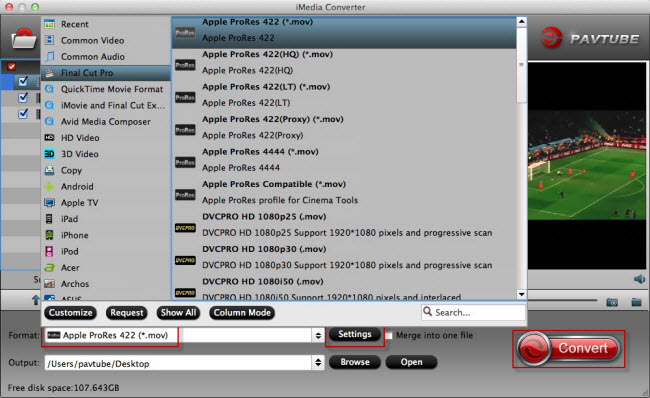
Step 3: Click the “Format” option and navigate the mouse cursor to “Final Cut Pro >>Apple ProRes 422 (*.mov)” as output format. Apple ProRes 422 (*.mov) and Apple ProRes 422 (HQ) (*.mov) have higher qualities. Apple ProRes 422 (LT) (*.mov) and Apple ProRes 422 (Proxy) (*.mov) have smaller size. You can choose according to your requirement.


Step 4: To set the profile settings, please click the “Settings” button. General speaking, the default settings are just fine. Click the “Browse” button to browse and specify a destination folder to save the converted files.

Step 5: When everything is ready, click “Convert” to start converting 4K AVCHD MTS to ProRes 422. This Mac MTS/M2TS Converter supports batch conversion so you may load multiple files and convert them at one time.

Conclusion: As 4K AVCHD MTS to Apple ProRes 422 Mac video converter, it enables you to trim out unwanted part, crop out black bars, change aspect ratio from 4:3 to 16:9 and vice versa, rotate 90 degrees clockwise, anti-clockwise, add plug-in subtitles, apply special effect, and more. Now, you can import 4K AVCHD MTS to FCP X without any hassles.

Further Reading:

Monday, March 16, 2015

Easily Edit Panasonic HC-X920 AVCHD MTS Files in FCP X


How to make Panasonic HC-X920 AVCHD MTS files compatible with Final Cut Pro? How to edit Panasonic HC-X920 AVCHD MTS files in FCP X? This article will give you a detailed solution.


Panasonic HC-X920 is one of the most popular camcorders on the market. Many users choose to buy this device because of its excellent hardware equipment. It features three back-illuminated MOS sensors, and it can records full HD 1080/60p videos in the AVCHD format.

There are all great improvements to an already excellent camcorder, but some limitations still exit there like the output 1080 60p or 50p AVCHD MTS movies cannot be supported by some non-linear video editors like the common tool FCP X/7/6 for Mac users, which causes unsmooth editing without rendering. This problem is largely caused by the incompatibility of video file format and video frame rate of Panasonic HC-X920 and Final Cut Pro X/7/6.
Tips: FCP supported video formats

From Final Cut Pro X product page, you will find that Apple ProRes codec MOV format is native editing codec for FCP X. With this editing codec and format, you won’t have any importing or editing problems. As we talked above, you need to convert X920 AVCHD MTS files to FCP X Apple ProRes codec. Here, you will need an X920 to FCP X converter. We recommend you to take a try on Pavtube MTS/M2TS Converter for Mac.


How to edit Panasonic HC-X920 AVCHD MTS files in FCP X?

Step 1: Download, install and run the program on your Mac. When the main interface pops up, please click “Add video” button to import Panasonic X920 AVCHD MTS files that you want to convert. You can load several files at once by clicking “Add from folder”.


Step 2: Click format column and choose best video format for FCP X. Just click and choose “Final Cut Pro>>Apple ProRes 422 (*.mov)” as output format for this profile is native format for FCP X. If you have the requirement to edit videos in other programs, you can choose according to your need.


Tips: Apple ProRes 422 (*.mov) and Apple ProRes 422 (HQ) (*.mov) have higher qualities. Apple ProRes 422 (LT) (*.mov) and Apple ProRes 422 (Proxy) (*.mov) have smaller size. You can choose according to your requirement.

Step 3: Adjust video and audio parameters in Profile Settings, where you can get by clicking “Settings” on the main interface.
Tips: For FCP X users, 1920*1080 as video size, 30fps as video bitrate and pcm-s16le as audio codec are the most suitable settings.

Step 4: Click “Convert” button to start Panasonic X920 AVCHD MTS to FCP X conversion process. This best Mac MTS converter will start the conversion process immediately

Conclusion: When all your Panasonic MTS files are converted, you can import X920 AVCHD files to FCP X and edit natively. In addition, the versatile Mac MTS Converter is also effective in getting MTS/M2TS files editable in iMovie, Final Cut ExpressAvid Media ComposerAdobe Premiere Pro, etc. Just try and it will do you a favor.

Further Reading:

Thursday, January 16, 2014

Solution to Import Sony Alpha 7R MTS to FCP X

Sony Alpha 7R users often meet the problem that they cannot edit AVCHD MTS files in FCP X. The following will tell how to use FCP X to edit Sony Alpha 7R AVCHD MTS, which is not a Mac friendly format.

Sony a7R Full-Frame Camera is the world's lightest interchangeable lens full-frame camera, and it can capture Full 1920 x 1080 HD uncompressed clean-screen video files to external recording devices via an HDMI connection in 60p and 60i frame-rates. Selectable in-camera AVCHD codec frames rates include super-smooth 60p, standard 60i or cinematic 24p.


But there is some problem in importing these AVCHD MTS files into your FCP X for editing because it is not a Mac friendly format for editing in FCP X. It is known that Apple ProRes codec is well compatible to FCP. Now you need a program help you to transcode Sony Alpha 7R AVCHD MTS to FCP X.

Here, Pavtube iMedia Converter for Mac is the best tool you need to help you convert Sony Alpha 7R MTS to ProRes 422 for FCP X editing. It does not only convert AVCHD to Apple ProRes for FCP X editing on Mac, but also convert AVCHD MTS to iMovie, FCE, Avid, Premiere Pro, Aperture 3, Kdenlive, After Effects CS6, DaVinci Resolve etc. compatible format/codec on Mac (Mavericks included).

What's more, with Pavtube MTS to FCP Converter, you can also add *.srt, *.ass, *.ssa subtitle to a video/movie files. Here I share a guide of how to add subtitles and some free subtitle files download website:
Here is the step-by-step guide for you to convert and import Sony Alpha 7R AVCHD MTS to Final Cut Pro X on iMac/MacBook Pro with Mac OS X like Mavericks, Lion, Snow Leopard.

Download Pavtube AVCHD MTS to ProRes Converter, install it on Mac.

Step 1. Load Sony a7R MTS files from SD card.

Connect your a7R to your Mac with USB2.0. Run Pavtube MTS to ProRes Converter and then click "Add video" button to load 1080p MTS files from Sony Alpha 7R AVCHD camcorder to the Mac program. You can tick the box in front of the file you want to convert.


Tip: If you have multiple MTS/M2TS files, you can select the "Merge into one file" box to merge/combine MTS files, so that you can import these files to FCP X without interruption.

Step 2. Set MOV as output format.

Click the "Format" option, and choose "Final Cut Pro -> Apple ProRes 422 (*.mov)" as output format, the output video will be kept as high definition 1920×1080.


Tip 1: You can also choose "Apple ProRes 422(HQ) (*.mov)" as output format for FCP X. The Apple ProRes 422 (HQ) codec offers the utmost possible quality for 4:2:2 or 4:2:0 sources (without an alpha channel) and provides the following:

  • Target data rate of approximately 220 Mbps (1920 x 1080 at 60i) 
  • Higher quality than Apple ProRes 422 
Tip 2: If you prefer smaller file size, please choose "Apple ProRes 422 (LT) (*.mov)" instead.

Tip 3: You can set the output folder by clicking "Browse" icon as you need.

Step 3: Add effect or Subtitle for your footage.

If necessary, click "Edit" icon to start video editing with your mts files, such as adding effect as well as adding watermark, trim your videos and so on.

You can also click "Subtitles" option, add srt, ass, ssa suntitle you want.

Step 4: Convert Sony a7R AVCHD MTS to Apple ProRes MOV for Final Cut Pro X.

Click the "Convert" button under the preview window, the Mac MTS to ProRes Converter starts converting Sony Alpha 7R AVCHD MTS to ProRes MOV, and joining the MTS files for editing in FCP X.

After converting and merging the MTS files, just import the output ProRes MOV files to FCP X and the video is in HD 1920×1080. You can also import the output ProRes videos to Final Cut Pro X, iMovie or Premiere Pro,etc for editing.

Read More: