Tuesday, May 7, 2013

P2 Mxf To Final Cut Pro- Edit Panasonic P2 MXF in FCP on Mac

Want to edit P2 MXF video in Final Cut Pro? Here we'll show you how to convert and import MXF video to FCP for smooth editing.
Final Cut Pro even FCP X won't import P2 MXF videos from Panasonic camcorder. The easy workaround is to transcode/convert P2 MXF footage to Apple ProRes codec on Mac. It's much easier to be done with a professional P2 MXF Converter Mac. Below is how. 

The Panasonic P2 HD camcorder use the latest AVC-Intra Codec for broadcasting (compatible with MPEG-4 AVC/H.264) at 1080 in 24p, 25p, 30p, 50i and 60i, and in SD (480i/586i) in DVCPRO50, DVCPRO and DV. But new users may face some frustrating result when importing the P2 MXF footage into Final Cut Pro, because the P2 .mxf file format is not fully supported by Mac non-linear editing software such as FCP and iMovie.

Question: How to Import P2 MXF files to FCP on Mac OS X Lion?

Answer: Convert Panasonic MXF to ProRes 422 for Editing in FCP .

How to convert P2 Card MXF footage from Panasonic to ProRes 422 HQ

Step 1. Connect your AVC-Intra MXF Camcorder to iMac with USB 2.0 cable or use card reader to transfer the P2 AVC-Intra .mxf files to Apple hard drive disk.


Step 2. Add Panasonic P2 AVC-Intra MXF videos to this top Mac Panasonic MXF Converter.

Run Pavtube MXF Converter for Mac, and click the "Add Files" button to load .mxf videos.


Step 3. Choose MOV with Apple ProRes 422 codec for Final Cut Pro 6/7/X.

Click the "Profile" option, and move mouse cursor to Final Cut Pro > Apple ProRes 422 HQ (*.mov) as output format. To get 1080 videos, we need to click the "Settings" button and choose 1920*1080 as output video resolution.


Step 4. Specify output file path. Click on "Browse" and browse to where you'd like to save target Apple ProRes 422 HQ video.

Step 5. Convert Panasonic P2 MXF to ProRes 422 MOV for Final Cut Pro 6/7/X.

Click the "Convert" button and the Mac MXF Video converter would start converting Panasonic AVC-Intra MXF videos to Apple ProRes 422 MOV immediately.

Step 6. Press "Open" to locate result video. Launch FCP 6/7/X, and go to "File > Import > Files…" to import converted P2 footage to FCP project.


The software also converts P2 MXF and Canon MXF video to compatible formats for FCE/iMovie, Avid, Adobe Premiere Pro, After Effects, etc. You can convert Panasonic P2 MXF to AIC .MOV for FCE and iMovie, or transcode Panasonic AVC-Intra MXF to H.264 MOV, DV, AVI, M4V, MPG for Avid, Adobe Premiere Pro, and After Effects.

Read More:

Monday, May 6, 2013

How to Shoot Slow-Motion Aerial Footage on the Sony F55 with Andrew Wonder


Great aerial footage seems simple enough to capture in theory, but there is often a team of people or years of experience backing up the terrific shots. In the post below, we have Andrew Wonder to take us through his process of capturing aerial footage of a female rugby team on the Sony F55.

This is a guest post by Director/Cinematographer Andrew Wonder.

If you were at NAB, then you already know that 2013 was the year of the drone. You could barely walk around the convention floor without the risk of getting a haircut by someone’s spin on the aerial rig. Though they look like toys, it’s easy to forget that operating a drone is an art that should be carried out by professionals. Like a Steadicam, you can’t just pick one up and expect cinematic results. Understanding how to balance and control these crafts is the difference between that perfect shot and ending up in the river.

For over a year I have been lucky enough to work with Anthony Jacobs and his team at Perspective Aerials. Not only has he helped capture some amazing shots to add to my commercials, but also has always impressed me with his desire to be a trailblazer and stay ahead of the curve of what a drone rig can handle.

Jacobs is a New York City based photographer and former Getty Images employee and has been a lifelong ‘tinkerer’ and avid RC enthusiast since he was a child. In 2006, Jacobs obtained a provisional patent on a custom wearable harness with a high-gain 2.4ghz antenna incorporated into the stitching that was worn by editorial photographers shooting in the field which allowed them to wirelessly transmit images to awaiting photo editors some distance away.

Early in life, Jacobs dreamed of being a robotics engineer, spending many hours dismantling his collection of RC cards to create other more ‘useful’ machines such as a 5-axis robotic arm able to move objects around. It’s almost like Anthony’s whole life built up to creating this drone which is why, even when things like the Movi come out, it’s important to remember that it’s the soul of an operator that is always more important than the tool he or she uses.

A good aerial rig is the cross-section of many factors but most importantly it’s a battle between weight and flight time. In theory, many rigs could handle the weight of a Red Epic, but lifting a heavy camera means nothing if your flight time is only a minute long. Creating rigs that can support heavier cameras while still getting a 4-5 minute flight time makes all the difference in getting that second take or capturing a magic moment as it unfolds in front of you.

A few weeks ago, I was fortunate enough to see his new rig, which allowed us to upgrade from smaller cameras like the Canon 5D Mark III and Sony FS100 to their big brothers the Canon C300, Sony FS700, and Canon 1D C. Anthony also modified JAG35 pieces to create a focus system that would give him even more control over the shot. Though it was a short test, I was blown away with Anthony’s results.

While director Laura Strausfeld and I were prepping her next feature (an adaptation of Chekhov that uses new tools in a way that will make Shane Hurlbut drool), she brought me in on a project she was trying to develop about a college female Rugby team. After gaining access to a team, we decided to make a short film to help sell our vision of the feature (very much like Ryan Koo is doing with Amateur) and to show audiences how impressive and inspiring these athletes can be.

While discussing the tone of our rugby short, we wanted to be careful not to go too Nike or get too indulgent with the game footage. Unlike male Rugby, the female version is not just about lining up and beating the snot out of your opponent. It’s a much more technical game and we wanted to capture the way girls communicate and their formations on the field. When watching the games live, the teams look like flocks of birds moving towards and away from each other, but in most game footage we only get a sense of the ball’s movement. Our goal was to capture the emotion of the game and put the audience in the middle of the scrum.

While planning the project, I contacted Anthony to see how we could further elevate our story using drone photography. We didn’t just want overhead shots but a way to give context to our ground coverage and make each play feel like the epic conclusion to an Animal Planet special. After talking about different angles and strategies, we discussed which format to shoot. Since our ground cameras will all be 4K, we wanted the same high resolution and pop from our aerial cameras. We quickly realized the perfect camera perfect camera for this task would be the Sony F55.

The Sony F55 is a very polarizing camera. On paper it’s everything we’ve been hoping for in a camera. Between high frame rate onboard 4K recording, a global shutter, and compact modular design, the F55 felt like the answer to getting true cinematic results out of Anthony’s drone rig. With the help of Mike Nichols, Alex Kurze, and Pete Abel at Abel Cine Tech in New York, we were fortunate enough to get an F55 to fly for the project. Having flown other Sony cameras, such as the FS100 and FS700, we were aware of balancing issues created by the long body length of both cameras. Having only read about the F55, we were curious to see if we would run into these same mounting issues.
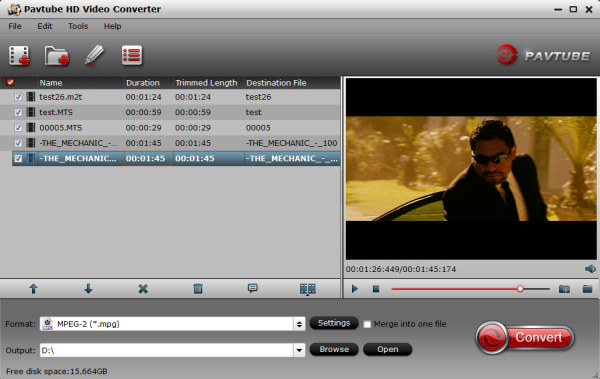
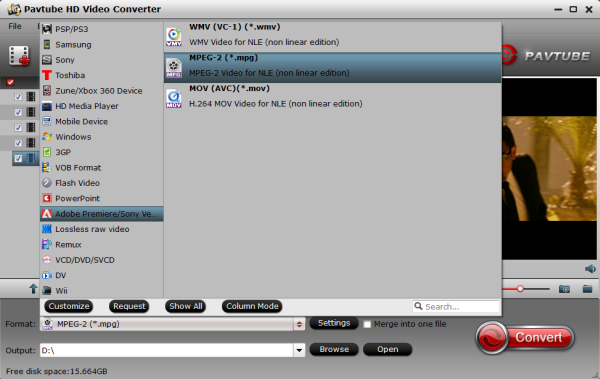
After shooting, we were able to verify our shots using Sony’s Content Browser 2.0 (if you are planning on shooting with the F55, go download it now while it’s still free). I tried to use Andy Shipsides’ F55 Import Guide from Abel Cine Tech’s blog to bring the footage into FCP 7 or Premiere, but quickly realized XAVC is still not playing very nicely with either program.

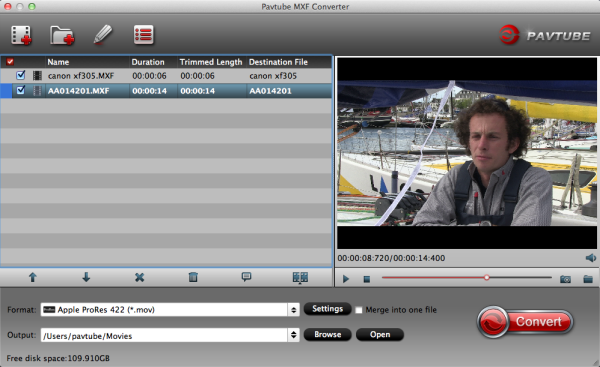
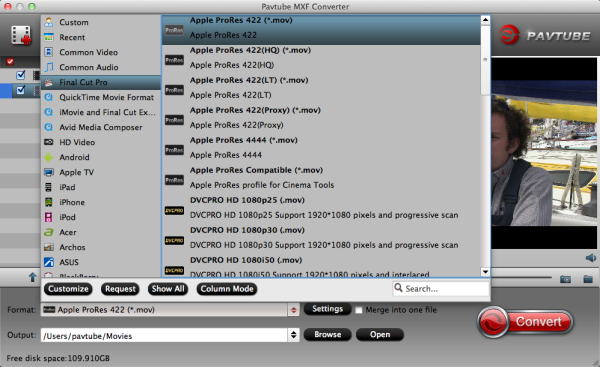
As a workaround, I downloaded a free 30-day trial of FCP X and used Andy’s guide to import the footage. During the import process, I had FCP X create Prores HQ transcodes, which editor Justin Sharp was able to bring into FCP 7 to create the above video. All the BTS footage you see here was captured by Dave “Cobra” Ellis.

The above aerial footage is not color corrected, so you can see what S-Log 2 looks like right off the card. There was also no post stabilization done on any of the aerial footage. I’m not sure if this is because of Anthony’s rig or because of the help of Sony’s global shutter, but it’s the smoothest and most cinematic drone footage I’ve been fortunate enough to witness. If you would like to download some of the original 4K transcodes, you can download them here until May 15th.

We have just begun to go through the rest of our Rugby footage, but the aerial shots alone have made my whole team very excited. I can’t wait to share the final piece with you all.

For your drooling pleasure here is some additional gear porn of the F55 on the drone. Thanks for taking a look!

Sunday, May 5, 2013

Canon XF305 to FCP- Import Canon XF305 MXF to FCP on Mac

Follow the post to learn how to import Canon XF305 MXF to FCP with FCP native codec on Mac.

The XF305, one of Canon's first file-based professional camcorders, records MPEG-2 MXF (Media eXchange Format) files – up to 1920 x 1080 Full HD at 50Mbps (4:2:2) – to CompactFlash (CF) memory cards. The Canon XF305 also offers multiple recording bit rates, resolutions and variable frame rates to expand your creative flexibility, and allow you to work in virtually any production environment.

Have you put your hands on this professional camcorder? If so, you would have collected a pile of MXF recordings, and have you tried to import Canon XF305 MXF to FCP for editing? Ever encountered some importing or editing troubles? If so, go through the page to find the solution.


As we know, FCP is the free and useful part of the Apple Mac iLife, you can use it to edit your movie or camcorder video which is shot by yourself. It supports video files like MPEG2, DV, HDV, QuickTime Movie and MPEG4 but no Canon XF .mxf files. So, to freely edit XF305 MXF in FCP on Mac, you need to convert XF305 MXF to FCP compatible video format.

Canon MXF to FCP Converter is the best Mac MXF Converter for you to convert MXF to iMovie on Mac. You can use it to convert/trasnscode Canon XF305 MXF files to Prores(Apple Prores Codec) codec MOV format, which is the FCP perfectly supported one. You can follow the guide below.

1. Download this best MXF converter for Mac OS X. This MXF to MOV converter will help you convert MXF to any formats you want, such as Apple ProRes 422 MOV, Apple InterMediate Codec MOV, etc.


2. Install and launch this XF305 MXF video converter for Mac. Import XF305 footages to the MXF Converter.

3. Click format bar to choose the output format you want. For converting XF305 MXF to FCP, you can choose Final Cut Pro -> Apple ProRes 422 (*.mov), it’s best supported by FCP.


4. You can click settings button to adjust the output parameters if you want.

5. Click convert button to start converting MXF to Apple ProRes 422.

With the best MXF to MOV Converter, you can easily convert XF305 MXF to FCP, by converting MXF to ProRes 422 codec MOV format, you can edit recorded footages in FCP smoothly.

Read More:

Sunday, April 28, 2013

Convert PWM-F55/F5 XAVC to Sony Vegas without Quality Loss

So far, there are two cameras Sony PMW-F55/F5, save files in XAVC format, some users are in trouble editing XAVC videos in Sony Vegas, this article will show you the solution to import XAVC footages to Sony Vegas for editing using a XAVC Converter.

With emergence of PMW-F55/F5 two cameras, the PMW-F3 and F65 CineAlta 4K, Sony Super35mm, among item lines blank to become filled to ensure that the qualified video production individual carrying HD, 2K or 4K shooting, production With much more versatile and inventive alternatives.


Great news to photographers, however the Sony F55/F5 make editing job tough. They record videos in XAVC format, which can be seldom supported by apps, Sony Vegas, having said that, will not accept such HD videos. To edit XAVC in Sony Vegas(Pro 12 will not be integrated), you need to convert XAVC videos to SV compatible formats, and to execute the conversion, an expert XAVC to Sony Vegas Converter is important.

Have recorded some XAVC files and want to edit them in Sony Vegas? Want to share them on YouTube to show you creativeness to your friends? Pavtube XAVC video converter is your perfect tool to load XAVC Videos towards the converter.

Step 1: Free download the best XAVC to AVI/WMV/MPEG-2 Converter and run it to add the F55/F5 footages.


Step 2: Hit the Format box and select "HD Video" option on the dropdown menu and you can choose "AVI/WMV/MPEG-2" as output format for editing with Sony Vegas. Besides, you can also choose "H.264 HD Video (*.mp4) " for playing back.

Step 3: Adjust video and audio parameters, including the Bitrate of Video and Audio, the Codec of Video and Audio, Video Size, Sample Rate, Frame Rate, Audio Channels, etc., by clicking the "Settings" button on the main interface for getting the best quality.


Step 4: Click the "Convert" button on the main interface to start transcoding F55/F5 XAVC footages to AVI/WMV/MPEG-2 for editing in Sony Vegas on PC.

When the conversion is completed, click "Open" in the main interface and get the converted files for importing and further editing. Now transferring and editing XAVC files in Sony Vegas is smooth and without any problem.

Other video tips: 

Thursday, April 25, 2013

Canon C100 and FCP WorkFlow- How to Import and Edit Canon C100 AVCHD in FCP(X)

This guide will teach you the best way we tested to import Canon C100  MTS to FCP X natively with Apple ProRes codec.


Canon already gave those looking for a full-frame DSLR plenty to think about, and now it's stirring up the movie-maker's pot. It's just announced a new member to its EOS digital cinema collection -- the EOS C100 -- and given us a better idea of when we can expect that C500 to land.

For the record, my C100 is easily the best camera I own. Its images always blow me away and its handling and form factor are just superb. But the most terrible thing is that when I imput these cilps to Final Cut Pro, I got the error message directly, no matter FCP 7 or FCP X. Why? I am eager to editing in FCP further. Is there anyone here can help me? Thanks in advance.


In my opinion, the key problem lies in the different codec. The most compatible Codec for FCP is Apple Prores Codec, but for Canon EOS C100 recordings, they are compressed by MPEG-4 AVC/H.264. That's the reason why the person mentioned above got the error while imputing Canon EOS C100 cilps to FCP 7/X. So the fastest and safest way to solve this problem is to convert Canon C100 AVCHD to Prores .MOV before editing in FCP (X). To do the job, Pavtube MTS/M2TS Converter for Mac is a good tool.

How to import Canon C100 AVCHD 1080p MTS to Final Cut Pro (X) for editing without rendering for beginners?

FCP (X) best supported video format is Apple ProRes 422 codec MOV format, so FCP X doesn't support Canon C100 AVCHD footages well. The best method to solve this problem is to convert Canon C100 AVCHD MTS footage to ProRes for editing in Final Cut Pro X, you can follow the steps below to transcode Canon C100 AVCHD MTS to FCP X for editing without rendering.

1.Load AVCHD files.

After install and launch the Pavtube Canon C100 Converter for Mac, drag and drop Canon C100 AVCHD MTS file. You can drag several files to the program directly.


2.Choose output format.

Apple ProRes MOV is the best format for Final Cut Pro (X), here you just need to choose the target application as output format, for example, "Final Cut Pro"->"Apple ProRes 422(*.mov)".


3. Do some settings as you want.


4.Transcode Canon C100 AVCHD to FCP (X).

At last, hit the "Convert" button to transcode Canon C100 AVCHD MTS to FCP (X).

With this Pavtube Canon C100 Video Converter for Mac, you can easily change Canon C100 AVCHD files to FCP (X) compatible codec for editing, this software runs fast, so you can convert your Canon C100 AVCHD footages to ProRes 422 MOV for importing to FCP (X) in less time, video and audio synchronization are perfectly guaranteed.

After converting you can follow this guide Final Cut Pro X files Transferring to import the converted Canon C100 AVCHD videos to FCP (X) for editing.

Realted Canon AVCHD solutions:

Wednesday, April 24, 2013

TS to Final Cut Express - Convert TS video to FCE on Mac with AIC codec

Pavtube TS to FCE Converter is the best chosice for you to easily and fast convert/import/bring your TS video into FCE on Mac.

MPEG transport stream (TS) is a standard format for transmission and storage of audio, video, and data, and is used in broadcast systems such as DVB and ATSC. Maybe you have some .ts videos or TS files and want to editing them on iMovie on Mac.


Final Cut Express, non-linear video editing application created by Apple Inc, is the relatively inexpensive consumer version of a professional video editng suite. Final Cut Express gives you the capability to synchronize images and sound, add special effects, and export projects as standalone videos in a variety of formats. Final Cut Express accepted video: MOV (*.MOV), DV Format (*.DV) and MPEG-4 Movie (*.MP4) , but no support for .ts files.


If you got a bunch of files end with .ts extension and want to edit TS with Final Cut Express, the best way to edit your TS files on FCE will be converting them to formats that are perfectly supported by FCE. TS to FCE Converter is the perfectly right tool for users who cannot import TS to FCE on Mac.

Pavtube MTS/M2TS Converter for Mac is an easy to use tool for you to encode TS files to FCE editable AIC .mov format. It features optimal format presets for these editing apps, resulting files with great image and sound quality without audio delay issues. Best of all, the 5.1 channels in your original TS files can be remained as well.

Easy steps: TS to Final Cut Express converting tutorial

Step 1: Add TS video

Go to download and install the best  to make the transcoding task without quality loss. Then launch the software to import your .ts clips to Mac TS to AIC Converter.


Step 2: Select the right output format

Click on the Format box to choose iMovie and Final Cut Express-> Apple InterMediate Codec (AIC) (*.mov) for FCE.


Step 3: Convert TS to FCE MOV

Hit the Convert button; it will convert TS to FCE on Mac immediately.

When the conversion finished, you can directly import the output AIC MOV files to Final Cut Express for editing and make your movies. The importing needn't any rendering because the AIC MOV is one of the compatible video formats on Mac OS X Lion.


Tip: 

Pavtube iMedia Converter for Mac can convert 1080p camcorders footages to editable HD video formats for non-linear editing software like iMovie, Final Cut Express, Final Cut Pro, Final Cut Studio, Avid, Adobe Premiere etc. The HD footage can be compressed to SD video clips for storage when you wanna save storage space. The Mac iMedia Converter is also able to extract audios from Blu-ray discs, DVDs and videos for media players with high quality and fast conversion speed.

Related points:

Tuesday, April 23, 2013

Edit Sony PMW-F55 XAVC in Final Cut Pro smoothly

Summary: This article outlines how to transfer Sony PMW-F55 XAVC footage to hard drive and import into Final Cut Pro for smooth editing.

Sony PMW-F55 is exceptionally small, light and modular, letting you build up the right configuration for each job-or each shot. PMWF55 CineAlta camera shoots spectacular images with its 8.9 megapixels (effective) Sony 4K image sensor. You get superb dynamic range, the widest colour gamut, and pristine image quality, whether you shoot in HD, 2K or 4K. The camera incorporates high-speed SxS PRO+memory card recording that allows the choice of: 8-bit MPEG-2 HD422, 50Mbps; 10-bit XAVC 2K*/HD 100Mbps; SR Codec 10-bit MPEG4 SStP 220, 440 and 880Mbps*; and XAVC 4K/QFHD* 300Mbps. All formats can be recorded at a range of interlace and progressive frame rates (see camera specifications for precise details).


XAVC has been created as an open format, supplying a license plan for other makers inside the broadcast and production market to create their very own good quality and higher frame price solutions. While enjoying the stunning videos recorded of HD image quality, many users are having problems when trying to edit PMW-f55 footage in FCP (includes FCP 6/7). Like edit your Sony PMW-F55 camers XAVC video in FCP with a simple way?

Since the XAVC footage is a peripheral non-standard format which is not supported by FCP 6/7. In order to import Sony PMW-F55 XAVC footage into FCP for smoothly editing, we can render to the third-party software to help convert XAVC to Apple ProRes 422 MOV– native format for Final Cut Pro 6/7. Besides, it is also a best way to help the users of PMW-F55 to edit Sony PMW-F55 XAVC in FCP smoothly.

To achieve our goal, the quickest and easiest way is to use the easy-to-use yet professional software called Pavtube XAVC Converter for Mac, with which we can effortlessly and flawlessly transcode Sony XAVC footage to ProRes MOV for Final Cut Pro 6/7 or iMovie. It is safe to install and easy to use.  A professional program in ripping Blu-ray/DVD/HD video  for playback, storage or editing. Below will show you how to transcode Sony PMW-F55 XAVC footage to ProRes MOV in details.

Convert/Import Sony PMW-F55 AVCHD to Final Cut Pro for editing smoothly with Apple ProRes Codec on Mac

Step 1. Free Download the Mac Sony XAVC Transcoder for FCP to your PC. Install and run it. It's excellent Sony video converter which can convert nearly all canon cameras' videos to any formats you need, such as Apple Prores 422 MOV, Apple InterMediate Codec MOV, QuickTime MOV, etc.


Step 2. Click format bar to choose output format for use in FCP 6/7 or FCP X. Choose Final Cut Pro -> Apple ProRes 422 (*.mov).

Here we recommend the Apple ProRes 422.


Step 3.
Click "Convert" button to start the conversion from Sony XAVC footage to FCP Apple ProRes MOV on Mac OS.

After the workflow, you can go to the output folder to find the converted video files. Now you are free to log and transfer or import/edit Sony PMW-F55 XAVC videos in Final Cut Pro 6/7 or FCP X under Mac without problems.

Tips: Before you try to do the conversion, if you are also a FCP X user, please make sure that you have installed the Apple ProRes Codec manually since the FCP X asks users to install it by themselves.

Read Related Articles: