Tuesday, June 25, 2013

How to import XDCAM MXF files from Sony PMW-320 to iMovie 11/8/9

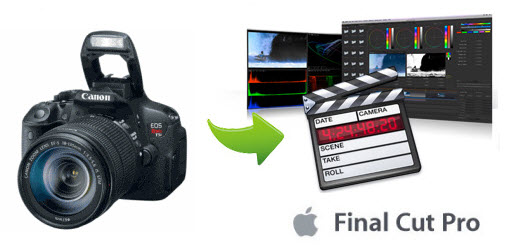
Encounter problems when import Sony PMW-320 MXF into iMovie 11/8/9 on Mac? Just follow this article to get the best tools and methods to edit PMW-320 MXF in iMovie.

Sony is pleased to announce the introduction of the new PMW-320 XDCAM EX Camcorder. This new shoulder mount camcorder joins the award-winning XDCAM EX product family of professional Solid State Recording acquisition tools. This new camcorder inherits all of the advanced creative recording features of the successful PMW-EX1, PMW-EX1R, PMW-EX3 and the PMW-350 camcorders, and also offers several enhancements such as improved low light capability as well as SD recording as a standard feature. Similar to the PMW-350, the PMW-320 supports multiple frame rate recording such as 59.94i, 50i, and native 23.98P and 25P as well as being 1080i/720P switchable.


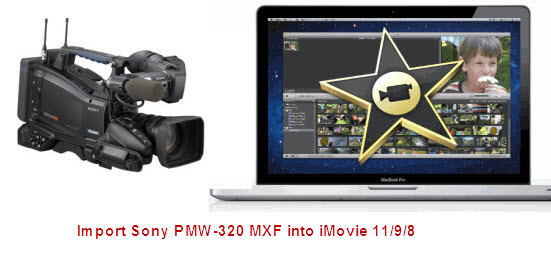
When shooting some footage on the Sony PMW 320 and want to edit them in iMovie 11/8/9, you will meet the incompatiblity problem as below, since iMovie (including iMovie '11, iMovie '8 and iMovie '9) can not support the .mxf video files.

Just received some SD footage from a two camera shoot with PMW-320s, one camera had 4 audio lines and both cameras timecodes were synched. Is there a way to properly import the files to iMovie? since just moving them from the card gives me no timecodes and only 2 audio lines. plus the quality seems lower than i expected. Thanks.

How can the PMW-320 XDCAM EX Rewarapped MXF files be editable with the lossless quality? It is easy, as we know, the most compatible format for iMovie 11/8/9 is Apple Intermediate Codec(AIC)(*.mov). So to get your Sony PMW-320 MXF files and iMovie to play nicely, the quicker and easier way is to transcode those MXF to AIC MOV videos.Thus, the third party component is vital in achieving your goal.

Here we recommend you to choose a top MXF to AIC Converter for Mac to transfer Sony PMW-320 recordings for iMovie 11/8/9 editing. 

Steps for deinterlace Sony PMW-320 MXF clips to iMovie 118/9.

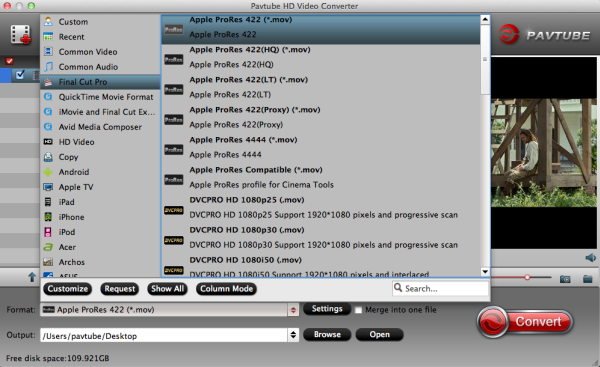
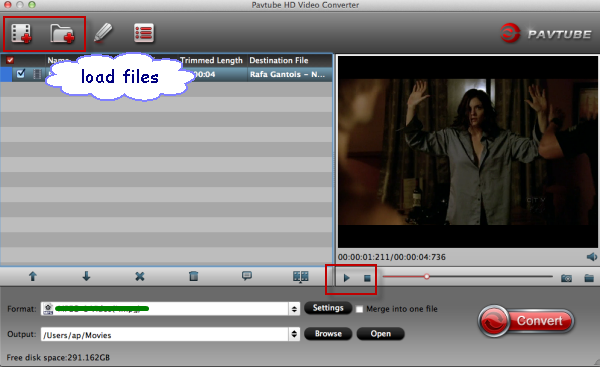
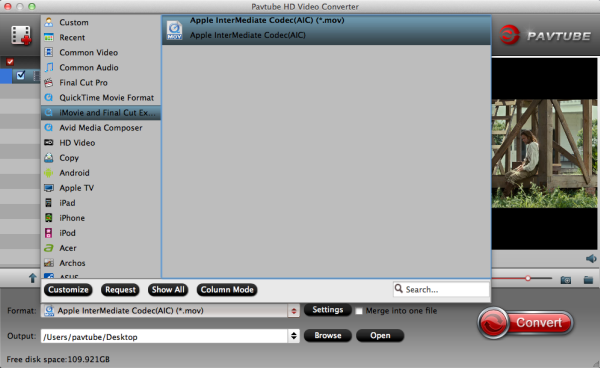
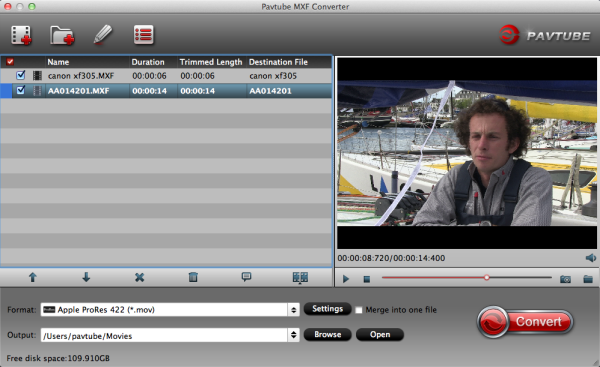
Step 1: Install the top Sony XDCAM MXF Converter for Mac on your Mac OS X, and run it to import your Sony PMW-3201080i/1080p MXF footages to it. Tip: If you want to combine the files together, please tick the box "Merge into one" on the main interface.


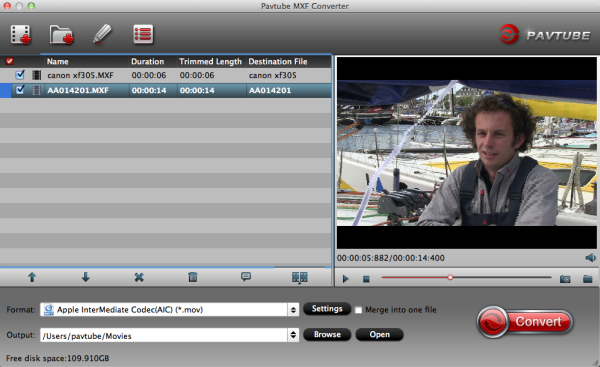
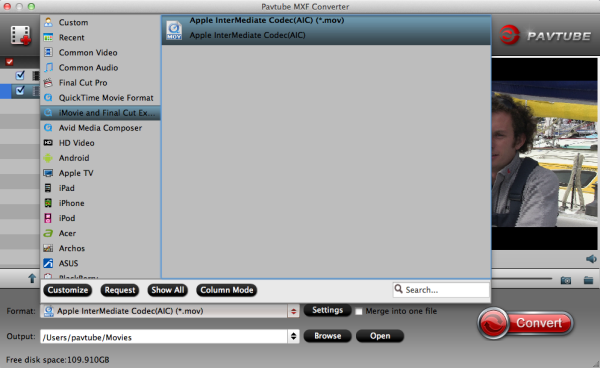
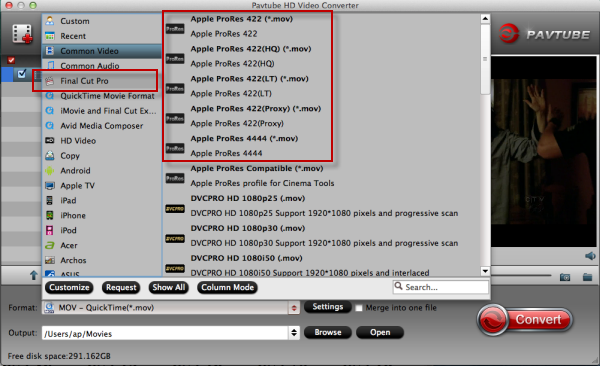
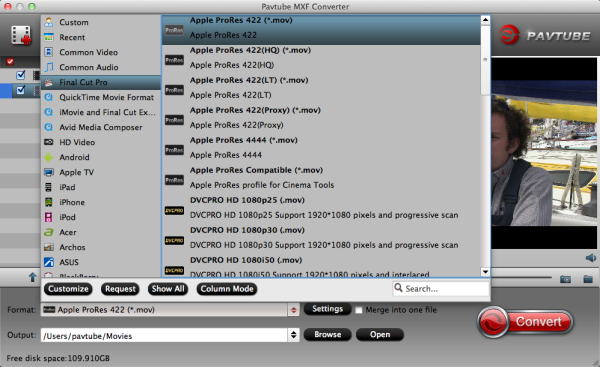
Step 2: Click the Format box and select best output format on the dropdown list. You are advised to choose Apple Intermediate Codec(AIC)(*.mov) as the export.


Step 3: Click the "Settings" icon on the main interface and you’d better set the video size as 1920*1080, video frame rate as 30fps(or 25fps PAL) for importing Sony PMW-320 MXF to iMovie 11/8/9 with the best quality.

Step 4: Click the Arrow button on main interface to start converting/deinterlace Sony PMW-320 MXF clips to AIC video immediately.

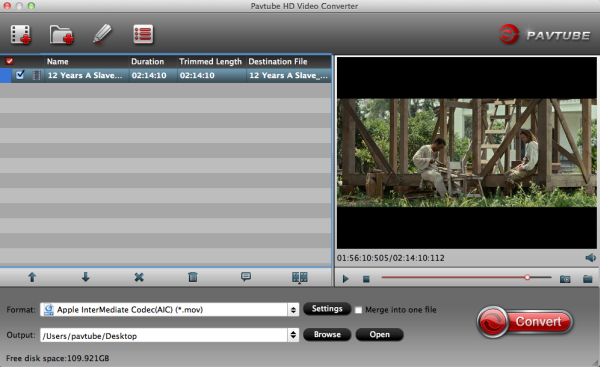
After the Sony PMW-320 MXF to AIC converter finished transcoding, you can run the iMovie 118/9 to import the converted files and edit Sony PMW-320 XDCAM MXF in iMovie 11/8/9 without any rendering or incompatibility problem.

Read More:

Monday, June 24, 2013

Import & Edit Panasonic HC-V720K 1080 60p/50p MTS files in Final Cut Pro X

In this post, you can get the info of Panasonic HC-V720K camcorder and learn how to import and edit Panasonic HC-V720K 1080 60p/50p AVCHD MTS in Final Cut Pro.
 
The Panasonic HC-V720K Live Streaming HD Camcorder features a 1/2.33" MOS sensor for recording Full HD 1080/60p video in the AVCHD format. The 21x zoom lens has a fast f/1.8 max aperture and a 35mm equivalent of 28-729.6mm, and the optical zoom is supplemented by an 50x Intelligent Zoom. Built-in Wi-Fi enables real time broadcasting via Ustream, and Near Field Communication technology allows users to connect a smartphone or tablet in one touch. Other features include a 3" LCD touchscreen monitor, Five Axis Hybrid OIS, 5.1-channel surround sound, and iA Plus Mode.


Panasonic HC-V720K camcorder works great, takes good video, and now I can easily create and share videos instantly from just about anywhere with it. Discover the power of instant sharing with Ustream, the ability to add excitement to your videos with built-in creative effects, and the delight in making high quality HD videos with ease. After making some footage with Panasonic HC-V720K camcorder in 1080 60p/50p AVCHD format, I'd like to edit the video from HC-V720K with Final Cut Pro X and upload the edited video to MySpace, but I was frustrated that HC-V720K 1080 60p/50p .mts file could not be imported into FCP X.

After googling, I was recommended to transcode V720K 1080 50/60p videos to Prores MOV for FCP X along with some help from a 3rd-party Pansonic AVCHD Converter for Mac.

If you looking for a solution for this problem likewise, check out Pavtube's iMedia Converter for Mac which is entitled as a top Panasonic MTS to FCP Converter. It supports encoding all Panasonic 1080p 50/60P AVCHD MTS files to Apple ProRes 422 so that you can easily and smoothly edit Panasonic HC-V720K Camcorder 1080 60p/50p recordings in Final Cut Pro X for editing on Mac. This will help you import the file correctly and saving the rendering time. 

Here is the step-by-step guide for you to import and edit Panasonic HC-V720K 60p/50p MTS to Prores MOV for Final Cut Pro X editing with Mac OS X like Mountain Lion, Lion, Tiger, Leopard, Snow Leopard. 

Step 1: Free Download and install Panasonic 50/60p MTS to FCP Converter to your Mac. It's excellent Panasonic AVCHD Converter which can convert nearly all Panasonic camcorder videos to any formats you need, such as Apple Prores 422 MOV, Apple InterMediate Codec MOV, QuickTime MOV, etc.


Step 2: Click the format bar, and move mouse cursor to "Final Cut Pro > Apple ProRes 422 (*.mov)" as output format for editing in Final Cut Pro X.

Here we recommend the Apple ProRes 422. In the settings you will find Pavtube allows you to keep the original frame rate 50/60fbps in the final ProRes files.


Step 3. Click "Convert" button to start transcoding Panasonic HC-V720K AVCHD 50/60p videos to FCP Apple ProRes on Mac OS.

After a shot conversion, you will be able to import/load Panasonic HC-V720K 1080 50/60p videos into Final Cut Pro X for editing without rendering.

Tips: Before you try to do the conversion, if you are also a FCP X user, please make sure that you have installed the Apple ProRes Codec manually since the FCP X asks users to install it by themselves.

Read More:

XAVC to AIC -Solution for Importing & Editing Sony PMW400 XAVC videos in iMovie11/FCE 4

Maybe you have come across Sony PMW-400 XAVC to iMovie/FCE imprting questions and here offers you the best solution for editing PMW-400 XAVC in iMovie 11 and FCE 4.

After the successful sale of PMW-F55 and PMW-F5 all over the world, Sony keeps on developing more new models so as to gain more market share and to solidify its position in the already-full HD cameras market. To our excitement, Sony is planning to launch another new shoulder-mount camcorder which’s likely to be called Sony PMW-400 in August, 2013.

According to Sony’s official website, PMW-400 is an “affordable” broadcast camera with three 2/3-inch high quality Exmor CMOS sensors – boasting good low-light sensitivity of F12 at 59.94Hz and F13 at 50Hz. It is said that it will be shipped with a a 16x zoom HD lens and a 960×540 color LCD viewfinder with high resolution. Just like PMW-55 and PMW-F5, this PMW-400 adapts and supports Sony’s peripheral XAVC codec to offer 10-bit HD422 recordings, including XAVC Intra frame 10-bit HD422 100Mbps and XAVC Long GOP 10-bit HD422 (low bit rate).

Speaking of XAVC, perhaps it is still new to some people. XAVC is a high-efficiency codec version designed to be used in a broader content production market. For mac users, iMovie and FCE are two kinds of easy-use tool to edit videos, however, you will find some XAVC footage from Sony PMW400 is not editable with iMovie11/FCE 4, such files will not be shown when you try to import. Keep reading and below is a quick and easy solution for solving the problem. 

To import Sony PMW400 XAVC files to iMovie 11 and FCE 4, the best way is to convert PMW400 XAVC to iMovie/FCE compatible AIC codec. To finish this job, a professional XAVC to AIC Converter for iMovie/FCE is necessary, and here, Pavtube XAVC Video Converter for Mac is highly recommended here.

How to convert Sony PMW400 XAVC/XAVCS media to AIC for iMovie11/FCE 4

Step 1. Install and launch the Pavtube HD Video for Mac, click "add videos" to load individual videos, or click "add from folder" to load the whole folder.


Step 2. Click "Format" preset and choose "iMovie and Final Cut Express-> Apple InterMediate Codec (AIC) (*.mov)" as best video format for editing Sony XAVC in iMovie and FCE as well as good video quality.


Step 3. now click "Convert" and let it go. The XAVC to AIC Converter for Mac supports batch conversion, so if you have lots of xavc videos to convert, check 'Shut down computer after conversion', and you can go away without keeping an eye on it.

Tips: When the conversion is finished, you can import the converted XAVC file to iMovie 11/FCE 4.

Now you are free to import/edit Sony PMW400 XAVC videos in iMovie 11 and FCE 4 under Mac without problems.

Related articles:

Edit F55/F5 XAVC in Sony Vegas
Burn XAVC to DVD

Sunday, June 23, 2013

Fast and Easy way to Convert Panasonic AG-HPX300 MXF to Apple Aperture 3

In order to edit Panasonic AG-HPX300 MXF clips in Apple Aperture 3 smoothly without codec problems,, you can follow this post to laern the best and easy way.  

Panasonic AG-HPX300 is a 1/3″ CMOS camera featuring full resolution 1920×1080 chips. The camera’s ENG frame comes equipped with a Fujinon 17x lens, making it the most affordable full-sized shoulder mounted camera available. The HPX300 has a feature-set including timecode, genlock and HD-SDI, which is usually found only on more expensive cameras. More importantly, the HPX300 can record Panasonic’s premiererecording format, AVC-Intra. When shooting in AVC-Intra mode the camera has the ability to shoot full-raster 1080p footage at 10-bit 4:2:2 color, something unheard of at this price-point.


The HD Camcorder shoots recordings in MXF file format. After make some footage on the Panasonic AJ-HPX3700, you may find your Apple Aperture 3 can't support Panasonic AJ-HPX3700 footages well. Then you have to look for the easy and fast workaround for editing Panasonic AJ-HPX3700 MXF files in Aperture 3 on Mac OS X Lion.

After google search, I find Pavtube MXF Converter for Mac which is the best professional MXF Converter for Mac software tool to make the Panasonic AJ-HPX3700 videos compatible to le Aperture 3. It would Convert Panasonic AJ-HPX 300 P2 .mxf files to Apple Aperture best supported video formats, such as Apple ProRes codec MOV, so that I can import onic AJ-HPX3700 MXF to Aperture 3 smoothly,  then you can edit the AJ-HPX3700 video in Apple Aperture without any crashing problem ank keep the original quality.

Now, you can follow the easy step by step tutorial, you will get to know how to convert Panasonic HPX300 MXF to Aperture 3 on Mac OS X Lion by yourself.

Step 1: Download Pavtube Mac MXF to Aperture Converter and import your HPX300 .mxf file.


Step 2: Click format column and choose the output format. You are recommended to choose Final Cut Pro -> Apple ProRes 422 (*.mov), it's great for editing in Apple Aperture.


Step 3: Click settings button to adjust the output video's parameters, such as bitrate, resolution, etc.


Step 4: Start converting Panasonic AJ-HPX3700 1080p MXF videos to ProRes codec for Apple Aperture 3.

After converting, you can load Panasonic AJ-HPX3700 footage to Apple Aperture for editing as you want, now you can have a try. Good luck!

See also: 

Saturday, June 22, 2013

The world's first Android-based mirrorless camera- Samsung Galaxy NX Hands-on

It's long been rumored, and it's finally happened: the interchangeable-lens camera has just stepped into the modern, connected world and become a smart device!

After last year's Galaxy Camera, Samsung split in two directions. It went closer to the phone with the Galaxy S 4 Zoom, shrinking the form factor (and some of the specs) for something that closer approximates a pocket-friendly device, and it got serious about interchangeable-lens cameras. 

Now Samsung has announced the Galaxy NX: the world's first mirrorless interchangeable lens camera running the Android operating system. The Galaxy NX takes a 20.3 megapixel, SLR-style mirrorless camera and adds 3G, 4G LTE and Wi-Fi, connectivity and Android 4.2 (Jelly Bean). The camera sports a gigantic 4.8" HD LCD touchscreen - with which you'll control nearly all camera functions. The Galaxy NX will be available sometime this summer for an undisclosed price.


Samsung NX, not surprisingly, draws much from the company's experience not only with smartphones -- a section of the market in which it has a dominant presence -- but also from 2012's fixed-lens Galaxy Camera. Like that model, the Galaxy NX is a quad-core device that runs Google's Linux-based Android 4.2 Jelly Bean operating system, along with built-in 3G / 4G LTE and Wi-Fi wireless connectivity.

Beneath the skin, the Samsung Galaxy NX is pretty similar to the Samsung NX300, in terms of its imaging hardware, using the same 20.3 megapixel image processor and DRIMe IV branded image processor. On the rear is a huge 4.8-inch high definition LCD panel and SVGA electronic viewfinder. Sensitivity ranges to ISO 25,600 equivalent, and the Samsung Galaxy NX is capable of swift 8.6 frames per second burst shooting.
 Samsung has yet to announce pricing or availability for the Galaxy NX, which the company has just revealed at a global press conference. Nor has it yet revealed which carriers will be offering the Samsung Galaxy NX in the US market, or overseas.

We've already been hands-on with this extremely interesting compact system camera, though -- so if you want to know more, you'll want to read our Samsung Galaxy NX review for first impressions.

Thursday, June 20, 2013

Best workflow for editing Canon EOS 700D/T5i 1080p footage with Final Cut Pro 6/7

With the best Canon MOV to Prores Converter, your Canon 700D/Canon T5i 1080p footage workflow with Final Cut Pro 6/7 will be smmoth and native.

Canon EOS 700D/Rebel T5i is an awesome Digital SLR camera which attributes an 18.0 Megapixel APS-C size CMOS sensor and Dual DIGIC four Image Processors, capturing tremendous pictures at as much as ISO 12800 and speeds of as much as eight.0 fps. Body surface treatment process and key made optimized feel better.


As 650D does, Canon 700D records FULL HD video in a highly compressed video format MOV, which is not an ideal editing format for FCP 6/7. Of cource, you may downloaded the update from Canon, and it is reading the Canon alternatives on FCP, but dragging the mov's into Log & Transfer isn't working. It keeps saying "Can't Read" or "Not Compatible."

So to make it easy to use Canon 700D/T5i 1080p footage in Final Cut Pro 6/7, the conversion between MOV to FCP is necessary. Now Pavtube HD Video Converter for Mac gives you the ability to edit Canon EOS 700D in Final Cut Pro 6/7. Before importing EOS 700D MOV to FCP 6/7, you should transcode Canon MOV videos to FCP preferred movie types: like ProRes .mov, and Apple ProRes is the greatest choice for maintaining the highest quality and performance while requiring less storage space than uncompressed HD video.

Here comes the step-to-step guide to convert Canon T5i/700D footage to ProRes 422 for FCP 6/7.

For the preparation of this conversion, connect your Canon 700D/Canon T5i MOV to iMac or Macbook and transfer MOV video files into hard drive.

Step 1: Load Canon 700D/Canon T5i MOV video files into this program.
Run Pavtube HD Video Converter for Mac as a Canon MOV to FCP Converter, and click the "Add" button to load 700D/T5i.mov footage.


Hints: Batch video files are allowed to be imported,therefore joining several video files into big one is supported by ticking the checkbox of "Merge into one file" under the preview window.

Step 2: Choose Apple ProRes 422 MOV as the output video format and specify the destination folder.
Click on "Format" bar and set a FCP friendly codec in dropdown-list. You are advised to follow "Final Cut Pro" template and choose "Apple ProRes 422 (*.mov)" as an optional format for converting Canon 700D/T5i MOV files to Final Cut Pro 6/7 


Step 3: Edit Canon 70D/Canon T5i MOV video files.(Optional)
Click the big button "Editor" and another interface comes out for you to perfect video files. As it shows, some editing options are provided, and there you are free to crop unwanted video parts, trim video length and add interesting video to original one.

Step 4. Start the process to transcode Canon EOS 700D(T5i) mov files to ProRes 422.
Click the button "Convert", this conversion will begin immediately. And after a few minutes, Prores MOV files are ready for you to edit on Final Cut Pro 6/7.

Hope this guide "Canon 700D 1080p footage workflow with Final Cut Pro 6/7" really do some help, and this Mac Canon H.264 to Prores MOV Converter also supports importing Canon EOS 700D/T5i MOV to iMovie/FCE with AIC MOV Format. It will surely become your ideal assistant in your digital.

Read Related Articles:

Wednesday, June 19, 2013

Effortlessly import Sony PMW-500 XDCAM MXF to Adobe Premiere Pro CS5

Summary: If you want to edit Sony PMW-500 MXF footages to Adobe Premiere Pro 5 on Mac, and have PMW-500 XDCAM MXF to Premiere importing issue, you can follow this article to convert Sony XDCAM MXF to Premiere best prores codec and edit without rendering.

As Sony's first XDCAM HD422 camcorder, PMW-500 comes with solid state recording and features three 2/3”-type 2.2-megapixel full-HD progressive CCDs. In addition, it records high-definition video with 1920×1080 and 1280×720 resolutions up to 50Mbps using MPEG-2 4:2:2P HL compression technology.

While, for some Adobe users, they may be frustrated by importing PMW-500 XDCAM HD422 MXF files to Adobe Premiere Pro CS5, some error messages during the editing process as the XDCAM MXF still cannot fully supported by some video editors like Adobe Premiere Pro.

So if you are using Adobe Premiere Pro for editing just like that, the best workaround for us is to convert Sony PMW-500 MXF to Adobe Premiere Pro CS5 MOV, which is the most compatible format for Premiere Pro CS5, and it will make the editing work much smooth and easier.

To do this job, Pavtube iMedia Converter for Mac is a good choice. It is capable of converting Sony XDCAM, Canon XF, Panasonic P2 MXF files as well as Blu-ray and DVD discs to Adobe Premiere Pro CS5 for editing smoothly. The process is easy and quick, and you can join of multiple mxf videos into one file. What's more, the editing feature to trim the recorded videos is great, as you can control the content for conversion.

Supported cameras include:

Sony PMW-500, PMW-320,PMW-150...
Canon XF100,XF105, XF300, C300,C500 ...
All Panasonic cameras with P2 cards...

Now please follow the steps below to know detail conversion steps.

Guide to import Sony PMW-500 XDCAM MXF to Adobe Premiere Pro CS5 with ease

1.Download Sony XDCAM MXF Converter for Mac. It's an excellent software which can convert Sony PMW-500 XDCAM MXF to MOV for Adobe Premiere Pro CS5 on Mac, more output formats are also supported, such as MOV, AVI, etc.
  

2.Install and launch the top Sony XDCAM MXF to Premiere Converter Mac, import the Sony PMW-500 MXF video you want to convert.


3. Click format column and choose Adobe Premiere/Sony Vegas > MOV (AVC)(*.mov) or MPEG-2 Video (*.mpg)” as the best video format for editing in Adobe Premiere Pro CS5 on Mac .


4. You can customize output parameters as you want. Adjust the resolution, bitrate, etc according to your need; you can also keep the parameters as original.

5. After these steps above, click convert button to start transcoding Sony PMW-500 MXF to MOV for Adobe Premiere Pro CS5 on Mac.

As soon as the conversion process finished, you can click “Open” button to get the generated file that is ready for editing with Premiere Pro.

  • Start up Premiere Pro, choose File > Import…, and navigate to the source folder to import files. 

This Sony XDCAM to Premiere Pro converter will help you convert videos with best quality, and then you can edit Sony PMW-500 MXF in Adobe Premiere Pro CS5 on Mac as you want with no codec problems.

Read More: