Wednesday, July 31, 2013

Transcode Blu-ray to FCP 6/7/X preserving multiple audio tracks and subtitles

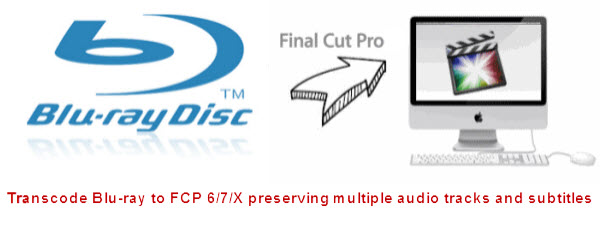
Having a lot of Blu-Ray Discs and want to edit the content with Final Cut Pro? The following article will show you how to transcode Blu-ray to Prores codec for FCP 6/7/X with multiple audio and subtitle tracks.


Final Cut Pro is a professional editing tool for Mac users. May be you are video hobbyists or independent filmmakers, and want to make some Blu-ray HD contents into your own film with FCP 6/7/X. However, FCP will refuse to accept blu-ray discs. So do you have the problem for importing blu-ray to FCP as below.

"I need to get scenes from a series of blu-ray disks (have permission) into FCP for editing a promo. I'm not adept at ripping Blu-Rays. Can anyone recommend a way to do this? I can't seem to find any software for Mac that deals with BDs. Thanks!"

"I want to edit some Blu Rays in Final Cut Pro, these are some projects of the kids for their grandparents. What is the best way to go about it? From what I have read, converting Blu-rays to Prores codec seems to be the best / easiest way. Is that correct? The top blu-ray ripping program for FCP? Any suggestions?

"Have been struggling with this for a while. Having a lot of blu-ray collections on my mac. When I use FCP for editing the Blu-ray files, they are grayed out. How to get these blu-ray video files into Final Cut Pro for importing. 

In this case, how can we rip Blu-rays and edit Blu-ray movies in FCP 6/7/X? FCP prefers Apple Prores 422 as the native editing codec. To ingest Blu-rays to FCP, the quick and easy way is to transcode Blu-rays to Prores so that you can easily get the files into FCP on Mac.
  
To do this, what I recommend is Pavtube Bytecopy for Mac , a powerful conversion program for  converting Blu-ray to Prores with multiple audio and subtitle tracks. Becides, it is capable of helping you to transcode Blu-ray discs to various output formats. Suppose you are good at both English and Francia, and want to preserve both of them from original Blu-ray discs when converting, that is what Pavtube ByteCoy can do for you. And you can select the audio you want when enjoying movies.

Now let's download and install it and follow the guide to see how to transcode Blu-ray to FCP 6/7/X preserving multiple audio tracks and subtitles.

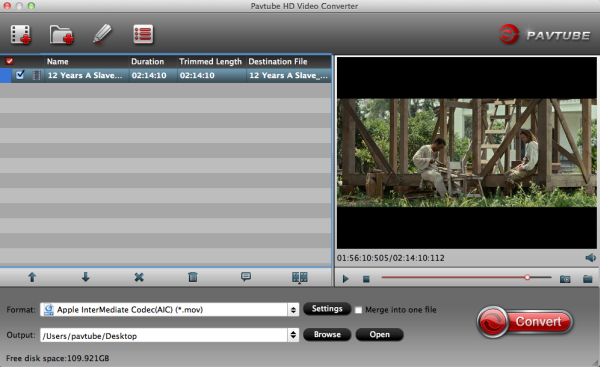
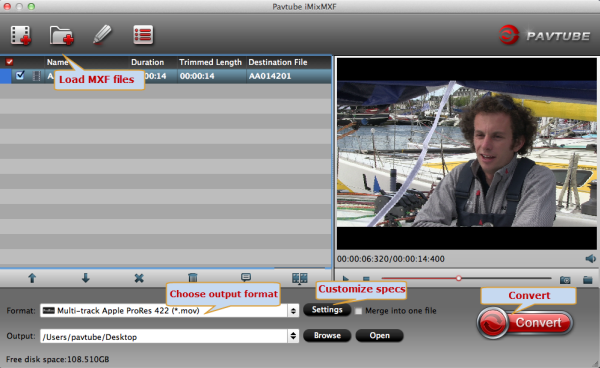
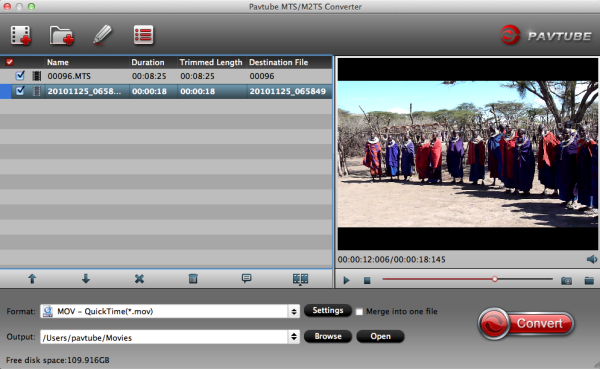
Step 1. Launch this Blu-ray to FCP Converter and click "" to load Blu-ray discs.


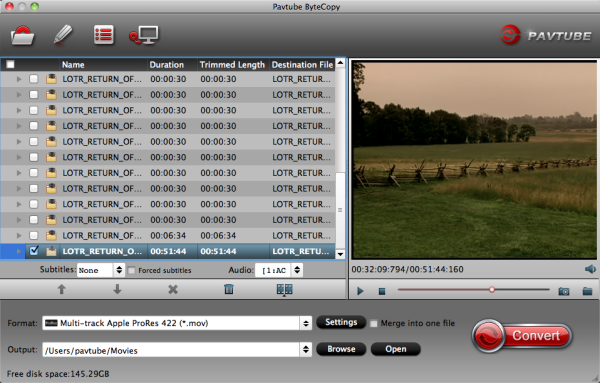
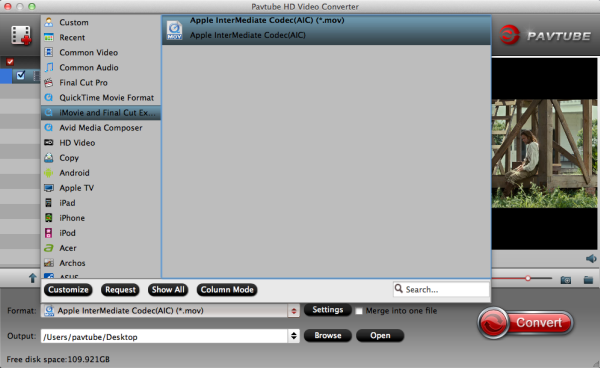
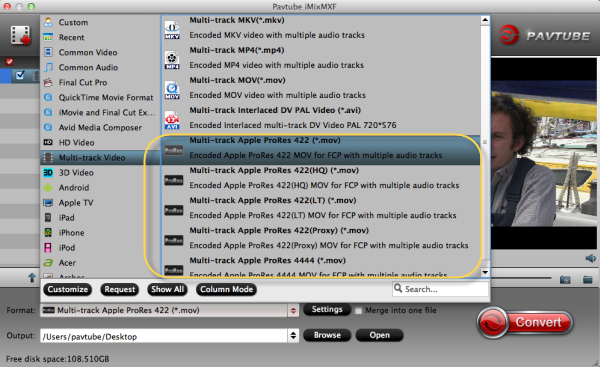
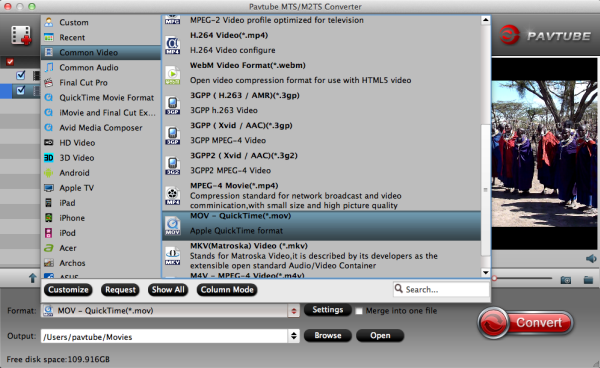
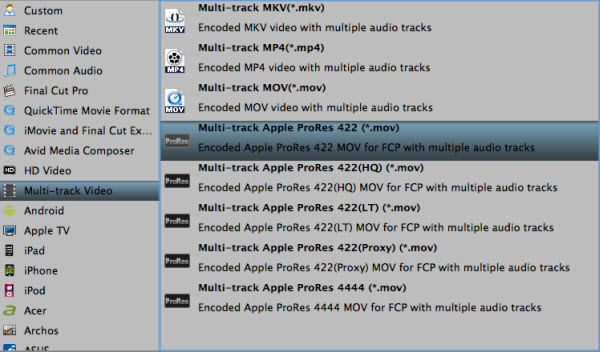
Step 2. Click "Format" to find "Multi-track Video" catalogue, select "Multi-track Video>Multi-track Apple ProRes 422(*.mov)" as output format for editing in FCP 6/7/X.


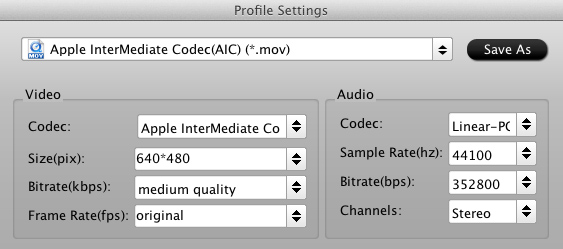
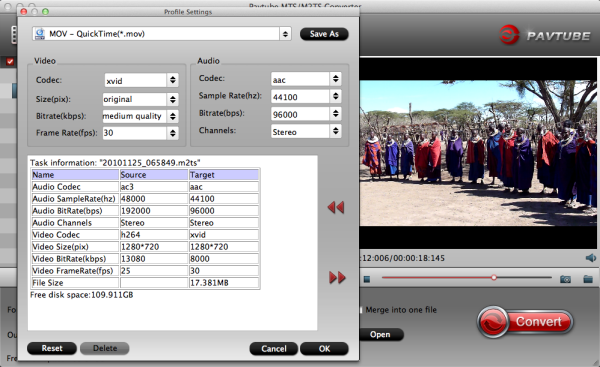
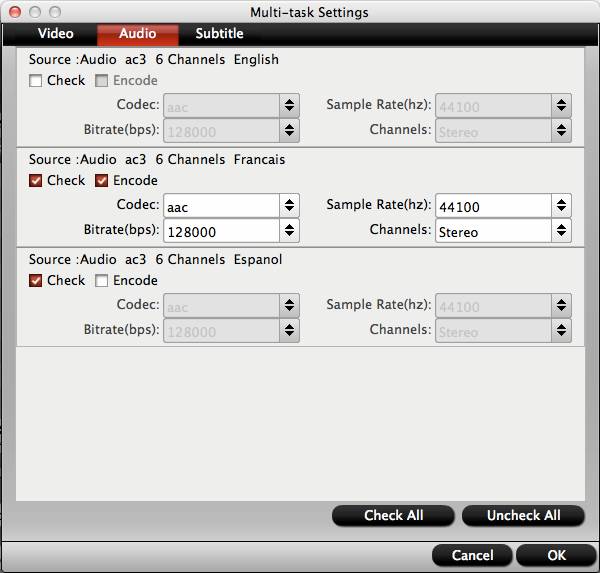
With output default "Settings" you can get all audio tracks preserved. In addition, if you want more customization, you can also uncheck the audio tracks you do not need to output. Just find "Audio" under "Settings" button, then uncheck the undesired audio.


PS. If you wanna add external subtitles(like *.srt, *.ass and *.ssa) in video, only click "Edit", choose "Subtitle" > "Enable", you need download a subtitle file, then click "Browse" to load it.
You can get to konw the best and top 5 Subtitle Sites to download subtitles you need here.


Step 3. Click "Convert" to start Blu-ray to FCPconversion, when completed, click "Open" to find the generated .mov files.

Obviously, it is easy to use the Blu-ray to Prores Converter to use Blu-ray HD contents in FCP 6/7/X preserving multiple audio tracks and subtitles, without any audio and video out of sync issue

And if you prefer to work with single audio channel and want to output each audio/video track separately, another Blu-ray/DVD Ripper for Mac software can do this for you, features in various output formats selection and editing options support. Worthy to point out that it also supports lossless quality output.

Related article: 

Tuesday, July 30, 2013

Can I import RMVB into iMovie on Mac OS X 10.9 Mavericks ?

This is an article about how to convert rmvb file to AIC codec for importing to iMovie on Mac OS X Mavericks, along with the introduction of  RMVB Converter for Mavericks.


RMVB,short for a variable bitrate extension of the RealMedia multimedia container format developed by RealNetworks. RMVB is typically used for multimedia content stored locally. Files using this format have the file extension ".rmvb".

RMVB files are extremely popular for distributing Asian content, especially Chinese television episodes and movies. For this reason, they have become noticeably present (though not entirely popular, partly due to their incompatibility with other media players) on file sharing platforms such as BitTorrent, eDonkey and Gnutella. So RMVB files can be great for online downloads.

Mavericks brings more iOS features into the MAC along with other tweaks including iBooks, Apple Maps, Finder Tabs, and a number of other time-saving enhancements. However, it becomes even harder for you to get RMVB files into video editing program like iMovie on Mavericks due to the unsupported codec. You may know pretty well that iMovie can only import DV, MPEG-4, MPEG-4 and M4V, etc, but iMovie can't recognize RMVB naturally.

To import RMVB files to iMovie on Mavericks without any problem, you require this professional RMVB to iMovie Converter to convert Variable Bite Rate RMVB first to iMovie acceptable AIC codec and then import RMVB to iMovie with constant bit rate, with super fast conversion speed and excellent output audio and visual quality. Basic edition function supported, including crop, effect, merge, snapshot and rotate.

With this RMVB Converter for Mavericks, you can perfectly enjoy .rmvb videos on any common video players on Mac OS X Mavericks. Only change .rmvb format to accepted one by your video player, e.g. Apple QuickTime, convert .rmvb/rm files to .mov, .mp4, .3gp; Windows Media Player for Mac, covert .rmvb to .avi, .mpg. Just follow the steps below to transcode RMVB to AIC for importing to imovie for editing on Mavericks.

Preparation: 

1. Install and launch the Mavericks HD Video Converter. You can directly drag and drop .rmvb/.rm video files to this software.


2. Click Format bar to choose the output format. Click and choose iMovie and Final Cut Express>Apple Intermediate Codec(AIC) (*.mov).


4.You can click "Settings" to customize the output parameters, adjust the resolution, bitrate as you want.


5.Start convert RMVB to AIC for iMovie editing on Mac OS X 10.9 Mavericks.

Click the "Convert" button to start transcoding RMVB to AIC .MOV videos to be compatible with iMovie.

After the MP4 to Prores conversion finished, you can easily import video files and projects into iMovie for further editing without any trouble. Congratulations! You have successfully taken the first step to make your own masterpiece.

With this RMVB to AIC Converter, you can easily change RMVB .rmvb/.rm files to iMovie for editing on Mac OS X mavericks

More Related Guides:

Import Canon VIXIA HF G20 1080 60i AVCHD to iMovie/FCE
Get Panasonic AJ-HPX2000 P2 .MXF into iMovie 6/8/9/11on Mac
Convert Lumix GM1 MTS for Editing in iMovie 11/9/8

Monday, July 29, 2013

Audio Track Mixer: Mix Canon C500 MXF to multi-track Apple ProRes for FCP 6/7

If you have problems with importing Canon C500 MXF to Final Cut Pro 6/7 on Mac, please follow this post below to know the esay solution to convert Canon C500 mxf footage to multi-track apple prores. 
 

Canon has officially announced the EOS C500, the professional 4K video camera output that it promised at the NAB trade show in April. A continuation of the concept of the C300, it can capture Raw 4K video footage and offers frame rates of up to 120fps in compressed 4K. It also captures 2K footage (2,048 x 1,080 pixels) at 12-bit, with 4:4:4 Y'CbCr chroma sub-sampling for high colour resolution.

With this professional EOS C500, you may have recorded many footage and want to do some editing work with FCP 6/7 to get better video effect. And you will find the following problem:

Q1: Using a card reader to download my footage shot with my Canon EOS C500 into FCP. My FCP 7 crashed while opening. If I am using Canon XF utility to backup the files, find out they are not readable? What's that? I am sure the videos are playable on C500. So strange. Any insight here how can I import these files into FCP 7?

Q2: I want to extract a small clip from my C500 and edit it in FCP 6, is there anyway to keep all my audio tracks? 

I believe you this is a common issue many new Canon users may meet, and most of them will choose to install a Canon C500 XF plugin for FCP. But unfortunately, at last they get little success: some don't want to upgrade, some has audio problems, and some may be confused with the complex procedure.

Then to make it smooth and easy to edit Canon C500 MXF to FCP 6/7 on Mac (including Mavericks 10.9), you can switch to a third party tool - Pavtube iMixMXF. I think it's much easier for me. It can not only convert Canon EOS C500 MXF .mxf to FCP 6/7 best editing codec Apple prores, but also has editing functions and unique multi-track preserving feature.

Convert Muti-track MXF files from Canon C500 to FCP 6/7 for editing

Step 1. Free download, install, and run Muti-track MXF Converter for FCP 6/7. Click "Add Video" button to load your source MXF clips or drag and drop the C500 MXF files to the converter. You are allowed to add multiple files to convert at a time.


Step 2. Click "format" bar to choose output format. Click and choose Multi-track Video>Multi-track Apple ProRes 422(*.mov), it's the best format for editing Canon C500 multi-track MXF files in Final Cut Pro 6/7.


Step 3. Adjust video and audio parameters. (Optional)

Click "Settings" button to customize the output video and audio settings by yourself. But if you are not good at it, you'd better use the default parameters, they will ensure you a good balance between file size and image quality basically. You can change the resolution, bitrate, frame rate as you need.

Step 4. When above steps finished, you can click "Convert" button to start transcoding Canon C500 MXF to mult-track ProRes MOV for Final Cut Pro 6/7 with a super fast speed.

With the excellent multi-track MXF to FCP Converter, you can work with Canon C500 MXF files in FCP 6/7 on Mac Mavericks with multi-track preserving and with best video and audio quality as you want.

Additional Contents

If you don't want to get multi-track videos or your videos has less that two audio track, you can try Pavtube MXF Converter for Mac, a profession MXF Converter and a good partner with your simple and efficient MXF conversion workflow on Mac.

Canon Related Tutorial:

Edit Canon XF100 MXF files in iMovie/FCE
Convert Canon XF300 MXF to ProRes for FCP/Premiere Pro
Edit Canon XF100 MXF video with Avid Media Composer
...

Saturday, July 27, 2013

Blackmagic Pocket Cinema Camera to Begin Shipping in 3-4 Days, 4K Camera Nearly Ready

A few days ago, we caught a glimpse of some more footage from the Blackmagic Pocket Cinema Camera, and it was quite excellent, to say the least. At that time we still had no idea whether or not the camera was going to start shipping anytime soon, and most of us believed that it probably wouldn’t. However, at Blackmagic’s LA event earlier today, the company announced that the Pocket Cinema Camera would begin to ship within 3-4 days in limited quantities and that the 4K Production Camera still needed more work before it begins to ship. 

Here’s the tweet from Ogy Stoilov at MRP Films which confirms the news from the event:


[Update]: Although the above tweet says that the 4K camera should be shipping by September, a source at Blackmagic Design has just informed us that the work on the camera should be completed within 2-3 weeks, and that it should be shipping sometime in August.

While I’m sure that some of you are absolutely thrilled about this development, it doesn’t seem likely that most folks will receive their pre-ordered camera for at least another couple of weeks or so. If previous shipping procedures are anything to go by, the “small quantities” of Pocket Cameras will be distributed somewhat evenly to resellers around the world, then they will slowly begin to trickle out into the film community from there.


Of course, the camera that many of us are waiting for, the Blackmagic Production Camera 4K, will not meet its estimated shipping date (not a big surprise considering we have yet to see any footage). We don’t know the exact reason for the delay, but since it’s another brand new sensor, it has to be properly calibrated to get the most out of it, and that’s probably the part that isn’t finished yet (since the camera was physically working at NAB 2013).

With that said, getting the Pocket Camera shipped this close to the projected shipping date, even if the quantities are limited, is a victory for Blackmagic Design, especially considering the ordeal with the original BMCC. I, for one, think that it’s a sign that Blackmagic is finally working out the kinks in its production model and gearing up to meet the massive demand for these cameras.

What do you guys think? Are you excited to see the BMPCC make its way into the wild? Is the fact that Blackmagic is closer to meeting their projected shipping dates a good sign for their future as a camera production company? Let us know in the comments!

Thursday, July 25, 2013

Make Sony NEX-FS100U 1080/60p mts editable in FCP X on Mavericks

Follow the guide below and you will know how to import Sony NEX-FS100U 1080/60p AVCHD to Final Cut Pro X without rendering on Mac Mavericks.


The NEX-FS100U super 35mm sensor camcorder is Sony's first fully professional large-sensor video camera. Hot on the heels of the PMW-F3, this compact, highly modular camera uses the same S35-size CMOS sensor as the F3. Able to shoot full 1080p video in a range of frame rates up to 60p, Sony FS100 provides the option of recording 28Mbps AVCHD footage onto SD or Memory Stick media.

When you are takeing part in applications like indie film, commercials, music promos, education, and wedding videos, Sony NEX-FS100U can be your best partner. After that, you may use Sony FS100U 1080/60p AVCHD recordings in a post-production FCP X workflow on Mac Mavericks.

Unfortunately, Mac users (including the latest Mavericks users) will get frustrated when importing FS100U 1080/60p AVCHD mts to FCP X due to the incompatibility of the AVCHD format and 60p high definition .As is known to us, Apple ProRes is the best editable Codec for Final Cut Pro (X). So to make Sony FS100U 50/60p AVCHD files compatible and editable with Final Cut Pro X, the best way is to transcode NEX-FS100U 1080/60p mts to Prores.

To accomplish this goal, this Professional Mavericks Sony AVCHD MTS Converter is your ideal tool. With it, you can easily convert Sony FS100U 1080p recordings to ProRes 422 MOV for FCP X on Mavericks with high quality kept.  Follow the steps below.
Good News! Pavtube Release a New Site - multipelife.com with Product Migration and Name Change.

To thanks for your continued support all along our previous site and the new www.multipelife.com, we are holding a 'New Site Special' with fantastic discounts up to 40% off. You can get 20% off BDMagic, 30% off ByteCopy, 40% off DVDAid and 20% off Video Converter Ultimate on Windows/Mac platform:

https://www.facebook.com/pavtubefans/app_209569249055691

Read more: http://pc-mac-compatibility-issues.blogspot.com/2014/05/pavtube-new-site-release.html


1.Download Pavtube AVCHD to FCP Converter.


2.Install and launch this AVCHD Converter for Mavericks. Import Sony FS100U 1080/60p mts footage to the Converter.


3.Click "Format" bar to choose the output format. Click and choose "Final Cut Pro -> Apple ProRes 422 (*.mov)" as Final Cut Pro X compatible codec for editing.


4.You can click "Settings" to customize the output parameters, adjust the resolution, bitrate as you want.

5.Click "Convert" button to start transcoding Sony FS100U 1080/60p AVCHD to ProRes for FCP X on Mac OS X Mavericks 10.9.

Now everthing is done, after conversion, you can easily import Sony FS100U 1080/60p mts files to FCP X for editing. This software runs fast, so you can do AVCHD to FCP conversion in less time, video and audio synchronization are perfectly guaranteed, and you can use accurate trim function when you edit Sony AVCHD video in the software before conversion.

Related Link:

Tuesday, July 23, 2013

Hasselblad unveils new Stellar compact camera modeled on Sony RX100

Hasselblad has just unveiled the new Stellar compact camera on the company's website. While Imaging Resource has not received any official announcement on the camera, which appears to be based on the Sony RX100 but with some distinctive exterior modifications, the Stellar has its own page on the Hasselblad site with images and some info on the camera. 


"The Hasselblad Stellar redefines quality with its elegantly designed aluminium body and metal operation controls," the Stellar page reads. "Only the finest materials are used to craft the ergonomic handgrip, making it a beautifully powerful, pocket-sized camera."

Hasselblad's strategy of sprucing up Sony cameras must be paying off -- that would explain Photo Rumors' apparent leak of the Stellar, a Hasselblad take on the RX100. The already high-end compact cam will reportedly switch to a tan metallic body and offer several choices of exotic grip material, including carbon fiber and padouk wood. There's no mention of functional upgrades over the Sony original, though. As with the Lunar, we're more likely to see a price hike instead -- Photo Rumors claims the Stellar should launch on July 26th for between $1,600 to $3,200, which would limit it to particularly well-heeled photographers.

See also:
Sony RX100 Mark II (M2) Hands-on

Convert Sony NEX-FS700U 1080/60p MTS to QuickTime MOV on Mac OS X 10.9 Mavericks

Follow the guide you can Convert Sony FS700U AVCHD files to QuickTime MOV on Mac OS X 10.9 Mavericks easily via Mac Sony AVCHD Converter.


Sony NEX-FS700U Reviews:

Hot on the heels of the FS100, this compact, highly modular camera uses a very similar-sized Super 35 CMOS sensor as the FS100. But as a marked improvement over that earlier model's sensor, Sony NEX-FS700U features a native 4K resolution sensor. - Unlike smaller, broadcast-style sensors or the larger "full-frame" sensors of some DSLRs, the NEXFS700's imaging area matches that of standard Hollywood film cameras, providing complete compatibility with cine-style film lenses (sold separately).

FS700U 1080/60p AVCHD shootings:

The Sony NEX-FS700U Super 35 Camcorder (Body Only) is a fully professional large-sensor video camera. Able to shoot full 1080p video in a range of frame rates up to 60p, the FS700 provides the option of recording AVCHD footage onto SD card/MemoryStick or via the FMU (flash memory unit) port, or it can output 4:2:2 video (with embedded timecode) via HDMI 1.4 or 3G/HD-SDI to an external recording unit.

Play Sony FS700U MTS with Mac QuickTime Player:

If you have shot some MTS videos with your FS700U, then you probably want to play the 1080/60p MTS files on Mac conveniently with Apple players like QuickTime. But unfortunately these AVCHD mts footage is not compatible with QuickTime Player on Mac OS X 10.9 Mavericks.

So you have the need to convert the format of AVCHD, M2TS or MTS from Sony FS700U to QT supported formats like MOV. The solution is easy to think, but to practice it, you need a professional AVCHD Converter for Mac to be your helper. Now, Pavtube AVCHD Converter for Mavericks will help you convert Sony FS700U 1080/60p AVCHD files to MOV for QuickTime playback on Mac OS X 10.9 Mavericks. With ultrafast conversion speed, loss-less video quality, broad format support and so on. Besides, you are able to convert any video file including AVCHD M2TS, MTS to FCP, iMovie or more formats with ease.

This article shows you the method about how to convert Sony FS700U 1080/60p AVCHD MTS to QuickTime on Mac ( Mac OS X 10.9 Mavericks included) step by step.

1. Download Pavtube MTS to QuickTime Converter, install and run, and import the Sony FS700U AVCHD files you want to convert.


 2. Click format bar and choose best output format for output. Click and choose common video -> MOV-QuickTime (*.mov). You can also choose other formats for output as you want.


3. You can click “settings” to adjust the output parameters, such as resolution and bitrate.


4. Edit function is very easy to use, you can trim, crop, add watermark or adjust effect.

5. Click convert button to start converting Sony FS700U 1080/60p AVCHD to QuickTime MOV on Mac OS X 10.9 Mavericks.

After conversion, you can use converted files for natively watching Sony FS700U 1080/60p AVCHD mts on QuickTime Player freely.

P.S. You can also know more about QuickTime Player and get more solutions at Sony Column.

Read More: