Friday, November 29, 2013

Convert 5D Mark III h.264 footage to ProRes 422 for FCP 7

In this guide, you will learn how to convert Canon EOS 5D Mark III mov to Apple ProRes on Mac OS X so that you can smoothly import/edit 5D Mark III videos in Final Cut Pro 7 without rendering time.

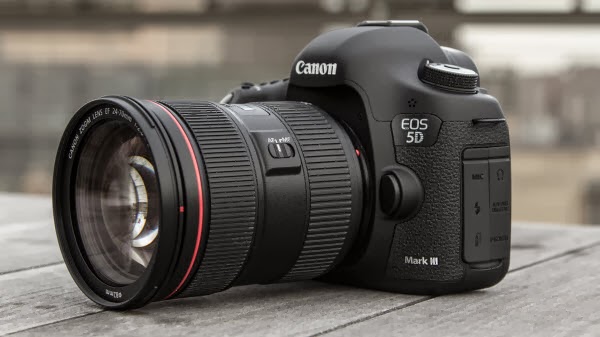
As the latest in its enthusiast full-frame 5D series and successor to the popular EOS 5D Mark II, Canon EOS 5D Mark III has been tested to be a great camcorder by a number of truly brilliant photographers across the globe who prefer to use it daily in all sorts of disciplines and locations, and attracted much attention even since it has not came out to the market. Based around a 22MP full-frame sensor, it can shoot 6 frames per second and features a 61-point AF system much like the 5D Mark III. It can capture 1080p movies at 24, 25 or 30 fps and offers high quality intraframe (All-I) video compression amongst a host of movie-related improvements.


Everything is good but the only problem, as many Canon DSLRs users may have, is the incompatibility which will jump out when you want to ingest Canon EOS 5D Mark III 1080p MOV files to Final Cut Pro 7 for editing on Mac. They will hit a snag in the form of a “contains unsupported media… invalid directory” error. You can import your files with Log and Transfer but you have to back up the ENTIRE CARD STRUCTURE from the beginning.

Obviously, what matters is not the MOV fomat, since it is fine while playing with QT player on Mac, but the H.264 codec. It is a highly compressed codec, great for playing/streaming videos. But as for editing H.264 MOV in FCP, it is not such a suitable choice. In order to make Canon 5D Mark III footages editable in FCP 7, you have to convert H.264 MOV to ProRes 422, the codec which is proved to be the most compatible one with FCP 7.

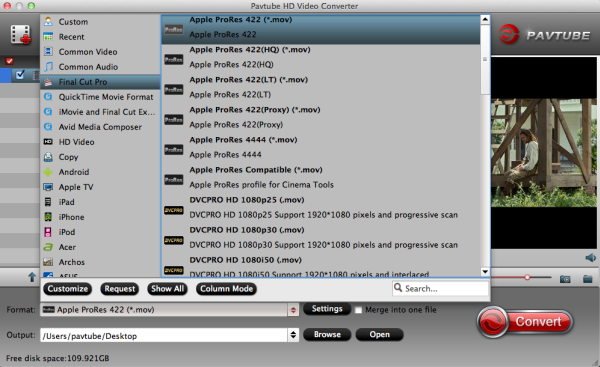
You are provided with five options, including Apple ProRes 422 HQ (*.mov), Apple ProRes 422 (*.mov), Apple ProRes 422 (LT) (*.mov), Apple ProRes 422 (Proxy) (*.mov) and ProRes 4444 (*.mov). Here listed the main difference of the five ProRes codecs.

a. ProRes 422 (HQ): offers the utmost possible quality for 4:2:2 or 4:2:0 sources and provides target data rate of approximately 220 Mbps and higher quality than Apple ProRes 422;

b. ProRes 422: provides target data rate of approximately 145 Mbps and higher quality than Apple ProRes 422 (LT);

c. ProRes 422 (LT): provides roughly 70 percent of the data rate of Apple ProRes 422 (thus, smaller file sizes than Apple ProRes 422) and higher quality than ProRes 422 (Proxy);

d. ProRes 422 (Proxy): provides roughly 30 percent of the data rate of Apple ProRes 422 and high-quality offline editing at the original frame size, frame rate, and aspect ratio;

e. ProRes 4444: offers the utmost possible quality for 4:4:4 sources and roughly 50 percent higher than the data rate of Apple ProRes 422 (HQ).

A top Video Converter for Canon 5DM3 and FCP 7 users should be developed with all the five options. Here recommended the best H.264 MOV to ProRes Converter for Mac in that it is not only capable of converting H.264 MOV files to Apple ProRes codecs, all 5 ProRes codecs included, but also able to rip your BD/DVD disc for editing.

What's more, you can make your work easier with some useful editing functions, including joining imported clips together for easy importing, trimming section of your file, adding text/image/video watermarks to your original files, replacing audio tracks, etc. Follow the Three-step conversion and you are capable of importing/editing Canon EOS 5D Mark III files in Final Cut Pro 7.

Three-step Guide for transcoding Canon EOS 5D Mark III H.264 MOV to Apple ProRes for FCP 7

Step 1: Free download and run the best Mac Canon MOV to ProRes Converter for FCP, and drag Canon EOS 5D Mark III H.264 MOV files to the software.

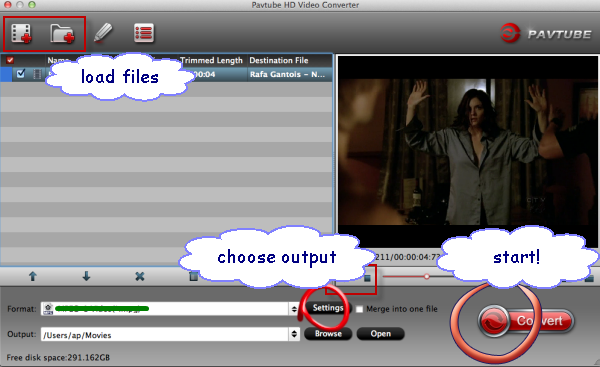
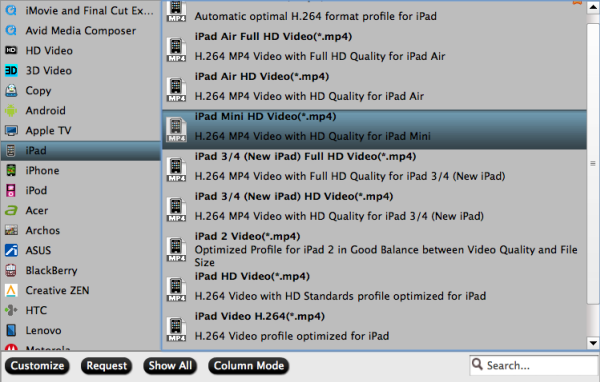
Step 2: Select output format for Final Cut Pro. You are advised to choose “Apple ProRes 422 (*.mov)”or “Apple ProRes 422 HQ (*.mov)” format.


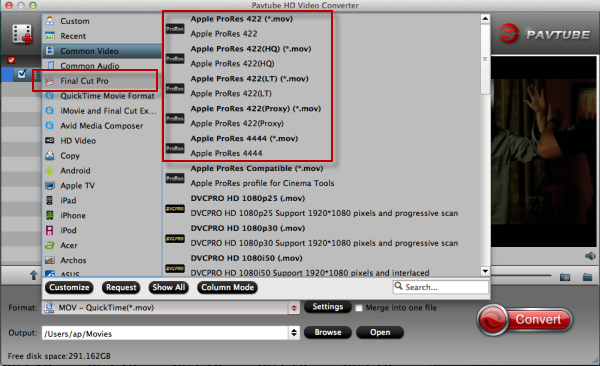
Due to the difference in the compresstion standard of AVCHD and ProRes 422, the converted files are significantly larger than the original ones. If you prefer smaller file size, please choose “Apple ProRes 422 (LT) (*.mov)” instead.

Since ProRes 422 (LT), ProRes 422 (Proxy), and ProRes 4444 have not been added to FCP 6, you’d better not set one of them as output if you happen to edit your H.264 files in FCP 6 before upgrading FCP 7.

Tips:

1. Settings- click to set video resolution(1920×1080/1440×1080/1280×720/720×480), bitrate(from 1Mbps to 20Mbps), frame rate (24p/30p)

2. Editor (next to “Add” icon)- click to set deinterlace, denoise, mute, volume up, trim, crop, etc.

Step 3. Click the “Convert” button to start converting H.264 MOV files to Apple ProRes on Mac immedaitely.

After converting the Canon DSLR EOS MOV video to ProRes format, you can easily import/edit Canon EOS 5D Mark III MOV files in Final Cut Pro 7 smoothly on Mac.

When the conversion is completed, please run the FCP 7 and click File –> Import –> Files for editing Canon EOS M files in FCP 7 without any rendersing and quality loss.

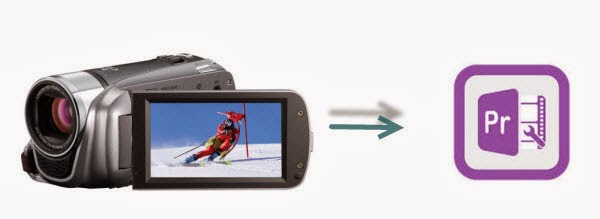
Besides the ability to transfter the EOS 5D Mark II files to FCP 7, the versatile Canon Video Converter for Mac can help you ingest/edit H.264 MOV files into FCP X, iMovie, FCEAdobe Premiere Pro, Adobe Premiere Elements, Adobe After Effects, Avid Media Composer, etc.

Hope you enjoy it!

Read Related Articles:

Wednesday, November 27, 2013

Pavtube Black Friday Deal - Play to Win! Earn $30 Amazon gift card and Free products

2013 Black Friday & Christmas shopping season starts on November 29, 2013. At Black Friday & Cyber Monday shopping season, how to prepare and make shopping plans? Come to play Sudoku and earn $30 Amazon gift card and extra coupons for any Pavtube products now.


Any plans lined up for the special day? With so many ads posted all over online and offline, are you tried of waiting in front of stores or browsing the Black Friday ads? How about having some fun: come and play Sudoku to earn $30 Amazon gift card, Free or Up to 50% OFF for any Pavtube Blu-ray/DVD/Video/iTunes programs.

Do you Sudoku?

Take"Evil level" to go~

https://www.facebook.com/pavtubefans/app_192602997444667

Difficult?
Take it easy
Click "Medium level" or "Easy level"to go!

Good luck~

* All participants will get 30% discount at least!
* Share this poster on Facebook to get 40% discount for any Pavtube product.
* Write movie review for your favorite movie to get 50% discount for any Pavtube product, or even free if your movie review is confirmed to be excellent by us.

For Sudoku players:

Losers: 30% discount for any Pavtube BD/DVD/video converter series if they send us answer by Message only via Facebook.

Lucky winners will be automatically chosen from replied persons and get bonus below:


Easy level: 100 lucky winners are allowed for 40% off for any Pavtube product
Medium level: 2 lucky winners are allowed for 50% off for any Pavtube product or USD 10.00 Amazon coupon.
Evil level: Only 1 lucky winner is allowed for any Pavtube product for free or USD 30.00 Amazon coupon.

Rules: Fill the grid so that every row, every column and every 3x3 box contains the numbers 1 to 9.

Send answer by MESSAGE only via Facebook.
***DO NOT reveal your answer by replying directly***

Lucky Winners will get the for Pavtube discount product or Amazon Coupon after the exact need is confirmed in their message.

It will be expired on 2-Dec,2013

Come on! Click here: https://www.facebook.com/pavtubefans/posts/659389654105474

Source: http://video-tips.jimdo.com/2013/11/27/2013-black-friday-deals/ 

Monday, November 25, 2013

Best way to import Sony Alpha NEX-5T MTS to iMovie & FCE

This article teaches you how to easily convert and import Sony Alpha NEX-5T MTS footage into iMovie or Final Cut Express for further editing on Mac (OS X 10.9 Mavericks included).

Sony brought its NEX mirrorless camera series into the hybrid autofocus age, with the debut of the NEX-5R. Just ten months later, that camera gets a more modest refresh, with the arrival of the Sony NEX-5T.


Sony Alpha NEX-5T can record Full HD (1920 x 1080 pixel; 1080p/1080i) movies at a rate of either 60 frames per second, 24 frames per second, or 60 interlaced fields per second. (In some markets, the 60p/60i rates are replaced with 50p/50i rates, and the 24p rate with 25p.) You can also opt for lower-res 1440 x 1080 and 640 x 480 movies, with a fixed rate of 30p (25p on overseas models).

At the maximum resolution, movies are saved using AVCHD version 2.0 (MPEG-4 AVC / H.264) compression with AC-3 stereo Dolby Digital audio. At lower resolutions, movies are saved with MP4 compression and MPEG-4 AAC-LC stereo audio. Most users would like to make some editing with MTS footage from Sony Alpha NEX-5T, but problems came up as AVCHD is not a friendly format for editing in iMovie and FCE.

To solve the problem, you'd better transcode Sony NEX-5T AVCHD mts footages to AIC MOV for iMovie and FCE first. And here you need some third-party program to help. Pavtube MTS/M2TS Converter for Mac is an ideal choice for me. It works very well in the past months and also you can choose to output the video as 1080p or other size. It can convert Sony NEX-5T AVCHD MTS video to AIC codec .mov format, and then you can edit Sony Alpha NEX-5T MTS files natively in iMovie and FCE on Mac (OS X 10.9 Mavericks included).

Step 1. Free Download the Converter, install and run. And then import Sony NEX-5T recorded mts videos to the MTS to AIC converter.


PS: It's an excellent Sony AVCHD Converter for Mac which can also transcode MTS to an editable format like ProRes for FCP, AIC for iMovie/FCE, MPEG-2 for Adobe; to a playable format for putting on portable devices or uploading to YouTube.

Step 2. Click the format bar, and move mouse cursor to "iMovie and Final Cut Express > Apple Intermediate Codec(AIC) (*.mov)" as output format.


Step 3. Click convert button in the main interface to start transcoding Sony Alpha NEX-5T mts files to AIC fro editing in iMovie and FCE on mac.

Some more helpful features of the Sony MTS to AIC Converter:

1. Settings- click to set video resolution(1920×1080/1440×1080/1280×720/720×480), bitrate(from 1Mbps to 20Mbps), frame rate (24p/30p)

2. Editor (next to "Add" icon)- click to set deinterlace, denoise, mute, volume up, trim, crop, etc.

After the workflow, you can go to the output folder to find the converted video files. Now you are free to import/edit Sony Alpha NEX-5T AVCHD files in iMovie and FCE under Mac (OS X 10.9 Mavericks included) without problems.

See also:
Load Canon VIXIA HF S100 MTS to FCP X

Read More:

Friday, November 22, 2013

Transcode Canon EOS 70D H.264 MOV to ProRes 422 for FCP

The article shows you the best workaround for editing Canon EOS 70D videos in FCP by transcoding Canon H.264 .mov to FCP native editing format - Apple Prores 422 Codec.


I'm working on a feature on my mac, shot on Canon 70D, and am in the process of converting all my MOV files to manageable ProRes files. But I am unsure how to do this. Can someone give me a basic rundown of the procedure? I would be most appreciative.

This question is from one of my client, if you have used Canon 70D camera and recorded many 1080p videos, then how to ingest Canon 70D mov video into FCP for editing without crashing problem and avoid rendering?

In fact, MOV video format came from Canon 70D is a long GOP format that is highly compressed, which means it is not convenient for editing on Mac with Final Cut Pro. To import Canon EOS 70D 1080P video to Final Cut Pro for editing, the best way is to convert Canon EOS 70D 1080p HD MOV video to Final Cut Pro native Apple Prores .mov video on Mac.

Mac Canon h.264 MOV Converter is a professional HD video converter for you to easily convert Canon 70D 1080P video to Apple ProRes 422 so that you can easily import the Canon h.264 recordings to Final Cut Pro X, Final Cut Pro 6, Final Cut Pro 7 for editing on Mac. This will help you import the file correctly and saving the rendering time.

Below is a brief guide for you.

How to import Canon EOS 70D H.264 MOV footage to Final Cut Pro on Mac?

1. Free Download and run the best Canon H.264 MOV converter and drag 70D MOV files to the software.


2. Click format bar to choose output format for use in FCP 6/7 or FCP X. For editing Nikon MOV on Mac, you can choose Apple ProRes 422 for FCP.


Tips:

Here listed the main difference of the five ProRes codecs.

a. ProRes 422 (HQ): offers the utmost possible quality for 4:2:2 or 4:2:0 sources and provides target data rate of approximately 220 Mbps and higher quality than Apple ProRes 422;

b. ProRes 422: provides target data rate of approximately 145 Mbps and higher quality than Apple ProRes 422 (LT);

c. ProRes 422 (LT): provides roughly 70 percent of the data rate of Apple ProRes 422 (thus, smaller file sizes than Apple ProRes 422) and higher quality than ProRes 422 (Proxy);

d. ProRes 422 (Proxy): provides roughly 30 percent of the data rate of Apple ProRes 422 and high-quality offline editing at the original frame size, frame rate, and aspect ratio;

e. ProRes 4444: offers the utmost possible quality for 4:4:4 sources and roughly 50 percent higher than the data rate of Apple ProRes 422 (HQ).
Step 4. You can click “settings” to customize the output parameters, adjust the resolution, bitrate as you want.

Note 1: You are allowed to adjust output video and video parameters. However, if you have no idea about profile setting, keep it as original recordings will provide you the files with less quality loss, and keep default settings is also a good choice for your to get a high quality files.

Note 2: In order to get customized videos, you can add subtitles to your own videos.

3. Click convert button in the main interface to start converting Canon 70D H.264 MOV videos to Prores for FCP.

Some more helpful features of the app:

1. Settings- Click to adjust the output parameters, such as resolution, frame rate, etc, customize the parameters as you want.

2. Editor (next to "Add" icon)- click to set deinterlace, denoise, mute, volume up, trim, crop, etc.

After converting the MOV to ProRes format, you can easily import/edit Canon EOS 70D h.264 mov files in Final Cut Pro 6/7 or FCP X smoothly on Mac.

Tips:

1. Before you try to do the conversion, if you are also a FCP X user, please make sure that you have installed the Apple ProRes Codec manually since the FCP X asks users to install it by themselves.

2. This Mac Canon MOV Video Converter can convert mov video to Prores with retaining timecode for FCP.

Refer to the picture below to see how this cool mac H.264 converting tool keep the timecode for FCP. It is not difficult to find that the timecode is kept.


3. Pavtube HD Video Converter can also convert Canon 70D mov videos to iMovie and FCE, Premiere Pro, Avid Media Composer, DaVinci Resolve, Apple Aperture 3 and After Effects CS6 with good quality, just download the and have a try.

Read Related Articles:

Thursday, November 21, 2013

Canon EOS Movie Plugin-E1 for Final Cut Pro 1.5 for Mac OS X

Editing Canon EOS footage in FCP? Follow our tips about Canon EOS Movie Plugin-E1 for Final Cut Pro 1.5 for Mac OS X. Any question with the plugin, you can refer to this article.


Canon EOS Movie Plugin-E1 for Final Cut Pro 1.5 for Mac OS X
  • Date Added: August 25, 2013 
  • Publisher:Canon
  • File Size: 5.87 MB
  • OS: Mac OS X v10.8, Mac OS X v10.7, Mac OS X v10.6
  • Download here.
  • Release Date: August 01, 2013.
This plugin application is for Final Cut Pro, which was released for users of EOS DIGITAL and Final Cut Pro. This plugin allows you to use the Log and Transfer function to edit movies captured with the EOS cameras.

Changes in EOS MOVIE Plugin-E1 for Final Cut Pro 1.5:
  • Supports EOS 70D.
The following software must be installed on the PC
  • Final Cut Pro 6.0.6
  • Final Cut Pro 7.0.3 and later
Supported Models:

EOS 5D Mark II *1,*2 :
  • 1920x1080(1080p) / 30.0fps, 29.97fps/23.976fps(NTSC), 25.0fps(PAL) / IPP
EOS 7D *2, EOS-1D Mark IV *2, EOS 60D:
  • 1920x1080(1080p) / 29.97fps (NTSC), 25.0fps (PAL), 23.976fps / IPP
  • 1280x720(720p) / 59.94fps(NTSC), 50.0fps(PAL) / IPP
EOS-1D X, EOS 5D Mark III, EOS 6D *3:
  • 1920x1080(1080p) / 29.97fps (NTSC) (Drop frame is selectable.), 25.0fps (PAL), 23.976fps / Selectable from IPB and ALL-I.
  • 1280x720(720p) / 59.94fps(NTSC) (Drop frame is selectable.), 50.0fps(PAL) / Selectable from IPB and ALL-I.
EOS-1D C :
  • 1920x1080(1080p) / 29.97fps/59.94fps(NTSC) (Drop frame is selectable.), 25.0fps/50.0fps(PAL), 23.976fps / Selectable from IPB and ALL-I *5
  • Super 35 mm Crop (1920x1080) *4 / 29.97fps(NTSC) (Drop frame is selectable.), 25.0fps(PAL), 23.976fps / Selectable from IPB and ALL-I *5
  • 1280x720(720p) / 59.94fps(NTSC) (Drop frame is selectable.), 50.0fps(PAL) / Selectable from IPB and ALL-I *5
EOS 70D *3 :
  • 1920x1080(1080p) / 29.97fps (NTSC) (Drop frame is selectable.), 25.0fps (PAL), 23.976fps / Selectable from IPB and ALL-I.
  • 1280x720(720p) / 59.94fps(NTSC) (Drop frame is selectable.), 50.0fps(PAL) / Selectable from IPB and ALL-I.
* 1. Video files recorded using EOS 5D Mark II with the firmware version 1.x.x requires THM file.
*2. If THM file does not exist, "Shooting Information" does not appear.
*3. Video snapshot is not supported.
*4. The video size of Super 35mm Crop is 1920 x 1080 and the video format is the same as 1920 x 1080 (1080p).
*5. Only ALL-I is selectable when recording video in 1920 x 1080 (1080p) at 59.94 fps or 50 fps.

Recent Drivers

Canon Digital Camera Software 2.3 for Windows XP/Vista/7/8 x86/x64
Canon EOS Movie Plugin-E1 for Final Cut Pro 1.5 for Mac OS X
Canon EOS Digital Solution Disk Software 28.2A for Mac OS X
Canon EOS Digital Solution Disk Software 28.2A for Windows XP/Vista/7/8 x86/x64
Canon Digital Camera Software 2.1 for Mac OS X

Tip: 

FCP needs a native editing codec, if you work on Mac OS X Mavericks 10.9 or use FCP X or have any issues with Canon EOS Movie Plugin-E1 for FCP, then transcoding in a 3rd party app is a feasible workaround.

Apps For Converting Canon EOS MOV Files

Pavtube H.264 MOV to ProRes Converter for FCP can help you to make it possible, it can not only transcode Canon EOS H.264 MOV to suitable video format for FCP, but also do some little editing some simple editing features, such as merging several videos into one file, deinterlacing the original footages, cropping video size, trimming video clips, adding special effects and text/image/video watermarks to output videos.

With it, you can batch transcode as many of them as you like and it works pretty quickly. The files look great and with high quality. I've used it for a long time and I've never had a problem with it. Thus it will be on the top of your list. 

Canon EOS MOV Conversion Tutorials:

Ingest Canon T4i/650D into Avid Media Composer
Convert Canon 1D H.264 MOV to FCP X with Apple ProRes
Does Sony Vegas like handling the Canon EOS-5D h.264 MOV files well

Tuesday, November 19, 2013

Mac Compatibility: Canon HF R20 AVCHD footage to Adobe Premiere Pro CS5

With this guide, you can smoothly import and edit Canon HF R20 AVCHD footage in Adobe Premiere Pro CS5 by transcoding Canon .mts to Premiere Pro most compatible MOV or MPEG-2 video.

Canon's VIXIA HF R20 Flash Memory Camcorder is a mid-range high definition camera that's packed with useful features and functions. Record 1920 x 1080 video to the R20's 8GB internal flash memory or to SD/SDHC or SDXC cards using the dual memory card slots. The VIXIA HF R20 allows you to record up to 3 hours of crisp high definition video to an 8GB internal flash drive or to two removable SD memory cards.


With 24Mbps recording, video is captured from Canon HF R20 at the highest bit rate in AVCHD. You get exceptionally lifelike tone and exacting detail. However, if you've got some of those MTS files from Canon HF R20 camcorder, you may find you can' open the mts files in Adobe Premiere Pro CS5. Although Adobe claimed that Premiere Pro CS5 and above offer much better native AVCHD support than its predecessor, there are still some video, audio codec problems while importing/editing AVCHD MTS clips in Premiere Pro. Plus, even the Adobe program can ingest your MTS files directly, it takes a long time for rendering.

As Canon HF G20 mts footage can't be supported well by Adobe Premiere Pro CS5, the best method to avoid the importing problems is to transcode Canon HF G20 MTS footage into a Premiere Pro most compatible format like MOV or MPEG-2. Here's a way to convert Canon HF G20 MTS to Adobe Premiere Pro CS5 without losing the quality.

At first, a 3rd party converter is needed. Pavtube MTS/M2TS Converter for Mac (Only $29) is the one I choose.Easy convert AVCHD .mts from Canon HF R20 1080/60p MTS to mov files, which will fast import into Premiere Pro for editing. As for video quality, at least I cannot distinguish any loss by naked eyes.

Steps to transcode Canon HF R20 MTS for Adobe Premiere Pro CS5

1. Free download Pavtube AVCHD Converter for Mac. Install and launch. Click "Add" or "Add from folder" to import your mts files from Canon HF R20.


2.Click format bar to choose the output format, you can click and choose "MOV (AVC) (*.mov)"  or "MPEG-2(*.mpg)" as output format under Adobe Premiere/Sony Vegas catalogue for Adobe Premiere Pro CS5:


Tip – Profile Settings:

In case the default settings do not fit your requirement, you can click “Settings” button and enter “Profile Settings” panel to adjust video size, bit rate, frame rate, sample rate and audio channels.

In order to get customized videos, you can add subtitles to your own videos.

The free Subtitle Edit will help you to edit your own subtitles then put it into videos.

3.Click convert button to start to transcode Canon HF R20 MTS files to Adobe Premiere CS5.

After conversion completes, you can import your converted media files to Adobe Premiere Pro on Mac for editing. In this way, you can easily and fast ingest your Canon HF R20 MTS videos in Adobe Premiere Pro CS5 on Mac.

Related guides:

Friday, November 15, 2013

Convert DVD to iPad series (iPad Air, iPad Mini 2, iPad 4, iPad 3, iPad 2, iPad) on Mavericks

With the excellent DVD Ripper for iOS device, you can easily convert and sync DVD movies to your iPad Air, iPad Mini 2, iPad 4, iPad 3, iPad 2, iPad for smoothly playback with your Mac OS X Mavericks 10.9. 


iPad Air, the 5th generation of Apple iPad tablet, is one of the most popular tablets in the market. IOS Tablet is often used to playbak video and listen to music. But the Apple iOS devices like iPad Air, iPad Mini 2, iPad 4, iPad 3, iPad 2, iPad only support only supports H.264, MPEG-4 video in .m4v, .mp4, and .mov file formats and Motion JPEG (M-JPEG) in .avi format. If your movie is in a DVD or it isn't already in one of the supported formats, you'll need to convert your DVD movies to iPad series friendly video formats first. Below is how and here we provide the Mac solution.

Free Download the App


Pavtube BDMagic for Mac is highly recommended. - An excellent Mac Blu-ray/DVD converter for iOS device which can help you decrypt and compress Blu-ray/DVD to iPad Air, iPad Mini 2, iPad 4, iPad 3, iPad 2, iPad optimized formats at ease on Mac OS X (Mavericks 10.9 included).


If you are a Windows user, you can use its equivalent Windows version -  BDMagic to finish your work on Windows PC (Windows Blue PC 8.1 included).

Good News! Pavtube Release a New Site - multipelife.com with Product Migration and Name Change.

To thanks for your continued support all along our previous site and the new www.multipelife.com, we are holding a 'New Site Special' with fantastic discounts up to 40% off. You can get 20% off BDMagic, 30% off ByteCopy, 40% off DVDAid and 20% off Video Converter Ultimate on Windows/Mac platform:

https://www.facebook.com/pavtubefans/app_209569249055691

Read more: http://pc-mac-compatibility-issues.blogspot.com/2014/05/pavtube-new-site-release.html

To be honest, I've had success using the software to convert my huge Blu-Ray and DVDs to a format playable by my iPad Mini 2 and iPad. I've found the quality to be excellent, and see no difference when compared to playing the discs themselves. Now just get the right 30% Discount DVD converter for iPad series to encode and transfer DVD movies to your iPad Air, iPad Mini 2, iPad 4, iPad 3, iPad 2, iPad for smoothly playback in just a few clicks on Mac.

Convert, Rip and copy DVD movies to iPad Air, iPad Mini 2, iPad 4, iPad 3, iPad 2, iPad on Mac OS X Mavericks 10.9

Step 1: Once run the Mac DVD to iOS Converter software, click on "BD/DVD disc" icon to load movie from DVD and Blu-ray source(Disc, folder, ISO).


Step 2: Click on "Format > iPad", you will find many profiles for iPad including all iPad models. The output videos could fit on iPad Air, iPad Mini 2, iPad 4, iPad 3, iPad 2, iPad perfectly.


Tips: If you like, you can click "Settings" to change the video encoder, resolution, frame rate, etc. as you wish. Remember the file size and video quality is based more on bitrate than resolution which means bitrate higher results in big file size, and lower visible quality loss.

Step 3: Start to rip DVD to iPad Air, iPad Mini 2, iPad 4, iPad 3, iPad 2, iPad on Mac

When you are satisfied with all the settings, you can click "Convert" and let the software do the DVD to MP4 conversion for your Apple iOS devices.

Step 4: Transfer Converted Videos to iPad Air, iPad Mini 2, iPad 4, iPad 3, iPad 2, iPad

When the conversion completes, you can transfer the result videos to your iPad via iTunes, here's the way to go:

1) Launch the iTunes and connect iPad series to PC.
2) Choose "File – > Add File to Library…"
3) Drag the .mp4 file you want to the iPad icon.

In this way, you can watch DVD movies on iPad Air, iPad Mini 2, iPad 4, iPad 3, iPad 2, iPad on the go as you like.

P.S. If you have any problems about enjoying movies on iPad Air, iPad Mini 2, iPad 4, iPad 3, iPad 2, iPad, just check out the iPad Video Specials to find solutions.

You can also get the 20% Off discount All-in-one Video Converter Ultimate tool to encode Blu-ray/DVD and various formats of 1080p/720p HD videos to your IOS devices for watching.

See also: