Saturday, February 28, 2015

How to Convert FLAC to iTunes on Mac (Yosemite included)?

Cause iTunes has some best supported audio formats, you may don’t know how to play your FLAC files on iTunes, right? One way might be to try and get iTunes on OS X and iOS to support FLAC through some kind of plug-in. So if have read the page below, you have my word you won’t be confused with the issues anymore.


FLAC is an open source lossless audio format. Apple chooses not to support it, as they tend to prefer their own propitiatory standards over those that are free and open-source. Such is life in the techno sphere of all things Apple. Or in some other ways, you may have the experience of playing FLAC audio movies on VLC media player or HDTV, etc. While for iTunes, any good suggestions?

If you want to import FLAC to iTunes and won't loss quality, fortunately we here have the Pavtube Video Converter for Mac for you guys, which is just the professional FLAC to iTunes Converter with high output quality and fast conversion speed.

Main Key Features of Pavtube FLAC to iTunes Converter you may not know well:
  • As a audio converter: convert among all kinds of audio formats such as MP3, WAV, AIFF, AAC, FLAC, AC3, AU, MP2, OGG, DTS, M4A, WMA, RA and Apple LossLess M4A, FLAC and WAV, etc;
  • As a video extractor: extract audios from various of video such as MP4, AVI, WMV, MKV, OGV, ASF, MOV, RM, MPEG, DV, etc;
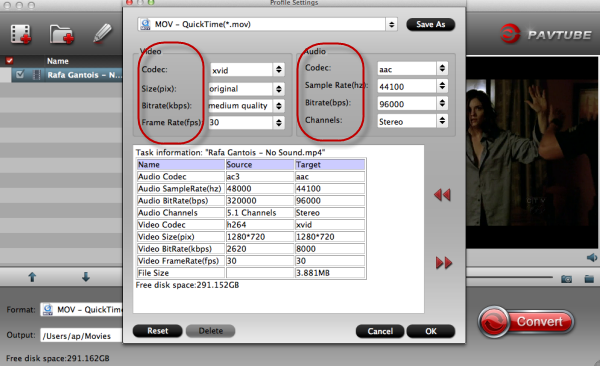
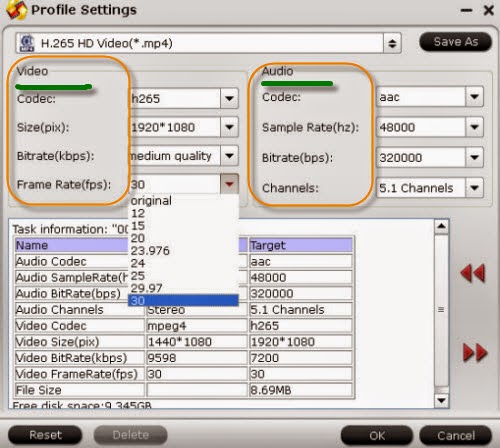
  • As a audio editor: cut, adjust volume/bitrate/sample rate of audio, merge files into one, split files by chapter, etc;
  • As a audio player: support playing nearly all audio formats like AIFF, AAC, FLAC, AC3, AU, MP2, MP3, WAV, OGG, DTS, M4A, WMA, RA and Apple LossLess M4A, FLAC and WAV, etc;

Let’s start to convert FLAC files to iTunes:
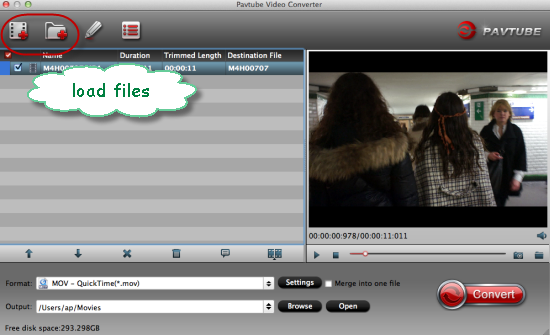
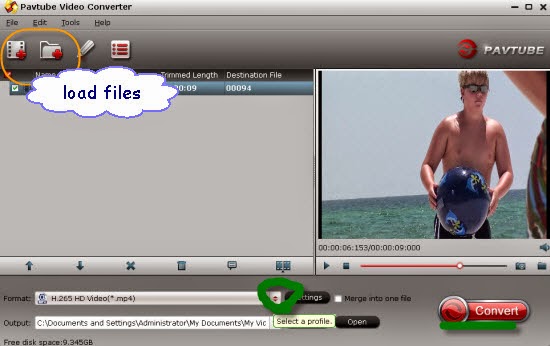
Step 1. Add your FLAC files to the program: simply drag and drop FLAC files to the main interface of Pavtube FLAC to iTunes Converter; click "Add File" button to open FLAC files that you want to convert.


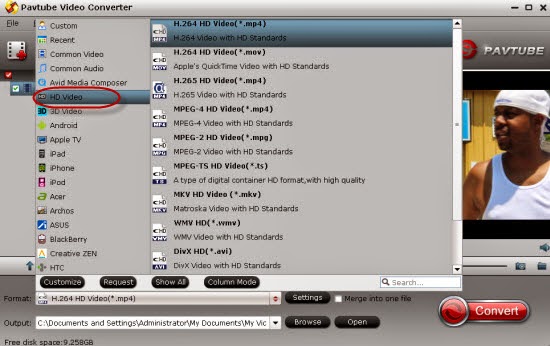
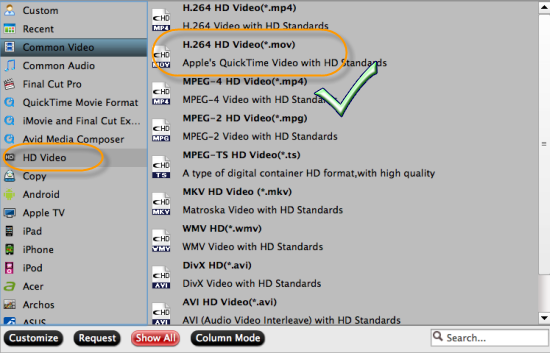
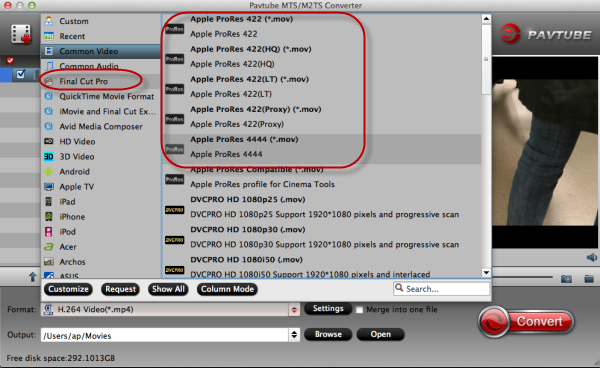
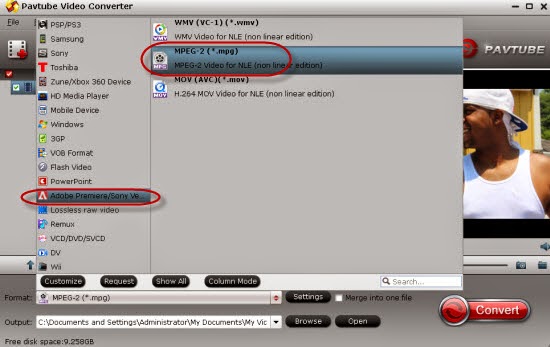
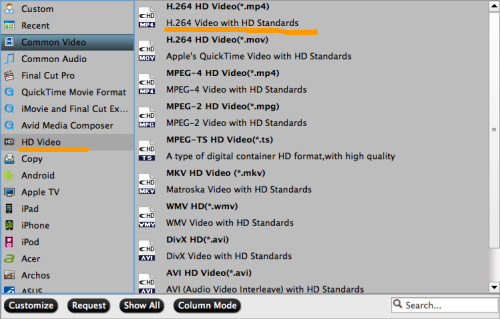
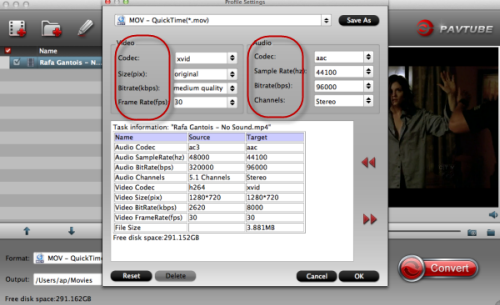
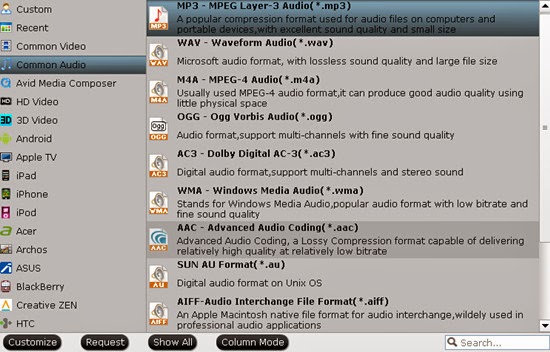
Step 2. Select MP3 or ALAC as the output format. Click "Profile" drop-down button to set "Common Audio’>>’MP3 MPEG Layer-3 Audio (*.mp3)" as the suitable output.


Step 3. Go back to the main interface if you have done all the preparation work. Hit the ‘Convert’ button to get our job started. The process will take you some time, which mainly depends on the size of all imported FLAC files and the performance of your Mac computer. Now, you can really play FLAC in iTunes on Mac. Just drag and drop the output files (.mp3 files) from the output folder to iTunes music library.

Some other guides?

Thursday, February 26, 2015

Let’s Transfer H.265 video to iTunes on PC

H.265(HEVC) codec, as a new codec technology and new video compression standard compared to H264 has thehigher quality and smaller size which can be the most import point loved by all video lovers. While as the specialty of this new codec, H.265 has not been available for iTunes yet so we still need some tools to ask for help. That’s the main purpose of this article.


Just few camcorders can shoot the H.265/HEVC recordings, Samsung NX1 is the typical one as you know. If you have recorded some H.265 video from NX1, add H.265 video to iTunes for syncing and playback on Apple devices for killing time on the move is a wise choice. However, no mater by dragging and dropping or by selecting Add File to Libray... from iTunes menu, iTunes won't import H.265 video since iTunes have no ability of playing HEVC/H.265 format cause iTunes has its’ own best supported video formats as we all know.

Well Preparation: H.265 to iTunes converter---Pavtube Video Converter for Windows
It’s the one of the firsts to provide an H.265 to iTunes easy and fast solution on windows and it ranks top on the H.265 converter application list. It is an all-in-one H.265 decoder, encoder, converter and player. Among the top ranked H.265 video converters, it has a good reputation online so it is deserved for us to have a try. 

How to convert H.265 to play in iTunes with ease?

Step 1.Install and run H.265 to iTunes converter, and then click the "Add" button to load the .H.265 videos. You can also use the drag-and-drop method to load the media files to the application UI.


Step 2. Since iTunes supports MP4, M4V and MOV formats, you can click Format bar and choose any of the three from Common Video as the output file format. If you want to load H.265 to iTunes for playing on iPhone, iPad, iPod, Apple TV, you can also directly select a format from decent device preset like iPad. Just take the following screen shot as the reference.


Tips: Click the ‘Settings’ icon to adjust video and audio parameters on the Profile Setting as you need to get the best quality video.

Step 3. Click the "Convert" icon under the preview window, and the H.265 Converter will start converting H.265 to iTunes on Windows 8/8.1/10. As soon as you transfer your files into iTunes, it’s our time to enjoy the higher definition movies on Apple devices!

Any more?

Monday, February 23, 2015

Canon PowerShot G7 X MP4 to DaVinci Resolve 9, iPhoto, Kdenlive, Keynote?

Once you get some H.264 MP4 reordings from Canon PowerShot G7 camera, have you ever tried to further edit them in some editing tools such like DaVinci Resolve 9, iPhoto, Kdenlive and Keynote, etc? Here in order to smoothly help you import G7 MP4 files in these editing tools for editing, we can give you some better solutions.


The PowerShot G7 X is a premium high-performance camera that puts exciting and impressive capabilities in a sophisticated, compact package. PowerShot G7 X is selfie-ready with a high-resolution multi-angle capacitive 3.0-inch touch panel LCD. So in this way, if you recorded many MP4 videos via Canon G7 X, you may want to edit Canon PowerShot G7 X 1080p MP4 videos, right? But the questio is how? 

After searching online, we know these several editing programs thouth cannot support the MP4 formats, they can accept the MOV well. Now, what we need to do is converting MP4 to MOV. Also, we have found the best Pavtube Video Converter for Mac can do us a big favor. Not only for MP4, but also for other high definition video formats such like MXF in DaVinci Resolve? Join us to know more lessons of how to work it well with MP4 files.

Step 1. Import Canon G7 X Video clips 
Install and run this professional MP4 Video Converter for Mac as a Canon PowerShot G7 X Video Converter, Click 'Add File' to load your Canon G7 X footages for converting.


Step 2.Choose the suitable MOV as output 
Just come to the output list, here we are going to suggest you to choose the ‘HD Video’>>’H.264 HD Video (*mov); as the best suitable one. 


Step 3. What is differs from other similar converting programs, we can also find the ‘Merge into one file’ to combine our files together. You can take the following screenshot as the good reference.


At the end of this conversion, we need to go back to the main interface to tap the ‘Convert’ button to start our work. With such easy and fast workflow, are you still worrying about how to edit your Canon PowerShot G7 X MP4 in DaVinci Resolve 9, iPhoto, Kdenlive, Keynote? Let’s move on!

See more related:

Read More:

Saturday, February 21, 2015

Workflow on Panasonic Lumix DMC-GF7 AVCHD to Final Cut Pro 6/7

Hi guys, if you are puzzeled with the problem that you can't edit your MTS footage from Panasonic Lumix DMC-GF7 in Final Cut Pro 6/7, why not read this article below carefully to make some more details? In order to resolve the problems, we are going to offer you the best way of converting AVCHD to ProRes mov for nice ediitng.


More details that we didn’t know yet about the Final Cut Pro, right? For example, fo you know any supported video formats for FCP? In other words, that may become the main cause that we should know well why AVCHD codec cannot be suitable with FCP. After that, we can be told the ProRes codec 422 has become the most compatible one for FCP. In this way, though for other high definiton codec such as XAVC or even the container format MKV, we may got some issues.

As long as the editing problems we may meet, here we also have the good solutions to solve the questions. PavtubeMTS/M2TS Converter for Mac comes out to achieve your goal smoothly. This Mac MTS converter features full support for almost all Canon, Sony and Panasonic AVCHD cameras, and it converts MTS files to editable format for using in Final Cut Pro. Below is a simple guide to follow for transcoding Panasonic DMC-GF7 MTS to FCP on Mac OS X (Yosemite included).

Let’s solve Panasonic Lumix GF7 to FCP incompatible issues step by step:
1. Download, install and run the MTS to FCP Converter; click "Add Videos" icon to load your source .mts videos.

2. Click “Format” option and navigate the mouse cursor to choose “Format > Final Cut Pro > Apple ProRes 422 (*.mov)” as the best codec for Final Cut Pro 6/7 and FCP X. 


3. Click the “Settings” button and customize proper video/audio parameters if necessary. Video size, bitrate and fame rate can be adjusted as you like. Usually 1920*1080 video size and 30fps video frame rate are recommended for FCP editing. 


At the end of the conversion job, tap the ‘Convert’ button on the main interface and you can get the work started. Then just easily transfer output videos to FCP and you can enjoy editing our Panasonic Lumix DMC-GF7 AVCHD recordings in FCP 6/7. Let’s all have a try!

More:

Monday, February 16, 2015

Sony Codec's XAVC-I/-L to Premiere Elements 13? How?

Though Adobe Premiere Elements with stunning features is popular video editing software for us. The point here, sometimes, you will find it's a painful experience when loading Sony codec’s XAVC-I/L files into Premiere Elements 13. So how make Sony XAVC recordings accepted by Premiere Elements 13 will be the top point for most user. May be in the following article, you may find some solutions.


‘I just got the Sony splash-proof wearable video camera the HDR-AS100VR. When I wanna edit the XAVC recordings to Premiere Elements 13 for editing and then send to my partners, something wrong happened there like ‘Unknown Errors’, what should I do?’ Asan enthusiast-level video editing application, Premiere Elements 13 has no ability of working with all video formats. No matter for the common AVI or the latest codec H.265/HEVC. Any good solutions there?

Then to solve the problem, we just need to look for a powerful third party program to convert XAVC S videos into MPEG-2, or MOV. Why not have a try of the Pavtube Video Converter for Windows/Mac? It is much professional on dealing with XAVC S videos into Premiere Elements supported formats. What’s more, you can adjust or edit videos with personal style. More details you can take the related review.

Learn how to transcode Sony XAVC to MPEG-2 MPG for editing in Premiere Elements:

Step 1.Add your XVAC files in
Launch this XAVC to Premiere Elements program, on the main interface, we can add our original files with ‘Add videos’ as individual video clips, or with ‘Add from folder’, we can load them in a complete folder. Look as the screen shot below.


Step 2.Select best output for Premiere Elements
Then we are going to come to the top important step, select the best output one for Premiere Elements. Tap the ‘Format’ bar on left of the preview window, drop down the output list, nearly on the bottom of the list, we suggest to find the ‘Adobe Premiere Pro/Sony Vegas’>>’MPEG-2 (*,mpg)’ as the best. Also, MOV and WMV you can have a try.


Notes: If you are fond of the higher quality and smaller sizeH.265/HEVC could also be a good choice for you if you need. You won’t be disappointed here!

Step 3. Optional function for advanced users
Still Pavtube studio keeps the ‘Settings’ item down for those who wanna more adjustments on their output videos. To adjust the video codec, video size, bitrates or frame rate or some audio channels, why not take around of this function?


At the end of this conversion, tap the ‘Convert’ icon on the main interface, we can easily get the MPEG-2 MPG output recordings which can be editing well in Premiere Elements 13. With the concise workflow and fast speed, we won’t wait for a long time.

See more?

Monday, February 9, 2015

Open MKV in Sony Vegas Pro on Windows/Mac

Here is the detailed guide on how to import, open and edit our MKV files smoothly in Sony Vegas Pro. IF you have the similar troubles in converting MKV videos or any solution to this situation, welcome to offer us more suggestions.

"I downloaded some 1080P MKV movies from website, and I plan to edit the .mkv movie in Sony Vegas Pro, but I can’t load my MKV videos into this editing software. The collection were saved in my computer D disk, after run Vegas Pro on Windows 8, I click "Files > Import…" and locate the file folder. It’s a pity, it’s empty. Why?"


You guys may not know yet that MKV is an open source container format and can contain multiple sound and subtitle tracks in one file, that is, the codec in MKV is flexible. It is due to this feature that few editing software and mobile devices can be supported to import MKV directly. For example, edit MKV in FCPPlay MKV on QuickTime or load in iTunes for Apple devices?

To get Sony Vegas Pro work with MKV files beautifully, we here need to a professional video assistant to convert MKV to the friendly formats MPEG-2 MPG for Sony Vegas Pro, right? Here Pavtube Video Converter for Windows/Mac is highly recommended. It supports creating high quality WMV or MPEG-2 codec to seamlessly fit Sony Vegas Pro, no matter what's the format of your source video files. Plus, it supports transcoding camera shootings in different formats (H.264 MOV, MTS/M2TS, XAVC, MXF, etc.) to video editing software compatible file types. Surely, you can take the review for more details?

Below is the step-by-step guide on converting MKV to Vegas Pro supported video format: MPEG-2 MPG:


Step 1: Add MKV files
Install and launch MKV to Sony Vegas Video Converter, and then click Add Video button to import your MKV files to the software. You can drag and your videos and drop them to it.


Step 2.Select the right output format
In order to select the right ones, we are glad to tell you to get into the output list, there we can drop down the list and choose the ‘Adobe Premiere Pro/Sony Vegas’ >>’MPEG-2 MPG’ as the best output one. 


Notes: New surprise for this Windows version, we are glad to tell you this new version can support the H.265/HEVC encode and decode. Do you wanna enjoy more?

More functional items:
1.Settings- Click it to customize audio and video parameters Video Codec, bit rate, frame rate, Audio codec, sample rate, audio channels.
2. Edit(next to “Add” icon)- Click to set add watermark, deinterlace, trim, crop, add subtitles, etc.

Step 3. Here we are coming to the ending step. Just go back to the main interface, it’s time to press the ‘Convert’ to start our job. With a faster speed and easy operation, we are glad to import the MKV recordings to Sony Vegas Pro for nice editing. Soon after the conversion is finished, just click “Open”>>’Open files’ button to get the converted MKV files for edit in Sony Vegas Pro 10/11/12 perfectly.

We can see more:

Friday, February 6, 2015

How to Play Our MTS (AVCHD) Movies on WDTV?

Though it is said that WDTV can support a wide variety of popular file formats, for the high definition AVCHD MTS recordings, we may got some troubles for playback. So in the following article, we are going to discuss the topic on how to play the AVCHD MTS movies smoothly on WDTV. 

‘I have read a lot about media players like Roku and WDTV but it appears that almost every piece of hardware out there soed not support MTS(AVCHD) files, which is insane to think Canon sells HD camcorder that saves in a format that isn’t supported anywhere….maybe we should get through this situation in another way’


As we know the issues we met above when working with WDTV, we also suggest you to know more details on WDTV supported file formats:

Video: MP4/MOV (MPEG4, h.264)
AVI (Xvid, AVC, MPEG1/2/4)
MPG/MPEG, VOB, M2TS, WMV9, FLV
TS/TP/M2T (MPEG1/2/4, AVC, VC-1)
MKV (h.264, x.264, AVC, MPEG1/2/4, VC-1)
Photo JPEG, GIF, TIF/TIFF, BMP, PNG
Audio MP3, WAV/PCM/LPCM, WMA, AAC, FLAC
MKA, AIF/AIFF, OGG, Dolby Digital, DTS
Playlist PLS, M3U, WPL
Subtitle SRT, ASS, SSA, SUB, SMI
File systems FAT32, NTFS, HFS+

As we see above, AVCHD MTS is not included on the list above, so here we recommend the best AVCHD to WD TV Live Hub Converter---Pavtube MTS/M2TS Converter for Windows/Mac, which enables you to convert/transcode AVCHD MTS files to WDTV compatible format easily, and then you can import/join/stream AVCHD to WD TV Live Hub without any trouble. Additionally for some NLEs like Sony Vegas or via iTunes, AVCHD MTS can be available too. What’s more, this program adopted the advanced NVIDIA CUDA that makes the conversion task finished at up to 6x faster speed.

Specific Guide on how to convert AVCHD MTS to HD MP4 for playing smoothly on WDTV:
Step 1: Import AVCHD to the best AVCHD to WD TV converter. You can transfer the files into this program with the USB capable or open the main interface, we can click the ‘Add videos’ or ‘Add from folder’ to add them in.

Step 2.Select an output format for WD TV? Yes! Just come to the output list we suggest you to choose the ‘HD Video’>>’H.264 HD Video (*.mp4)’ as our best. 


Notes: With the latest version of this Windows program, we have to tell you it can support the H.265/HEVC encode and decode right well. Also, there are three format standards of H.264 we can choose individually for different output devices. You won’t be disappointed here.

Step 3. Wanna adjust your audio and video parameters? Click the “Settings” icon and you will go into a new interface, here we adjust codec, bit rate, frame rate, sample rate and audio channel in the interface according to your needs and optimize the output file quality. 


Tips: You’d better to adjust Bit rate to high quality, Audio bit rate to 640000, Frame rate to 24, Video Size to 1920 x 1080, and audio channel to 5.1 channel to make a good output quality. 

After that, it’s time to press on the big icon ‘Convert’ to start our conversion job, with the easy operation and faster conversion speed, are you still worrying about the troubles in importing AVCHD MTS files to WDTV for nice enjoyment?

More guides: