What gift would you like to send to your mother on this 2015 Mother’s Day? To show our thanks to our mother, we are all thinking how to make this year’s Mother’s Day special with special gifts. If your mom likes watching the latest movies or videos, how about a professional video converter to get rid of the incompatible troubles to enjoy the favorite movies so smoothly? Pavtube Studio has upgraded all products to the latest version, which could be a warm gift for mom. Big discount will be offered by Pavtube Studio! Pavtube Big Deal for Mom (Mother’s Day Only)40% off discount we can enjoy if we get into the official promotion page and give the comments below: ‘What do you want say to your mom”. All of us can get the big coupon with the best Pavtube HD Video Converter for Windows/Mac, which is a professional converter to transcode all video formats nicely for any NLEs or media devices with a high quality preserved.Other Special Off on Facebook(For Facebook users)From May 7th to May 14th, all facebook users can enjoy a 50% discount of each Pavtube products during the 2015 Mother’s Day celebration! Just “Follow” the Pavtube official topic and “Like” it and you can own the qualification. Come on!Other Official Website 20% – 40% discount:Pavtube Video Converter for Mac(for Windows)Have full access to SD videos,digital camcorder recordings, DVR videos on devices such as Apple/Android/Windows series, media players, game consoles and video editing programs.Pavtube MTS/M2TS Converter for Mac(for Windows)Convert Sony/Canon/JVC/Panasonic recorded MTS/M2TS/M2T/TS/MOD/TOD footage to play on media players or edit with Premiere Pro, Avid Media Composer, Final Cut Pro, etc.Pavtube MXF Converter for Mac(for Windows)Converting MXF video files generated by Canon/Sony/Panasonic camcorders to various video formats such as H.264/MPEG-4, MKV, MP4, AVI, MPEG, WMV, FLV, SWF, F4V, etc.Pavtube iMixMXF(for Windows)Transcoding MXF video files to Multi-track Apple Prores MOV for Final Cut Pro or Multi-track MP4/MKV format for other video editing program and media playback devices.Additional Tips: With the recent upgraded version of Pavtube Mac products, all products have been upgraded to support the H.265/HEVC decode and encode. Some other bugs and fixed well there! Just come to Pavtube to know more and enjoy ourselves on 2015 Mother’s Day!
Due to Apples launch of the not so pro FCP X, there’s a lot of FCP users considering the jump to Premiere Pro. In this case, you may need to import FCP projects to Premiere Pro CC/CS6. If you don’t have any idea, this page will give you some hints.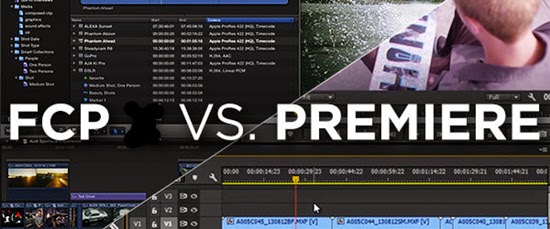 Searching online, we find a general tutorial of moving FCP projects to Premiere Pro CC/CS6—XML.You can import entire projects, selected clips, or selected sequences that you export from Final Cut Pro as XML files. In Premiere Pro, bins and clips have the same hierarchies and names that they have in the Final Cut Pro source projects. Also, Premiere Pro retains the sequence markers, sequence settings, track layout, locked tracks, and sequence timecode start points of Final Cut Pro source projects. Premiere Pro imports text from the Final Cut Pro Text generators into Premiere Pro titles.It’s worthy mentioning that you cannot import native Final Cut Pro project files, only XML files exported from Final Cut Pro. You can export Final Cut Pro XML files from Premiere Pro. The effects that are trAanslated from Premiere Pro are the same as those that are imported from a Final Cut Pro XML file. However, the least of perfection is complex operation. Are there any easier steps instead of complex workflow?Here we can introduce you a professional FCP to Premiere Converter which can smoothly migrate FCP projects between NLEs softly. Pavtube HD Video Converter for Mac is such the best one we would like to introduce to you, which has the ability of transcoding FCP projects with the original high quality preserved. Even for the latest Mac OS X Yosemite, this program can also work well. With the recent upgraded version 4.8.5.1, it can also decode and encode the H.265/HEVC videos so nicely.
 How to migrate FCP projects to Premiere Pro CC/CS6 for editing?Step 1: The only difference between the trail version and the retail version is the watermark “Pavtube” in the middle of the converted files by trail version. After the installation, click “Add video” button to load your original FCP projects to the program. You can also load several files at once thanks to “Add from folder” button. You can highlight it for a preview.
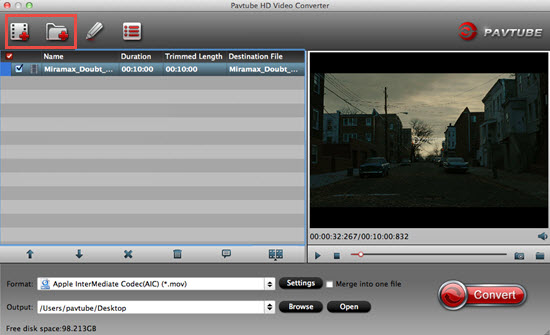 Step 2: For editing FCP projects in Premiere Pro CC/CS6, you can hit the “Format” bar to choose “Adobe Premiere/Sony Vegas>>MPEG-2 (*.mpg)” as best output format.
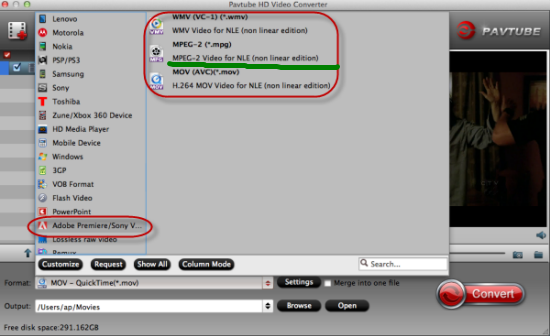 Step 3: Click “Settings” button to customize the output video and audio settings by yourself. But if you are not good at it, you’d better use the default parameters, they will ensure you a good balance between file size and image quality basically. You can change the resolution, bit rate, frame rate as you need.Step 4: Now everything has been settled, and don’t forget to set the file location. Click “Convert” button to start the conversion work and click “Open” when you finish your conversion to check your converted files.Conclusion: When you finished transferring FCP projects to Premiere Pro CC/CS6, we can enjoy editing the videos so nicely. Good news! All users can enjoy 30% discount from May 4th to May 6th after the upgraded days! Come on!Further Reading:
As soon as the Samsung announced that its new kind series camera has adopted the latest codec H.265/HEVC, which has a higher quality and smaller size compared with the H.264, it has been a high-performance video camera. This kind of camera has the strong capability to shoot videos at 4K video at 24 fps, UHD at 30 fps, and full 1080p HD video at up to 60 fps. It’s Samsung NX1.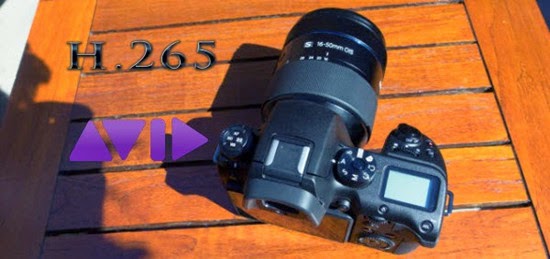 While as a new guy in this video place, H.265/HEVC has not yet been accepted by most devices, players, editing software, TV and more. According to this case, how to encode or decode the H.265/HEVC footage is an emergency task for us. No matter for editing tools or media players, no matter editing in Avid MC, Adobe Premiere Pro, After Effects or playing on Windows Movie Maker, Pinnacle Studio, Sony Vegas Pro, etc., it is necessary for us to find a professional H.265 Encoder and Decoder to do a favor.Different from 720p/1080p videos, the conversion of NX1 H.265 video is in a higher standard. As we know, there's no support for HEVC from non-linear editing such as Adobe Premiere, FCP X, Avid, etc currently, if we try to import Samsung NX1 to Avid Media Composer, we will have to transcode to work with the NX1 files. So, you may be scratched at how to convert NX1 H.265 files to Avid Media Composer for editing with lossless quality. Here Pavtube Video Converter for Mac is highly recommended, which is superior to many other programs since it not only has perfect input support for the H.265 codec compressed footage captured with Samsung NX1 camera, but also allows users to output the optimized Avid Media Composer DNxHD format directly, then you will have no problem when importing and editing Samsung NX1 H.265 files with Avid Media Composer. How to convert Samsung NX1 H.265 files to Avid Media Composer 7 for editing on Mac?Step 1: Install and run it as the best H.265 Mac Converter. It supports single or batch conversion. Therefore, you are able to add individual or multiple H.265 files into the program at one time. Click the “Add video” button on the tool bar to finish the input.
 Step 2: Select “Avid DNxHD (*.mov)” as output video format compatible with Avid Media Composer. Click the drop-down list in the format line to get the format box. Then choose “Avid Media Composer>>Avid DNxHD (*.mov)” as output format.
 Step 3: Click “Settings” button to customize the output video and audio settings by yourself. But if you are not good at it, you’d better use the default parameters, they will ensure you a good balance between file size and image quality basically. You can change the resolution, bit rate, frame rate as you need.Step 4: You can preview to check the final result. Once you are happy with it, click the “Convert” button to start converting NX1 H.265 files to Avid DNxHD MOV format. It will take you a little while. When it is finished, you can edit H.265 files from Samsung NX1 in Avid Media Composer 7 smoothly on Mac with no format limitation to worry about.Conclusion: When the conversion is done, you can click “Open” to get your generated files. Now, you can edit NX1 H.265 files in Avid MC 7 on Mac without any hassles. Good news for everyone! All of us can get 30% discount off before May, 6th, 2015. Come on!Further Reading:
Higher quality smaller size---that's the biggest highlight that brought by the new video codec H.265/HEVC. On the other hand, someone now are confused with the issues of playing H.265/HEVC files on VLC player. It seems that we should have an intensive talking on H.265/HEVC to know how to make H.265/HEVC files smoothly played on VLC player. Many high-definition video may enthusiasts casting their eyes–H.265/HEVC Videos. H.265 should use much less space and offer compression quality than H.264. The only problem is that H.265 is still not supported well. Most video players apps including Windows Media Player, VLC can’t read and play H.265 codec perfectly. Found in H.265/HEVC to VLC forum, some one asked “It was working fine prior to the last update to VLC, and I haven’t made any other changes to my Mac. But when I open my recorded H.265 files in VLC, Mac says it’s encoded with a codec not recognized by the player, and the VLC Player will play the audio, but not the video. Why?”Though H.265/HEVC can support 8K UHD with a resolution of 7680*4320 and it would become the best codec in the future. How could we edit and play H.265/HEVC files on VLC on Mac with no difficulties now? Searching online and I got some tech support. Although it is claimed latest version of VLC (2.2.0) should enable both HEV1 and HEV2 formats of HEVC, viewing H.265/HEVC files in VLC is not so easy as we image. As the problems occurred, the latest VLC media player still does not support H.265 video playback perfectly. Some workarounds I’ve found out online and now share with you the solution to play H.265/HEVC files on VLC on Mac flawlessly is adopting Pavtube Video Converter for Mac, which is an all-in-one Mac Video Converter to realize playing H.265/HEVC files on VLC without any hassles. How to play H.265/HEVC files on VLC on Mac?Step 1: Download and install the program from the website or click the free trial icon. Then, launch the best Mac video converter and load your original H.265/HEVC files in with “Add video” button or “Add from folder” button. Directly drag files in is available.Step 2: Choose the right output format for VLC. As we mentioned above, we would like to introduce you to select the “HD Video>>H.264 HD Video (*.mp4)” as your best choice. Surely you can choose other suitable ones as you like.
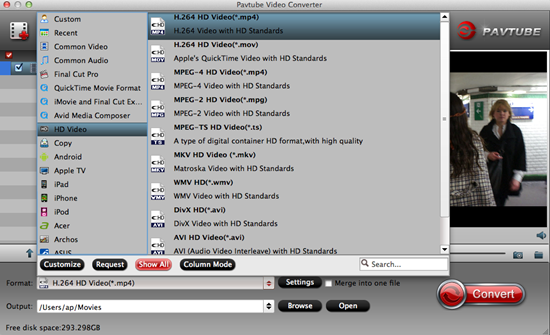 Step 3: Click “Settings” button to customize the output video and audio settings by yourself. But if you are not good at it, you’d better use the default parameters, they will ensure you a good balance between file size and image quality basically. You can change the resolution, bit rate, frame rate as you need.Step 4: You can preview to check the final result. Once you are happy with it, click the “Convert” button to start converting H.265/HEVC files to VLC best supported format. It will take you a little while.Conclusion: When the conversion is done, you can click “Open” to get your generated files. Now, you can play H.265/HEVC files on VLC on Mac without any problems. Just enjoy! Good news for everyone! All of us can get 40% discount off before May, 1st, 2015. Come on!Further Reading:
Haven’t figured out how to import XAVC MXF to Premiere Pro CS6 for editing? If so, you may have interest in this article. It displays a workaround to convert XAVC MXF to Premiere Pro CS6 best accepted .mpg for editing with lossless quality. Question: XAVC MXF files can’t be read in Premiere Pro CS6“I’m currently feeling so frustrated over XAVC MXF import issues with Premiere Pro CS6. I’m intending to import one of my clients’ XAVC MXF footage from a Sony camcorder to PP CS6. Every time I try it read the various audio files fine, but refused to import the video stream, and gave me a ‘generic error’. Why does this happen? Is there anything that I missed? Does that mean I have to convert XAVC MXF to an intermediate codec so CS6 can recognize them? Any help of advice would be greatly appreciated.”As far as we know, only the latest Adobe Premiere Pro CC has added support for the XAVC format. To be able to import and edit XAVC MXF in its former version Premiere Pro CS6, you will need to download and install plug-ins like Rovi Totalcode, which has perfect support for your XAVC MXF recordings. Unfortunately, this plug-in costs a lot of money ($350) and only comes with PC version. If you are looking for an easy and affordable way to work XVAC MXF with Premiere Pro CS6, we do recommend convert XAVC MXF to MPG format with MPEG-2 codec for use in Premiere with optimum performance. This requires a reasonable priced third party program named Pavtube Video Converter for Mac. If you are running on Windows, you can choose the equivalent version Pavtube Video Converter. How to import XAVC MXF to Premiere Pro CS6 for editing on Mac Pro?Step 1: Run the upgraded Mac Video Converter, and click the “Add video” button to load your original XAVC MXF recordings. If you want to load several files at one time, “Add from folder” button is available. Besides, you can also drag and drop the files to the main interface directly.Step 2: When you launch the program and load your XAVC MXF files in , then we can choose the suitable output formats. You’d better click “Format” bar and select “Adobe Premiere/Sony Vegas>>MPEG-2 (*.mpg)” as output format.
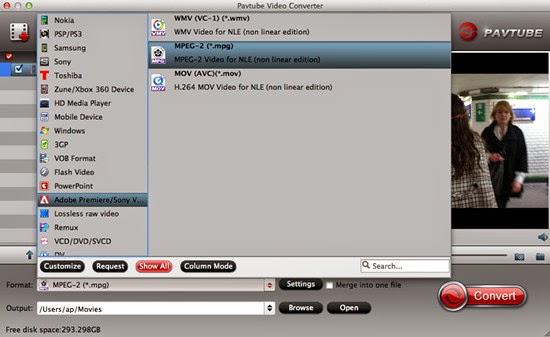 Step 3: Click “Settings” button to customize the output video and audio settings by yourself. But if you are not good at it, you’d better use the default parameters, they will ensure you a good balance between file size and image quality basically. You can change the resolution, bit rate, frame rate as you need.Step 4: When everything is done, you can take a preview by hitting “Play” button. If you are satisfied with the final result, you can click “Convert” button to finish the conversion work.Conclusion: When the conversion is finished, you can click “Open” to get your generated files. Now, you can edit XAVC MXF in Premiere Pro CS6 without any hassles. Surprise! All of us can get 40% discount off before May, 1st, 2015!Further Reading:
Good news for everyone! Thanks to the Pavtube Studio, we can realize our hope to enjoy the super high quality videos encoded by H.265. With the stronger and stronger function of the upgraded Pavtube Video Converter for Mac, XAVC MXF supported and VPx series decoder can be done excellently. Pavtube Video Converter for Mac- upgrade to the version 4.8.5.0This upgraded Pavtube Video Converter for Mac is the professional and easy-to-use Mac Video Converter, which is specially designed for Mac users to easily convert between various video formats including H.265/HEVC, H.264, MP4, MOV, MKV, AVI, MPEG, Xvid, DivX, 3GP, WMV, FLV, MOD, TOD, WTV, MXF, MVI, F4V, WebM, VP8, 720p, 1080p, 1080i HD, AVCHD videos and more, convert between various audio formats including APE, MP3, AAC, AC3, WAV, WMA, and even extract audio from movie files. You can know more details on the official website.What’s new of Pavtube Video Converter for Mac (version 4.8.5.0)?1.Support H.265 decoder and refine asm.2.Support XAVC codec contained in MXF.3.Better support for VPx series decoder.Key features of Pavtube Video Converter for Mac (version 4.8.5.0):1. Convert various videos/audios as input and output.2. So many popular editing tools and media players are available.3. Easy operation workflow and faster conversion speed.4. Extra acceleration function for Mac users.5. Strong ability of setting and editing output videos. Tips: Before May 1st, you can get a discount on Pavtube Video Converter for Mac. Why not click the link to know more about this 40% off event and seize the chance to buy excellent products with such pretty attractive price?Simple guide on how to convert videos with this Mac Video Converter:Step 1: Run the upgraded Mac Video Converter, and click the “Add video” button to load your original recordings. If you want to load several files at one time, “Add from folder” button is available. Besides, you can also drag and drop the files to the main interface directly.
 Step 2: When you launch the program and load your files in , then we can choose the suitable output formats. For example, if you want to convert XAVC MXF to FCP X/7/6 for editing, you can click the “Format” bar and choose “Final Cut Pro>>Apple ProRes 422 (*.mov)” as target output. There are many presets in the software, you can choose the output format according to your requirements.
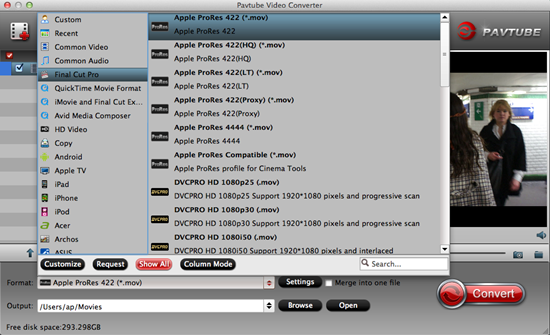 Tips: If you want to convert your recordings to H.265 codec, let’s go to the “Common Video” to get the “H.265 Video (*.mp4)” as the best. You can also choose “HD Video>>H.265 HD Video (*.mp4)” to get higher definition.
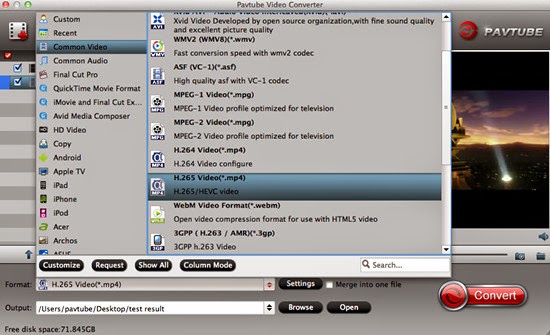 Step 3: Click “Settings” button to customize the output video and audio settings by yourself. But if you are not good at it, you’d better use the default parameters, they will ensure you a good balance between file size and image quality basically. You can change the resolution, bit rate, frame rate as you need.
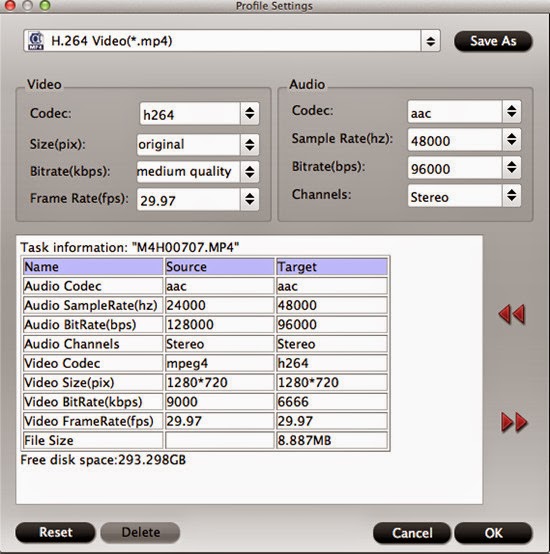 Step 4: Most of you guys must have the desire of a further editing with your output videos, right? On the main interface, “Edit” is waiting for you. “Trim” to decide where to start and where to end, “Crop” to cut some unwanted clips, “Subtitles” to add some explanations to your audience.
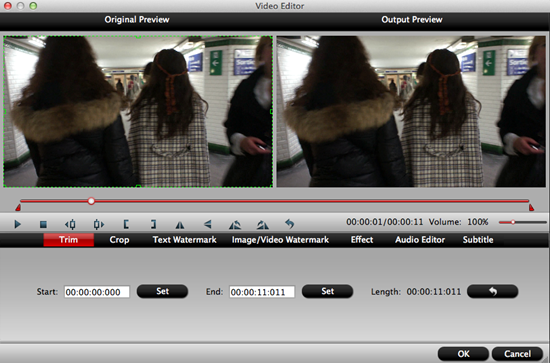 Step 5: When everything is ready, you can take a preview by hitting “Play” button. If you are satisfied with the final result, you can click “Convert” button to finish the conversion work.Conclusion: When the conversion is done, you can click “Open” to get your generated files. Now, you can use them for editing, playing, uploading, sharing and all you want.Download Address:Official download:http://download.pavtube.com/video-converter-mac/videoconvertermac_setup.dmgAmazon download:http://www.amazon.com/Pavtube-Video-Converter-Mac-Download/dp/B00QIBK0TQ/ref=sr_1_3/175-5152965-3528837?ie=UTF8&qid=1430103806&sr=8-3&keywords=pavtubeFurther Reading:
Any way to import H.265 videos to Windows Movie Maker? Here is the quick tutorial for you that will show you the simplicity of importing H.265 videos to Windows Movie Maker flawlessly. Follow it now. Samsung NX1 is a native 4K Mirrorless Digital Camera for users. Have you got one? As many users get NX1, more problems are coming up: some of them have the need to import Samsung NX1 H.265 videos to Windows Movie Maker for editing, but they always meet the importing issues. H.265 is a cutting-edge, high efficiency video codec that’s particularly useful for streaming 4K video. If you’ve got some 4K H.265 videos like from Samsung NX1, how to make a smooth post production?In fact, H.265, a highly compressed format, is not easy for editing in Windows Movie Maker. In addition, you may also have difficulties in importing MP4, AVI, Divx, VOB and MKV files to WMM. Then how to edit H.265 videos in WMM without any issues? Well, if you make the recordings editable before taking to the program, the incompatible error won’t happen any more. As far as I know, WMV is the best format for Windows Movie Maker, which ensures both efficiency and quality.After testing countless freeware and commercial software, I highly recommend Pavtube Video Converter to you which is the best H.265 Converter for you to encode and decode H.265 videos for Windows Movie Maker smooth editing on Windows. It ranks top on the H.265 Converter application list. Besides, it is an all-in-one H.265 encoder, decoder, converter and player. With it, you can convert H.265 to any other formats with several mouse clicks.
 How to import Samsung NX1 H.265 videos to Windows Movie Maker for editing?Step 1: Download, install and run H.265 to WMM Converter. Click the “Add video” button to import Samsung NX1 H.265 videos to the program. If you want to load several files at once, you can click “Add from folder” button. You can also use the drag-and-drop method to load the media files to the application UI.
 Step 2: Click “Format” pull down list to select “HD Video>>WMV HD (*.wmv)” as output format for importing Samsung NX1 H.265 videos to Windows Movie Maker for editing.
 Step 3: Click “Settings” to fix the frame rate, bit rate, video size, and etc. to your needs. To have a smooth editing with Windows Movie Maker, you need create the files with the appropriate resolution and frame rate that matches your source footage.Step 4: Click “Convert” button to start Samsung NX1 H.265 videos to Windows Movie Maker conversion.Conclusion: With NX1 H.265 to Windows Movie Maker Converter, you can easily convert Samsung NX1 H.265 videos to Windows Movie Maker WMV format in few steps; video quality are guaranteed by the best H.265 to WMM Converter. Just try and enjoy yourself.Further Reading: