Summary: Facing issues when editing DJI Phantom 3 4K MP4/MOV in Premiere Pro? Tips and tricks are given in the following part about converting Phantom 3 4K MP4/MOV to MPEG-2 for Premiere Pro smoothly editing.
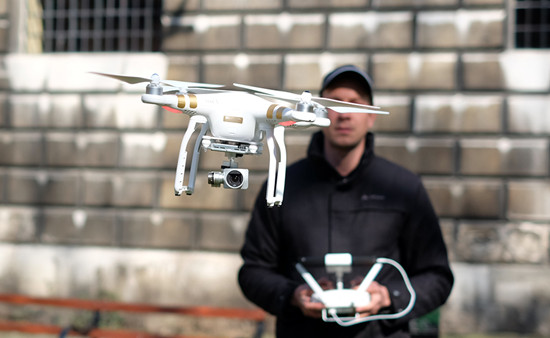 Finally, a flying camera that packs years of experience in aerial imaging into one compact, easy to use system. With the Phantom 3 Professional, you’re shooting 4K video at up to 30 frames per second and capturing 12 megapixel photos that look crisper and cleaner than ever. A live HD view lets you truly experience flight and see everything from your camera in real time.“I'm wondering if anyone out there has experience with the 4K footage the Phantom 3 produces and how it works with Premiere Pro. If so, do you have any suggested export settings to get the most resolution out of the footage - without having to buy a new server farm. Does Premiere Pro import the footage natively, or does it have to be converted first?”The DJI Phantom 3 professional captured 4K video in MP4 or MOV(MPEG-4 AVC/H.264) format, which is not a native editing codec for Premiere Pro. Adobe Premiere Pro CS6/CC can handle 4K files without much problem, but it is extremely hardware intensive. In addition, the 4K video footage compressed with MPEG-4 AVC/H.264 will still have big file size, it will take a lot of time for Premiere to render those 4K videos.To solve those problems, the quick workaround is to convert DJI Phantom 3 4K MP4/MOV to Premiere Pro natively supported formats MPEG-2. Although there are numbered tools and utilities can convert and compress the ultra HD videos, few of them can process at a fast speed. Featured with the most advanced converting technology, Pavtube HD Video Converter for Mac (review) is now providing the most reliable and professional 4K solutions to all format issues including 4K XAVC/XAVC S, 4K MP4, 4K MTS, 4K MXF and more.
 Other Download:- Pavtube old official address: http://www.pavtube.com/hd-video-converter-mac/- Amazon Store Download: http://www.amazon.com/Pavtube-Video-Converter-Mac-Download/dp/B00QI9GNZS- AppStore Download: https://itunes.apple.com/de/app/pavtube-hd-video-converter/id502792488?mt=12- Cnet Download: http://download.cnet.com/Pavtube-HD-Video-Converter/3000-2194_4-76177786.htmlHow to import DJI Phantom 3 4K MP4/MOV to Premiere Pro for editing?Step 1: Download and have a quick installation. The trial version will have a watermark on your converted files. Except for that, there are no time limitation, no virus, and no unnecessary bundle apps while downloading. After that, click “Add Video” button to load your original videos. You can load several files at once thanks to “Add from folder” button.
 Step 2: Here, you need to choose what you want the output to be. Click “Format” drop-down list, and then select “Adobe Premiere/Sony Vegas>>MPEG-2 (*.mpg)” as the best output format.
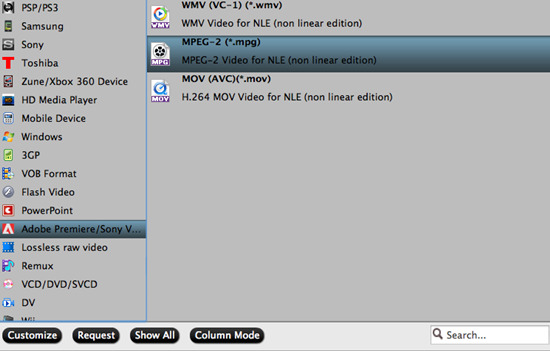 Step 3: Click “Settings” button to customize the output video and audio settings by yourself. But if you are not good at it, you’d better use the default parameters, they will ensure you a good balance between file size and image quality basically. You can change the resolution, bit rate, frame rate as you need.Step 4: When everything is done, you can take a preview by hitting “Play” button. If you are satisfied with the final result, you can click “Convert” button to finish the conversion work.Conclusion: Once the conversion process is complete, you can click “Open Folder” button to get the generated files for editing DJI Phantom 3 4K MP4/MOV in Premiere Pro with optimum performance.Further Reading:
Summary: Are you run into a situation where you can’t import AEE S71 MP4 to FCP 7/X for editing? This article will tell you how to convert AEE S71 MP4 to ProRes, which is the most compatible format for Final Cut Pro.
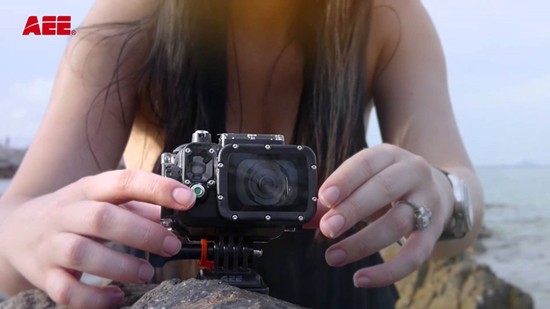 AEE S71 Action Cam records your adventures far and wide in 4K, 2.7K, 1080p, 960p, or 720p with the world’s best ultra HD action camera. The S71 Action Camera Kit sets a new standard for versatility. The camera is full of impressive features and the kit includes the most mounts and accessories, a 2 inch LCD color display screen, a remote control, 1/4 inch tripod mount, and a rugged waterproof/dustproof/shockproof case.If you record some 4K/HD .mp4 format videos with AEE S71 for outdoors sports, surfing, jet ski, race cars, etc, you probably would like to edit the recorded AEE S71 MP4 footage in NLEs for polishing. For Mac users, FCP must be the first choice. While problems occurred: we can’t edit AEE S71 MP4 video files directly in FCP 7 including the latest FCP X.As a quite hot file extension, MP4 is widely used for saving media data and can be found in lots of places online or off line, which means, you can get MP4 videos from AEE S71, YouTube, GoPro camera, Sony XDCAM EX camcorder or shared MP4 videos from others. MP4 is a final delivery file type, and is heavily compressed. More worse, Final Cut Pro 7 like many editors use 1080p as primary delivery format and will continue to do so for a long time, which means it doesn’t support 4K yet.In order to import AEE S71 MP4 to FCP 7/X for editing smoothly, you are advised to convert AEE S71 MP4 to FCP most “editable” format- ProRes for further editing. You’ll need a third-party program to achieve your goal. One such program of great quality is Pavtube HD Video Converter for Mac (review), an easy-to-use yet powerful app which ensures best results when working AEE S71 footage with FCP 7/X. Other Download:- Pavtube old official address: http://www.pavtube.com/hd-video-converter-mac/- Amazon Store Download: http://www.amazon.com/Pavtube-Video-Converter-Mac-Download/dp/B00QI9GNZS- AppStore Download: https://itunes.apple.com/de/app/pavtube-hd-video-converter/id502792488?mt=12- Cnet Download: http://download.cnet.com/Pavtube-HD-Video-Converter/3000-2194_4-76177786.htmlHow to import AEE S71 MP4 to FCP 7/X for editing?Step 1: Launch the HD Video Converter on your Mac, and then click the “Add video” button to import your MP4 videos from AEE S71 directly. In order to import several files at one time, you can click “Add from folder” button.
 Step 2: Click the “Format” bar to get the drop-down menu and you can get “Final Cut Pro>>Apple ProRes codec”, including ProRes 422, ProRes 422 (HQ), ProRes 422 (LT), ProRes 422 (Proxy) and ProRes 4444. Choose the proper one you want.
 Step 3: Press the “Settings” icon and you’d better set the video frame rate as 30fps, video size as 1920*1080 for editing AEE S71 MP4 in FCP 7/X easily.Step 4: Now, click "Convert" and let it go. The MP4 to FCP 7/X Converter for Mac supports batch conversion. So if you have lots of MP4 videos to convert, check “Shut down computer after conversion” and you can go away without keeping an eye on it.Conclusion: Once the conversion process shows in 100%, click “Open” to get the output videos. Create a project and start AEE S71 editing MP4 videos in FCP 7/X with light speed.Further Reading:
Summary: This article aims to give you a solution to convert Panasonic AJ-PX380 MXF to DNxHD MOV for smoothly editing in Avid Media Composer.
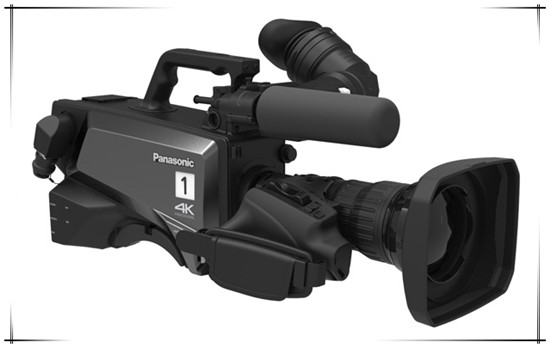 The PX380, expected to release in September 2015, will record in AVC-LongG to output on-air content direct from the shooting location and for workflows using content transferred over the internet. The camera will capture at different AVC-LongG bit rates - AVC-LongG50/25 keeps 10 bit, 4:2:2 quality at bit rates of approximately 50/25 Mbps, and the more economical AVC-LongG12 is optimized for wireless field workflows.After got the Panasonic AJ-PX380 camcorder, many users don’t know the way how to import Panasonic AJ-PX380 recorded MXF to Avid Media Composer and edit natively. MXF is a special video format and it is often adapted by advanced camcorders, such as Panasonic 4K camcorder, Blackmagic Cinema Cameras, Canon XF series camcorders, etc. This MXF video format is not well supported by editing programs, so you can’t import Panasonic AJ-PX380 AVC Intra MXF to Avid Media Composer for editing directly. If you need to edit Panasonic AJ-PX380 MXF in Avid MC flawlessly, you’d better convert Panasonic AJ-PX380 MXF to Avid well-acknowledged video format.Well, Pavtube MXF Converter for Mac (review) is highly recommended here to help you achieve your goal. It's an easy-to-use yet professional (P2) MXF converter, player and editor. The program is capable of converting PX380 MXF to DNxHD, MPEG-2, Apple ProRes, AIC, etc on Mac OS X for smoothly importing and editing in various non-linear editing systems, including Avid Media Composer 5.5/6.0/6.5, Adobe Premiere Pro, Final Cut Pro, iMovie and more.
 Other Download:- Pavtube old official address: http://www.pavtube.com/mxf-converter-mac/- AppStore Download: https://itunes.apple.com/us/app/pavtube-mxf-converter/id502807634?mt=12- Amazon Download: http://www.amazon.com/Pavtube-MXF-Converter-Mac-Download/dp/B00QID8K28- Cnet Download: http://download.cnet.com/Pavtube-MXF-Converter/3000-2194_4-76177789.htmlHow to import Panasonic AJ-PX380 MXF to Avid Media Composer for editing?Step 1: Download Mac MXF Converter, and follow the prompts to install the program. When the installation is complete, the best MXF to Avid MC Converter will launch automatically.Step 2: Click “Add video” button to load Panasonic AJ-PX380 MXF files or directly drag the files into file list. By default, the files are selected. You can delete files which you don’t want to import to.
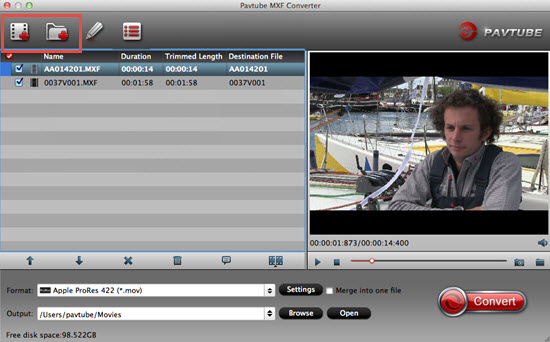 Step 3: Click “Format” bar to determine output format. For best image quality, click the format bar and choose “Avid Media Composer>>Avid DNxHD (*.mov)” as output format.
 Step 4: Click “Convert” button to start to convert Panasonic AJ-PX380 MXF to DNxHD MOV format. After conversion, import the converted MXF videos to Avid MC for real time editing and mastering.Conclusion: You can set auto shutdown in progress window or leave it there and come back later. There is no more difficulty in editing Panasonic AJ-PX380 MXF in Avid Media Composer.Further Reading:
Summary: If you're having the trouble uploading Panasonic HX-A1 MP4 to YouTube for sharing with more people, get the solution here. We show you how to do that in this simple guide.
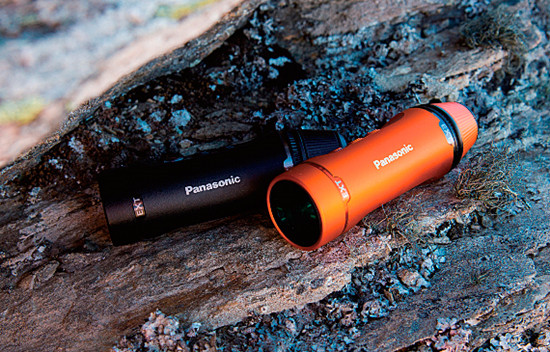 Hot search: YouTube Video to Keynote | iMovie videos to YouTube | XAVC S to YouTubePanasonic expands its line of wearable POV action cameras with the new HX-A1. The camera is incredibly lightweight, at only 1.6 ounces, yet has a rugged design that can withstand harsh environments. It is waterproof to depth of 5' without an additional housing, shockproof from drops of up to 5', dust proof (IP6X), and freeze proof to 14°F. This “quad-proof” design makes the A1 an ideal choice for nearly any action sport or adventure. It sports a cylindrical design that can be mounted in a variety of positions for hands-free action footage.“While we trying to upload the Panasonic HX-A1 MP4 to YouTube, the videos look great on my PC but YouTube consistently fails to process them correctly.” YouTube only accepts the MP4 file with the specific audio and video codec. So , how to upload a long Panasonic HX-A1 video to YouTube?Tips: YouTube supported video formatsThere are two basic issues we need to resolve: Convert Panasonic HX-A1 video to a compatible file type for YouTube; divide Panasonic HX-A1 files into shorter 15 min sections ( YouTube has a 15 min limit in usual). Along with the help of Pavtube Video Converter, you can complete the task effortlessly. The program is an easy-to-use MP4 converter for you which supports creating high quality H.264 MP4 video for YouTube, no matter what’s the format of your source video files.
 Other Download:- Pavtube old official address: http://www.pavtube.com/video_converter/- Amazon Download: http://download.cnet.com/Pavtube-Video-Converter/3000-2194_4-75734821.html- Cnet Download: http://download.cnet.com/Pavtube-Video-Converter/3000-2194_4-75734821.htmlHow to upload Panasonic HX-A1 MP4 to YouTube for sharing?Step 1: As soon as you download and install the program, launch it and when the main interface pops up in front of us, just click the “Add Video” or “Add from Folder” to let in.
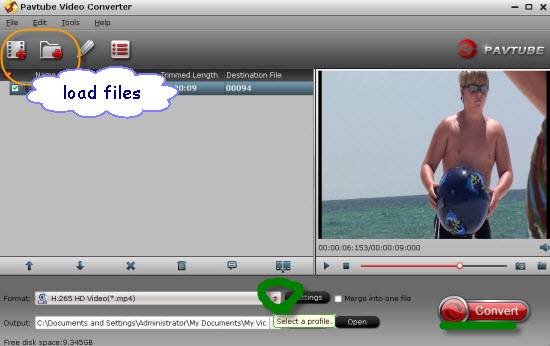 Step 2: When you load your files on the list, hit the “Format” bar, we wanna here suggest you to select the “HD Video”>>”H.264 HD Video (*.mp4)” as the best output format for YouTube.
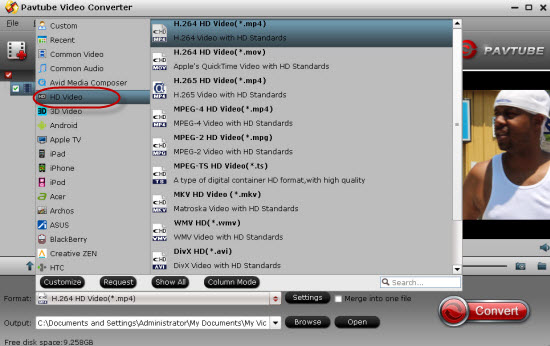 Step 3: Click “Edit” button and you can trim the video with the built-in video editor to get the very part and effect of the movie you want. Just choose the chapter which you need to trim, to set "start time" or "end time", type the portion which you want to save. If the video clips you've trimmed are still longer than 15 minutes, you can choose to split the long Panasonic HX-A1 video into smaller parts so as to share on YouTube without limit.Step 4: After that, click “Convert” to start the Panasonic HX-A1 to YouTube conversion.Conclusion: When the conversion ends, you can tap the “Open” button to locate the converted files and then upload the Panasonic HX-A1 MP4 to YouTube simply. Before uploading Panasonic HX-A1 footage to YouTube for sharing, if you wanna import your Panasonic HX-A1 MP4 to the NLEs for further editing, this Video Converter for Panasonic HX-A1 files is still a big help.Further Reading:
Summary: All in all, to smoothly import Sony PXW-X320 XAVC files to FCP 6/7, you'd better to convert X320 XAVC to FCP 6/7 totally compatible Apple ProRes MOV format.
 The PXW-X320 supports XAVC offering high quality content creation in the HD domain. In addition to XAVC, MPEG HD422, MPEG HD, MPEG IMX, and DVCAM are supported. Two HD/SD-SDI, HDMI, i.LINK, and composite outputs provide a wide range of AV and IT interfaces. However, if we want to import the XAVC videos from Sony PXW-X320 to FCP 6/7 for editing, you may find the high quality XAVC files are not recognized by FCP.While enjoying the stunning video quality, many folks are having problems when importing Sony PXW-X320 XAVC to FCP 6/7 like the below:“We shot a video using PXW-X320 and now when we are trying to import the XAVC files into FCP 7, but we are getting an error that says that there may be no codec for FCP 7.”“Importing Sony PXW-X320 XAVC to FCP 6 isn't working, it gives us an error.”Well, in fact, it’s not a “fresh” problem we’ve met when getting XAVC clips into Final Cut Pro. So what's the available workflow for Sony PXW-X320 and FCP? Although Sony itself generates plug-ins like XAVC/XDCAM Plug-in for Apple (PDZK-LT2) to enable FCP ingest Sony XAVC files correctly. However, the plug-in requires Final Cut Pro X 10.1 or later, that means if you want to import XAVC to FCP 6/7, it won’t work. Besides, you’ll need to a powerful Mac to edit the highly-compressed XAVC footage in FCP. So to transfer XAVC files from Sony PXW-X320 to FCP 6/7, a suggestion is to convert XAVC to ProRes which Final Cut Pro works best with.Pavtube HD Video Converter for Mac (review) is the solid tool to help users achieve the goal, applying which you are capable of converting XAVC to Apple ProRes format with lossless quality at faster speed so that you can edit Sony X320 XAVC in FCP 6/7 without any problem. Besides, the program is developed with some useful editing features, including merging several clips into one for easy importing, downsizing the files for editing and storage, adding text/image/video to original files, adding subtitles, replacing original audio tracks, etc. Other Download:- Pavtube old official address: http://www.pavtube.com/hd-video-converter-mac/- Amazon Store Download: http://www.amazon.com/Pavtube-Video-Converter-Mac-Download/dp/B00QI9GNZS- AppStore Download: https://itunes.apple.com/de/app/pavtube-hd-video-converter/id502792488?mt=12- Cnet Download: http://download.cnet.com/Pavtube-HD-Video-Converter/3000-2194_4-76177786.htmlHow to convert Sony PXW-X320 XAVC to ProRes 422 for FCP 6/7 editing on Mac?Step 1: Download and have a quick installation. The trial version will have a watermark on your converted files. Except for that, there are no time limitation, no virus, and no unnecessary bundle apps while downloading. After that, click “Add Video” button to load XAVC video. You can load several files at once thanks to “Add from folder” button.Step 2: Click the “Format” bar to get the drop-down menu and you can get “Final Cut Pro>>Apple ProRes 422 (*.mov)” as output format.Step 3: Click “Settings” button to customize the output video and audio settings by yourself. But if you are not good at it, you’d better use the default parameters, they will ensure you a good balance between file size and image quality basically. You can change the resolution, bit rate, frame rate as you need.Step 4: Click “Convert” button on the bottom of the screen to start XAVC to ProRes MOV conversion process. The amount of time it takes will vary based on your system’s hardware and the quality settings you selected.Conclusion: When the conversion is done, you can click “Open” button to get the generated video files. Now, you can edit Sony PXW-X320 XAVC in FCP 6/7 freely.Further Reading:
Summary: In this article, you’ll learn how to import AJA Cion 4K video to Premiere Pro CC for editing. Best solutions are offered here and keep reading.
 AJA Video Systems announced its AJA Raw CION camera format can be supported in Adobe Premiere Pro CC, but it is extremely hardware intensive. On the other hand, it is a complete nightmare to import AJA CION 4K video to Premiere Pro CC- it cannot recognize ProRes codec, and even worse than that is Adobe Premiere Pro (CC) will import an MOV file of any codec -Animation/ProRes, whatever doesn't matter. Whereas, you will find it is a painful experience to import 4K ProRes to Premiere Pro CC (before 8.2.0) or CS6, CS5, CS4.If you are currently using an older version of the Adobe (for instance prior to Adobe version CS5), maybe an upgrade of the Adobe version could help. Still stuck with unsuccessful attempts? Perhaps there is some required codec missing or it is an incompatible video file format. Actually, it’s not so hard to do the trick. Why we always have trouble editing because Premiere Pro still cannot accept all codecs. From Adobe Premiere Pro supported file formats list, we can find Premiere supports MPEG-2. So here comes to the key problem.Now, the problem seems easier to be solved–a professional and powerful tool is the solution. Here we recommend Pavtube HD Video Converter for Mac (review), applying which you are capable of converting AJA Cion 4K video to MPEG-2 .mpg format, the compatible video format with Premiere, with lossless quality at faster speed so that you can edit 4K videos in Premiere Pro CC without any problem. Besides, the program is developed with some useful editing features, including merging several clips into one for easy importing, downsizing the files for editing and storage, adding text/image/video to original files, adding subtitles, replacing original audio tracks, etc. Other Download:- Pavtube old official address: http://www.pavtube.com/hd-video-converter-mac/- Amazon Store Download: http://www.amazon.com/Pavtube-Video-Converter-Mac-Download/dp/B00QI9GNZS- AppStore Download: https://itunes.apple.com/de/app/pavtube-hd-video-converter/id502792488?mt=12- Cnet Download: http://download.cnet.com/Pavtube-HD-Video-Converter/3000-2194_4-76177786.htmlHow to import AJA Cion 4K video to Premiere Pro CC for editing?Step 1: Download and have a quick installation. The trial version will have a watermark on your converted files. Except for that, there are no time limitation, no virus, and no unnecessary bundle apps while downloading. After that, click “Add Video” button to load AJA Cion 4K video. You can load several files at once thanks to “Add from folder” button.Step 2: Click the “Format” bar to get the drop-down menu and you can get “Adobe Premiere/Sony Vegas”. Choose “MPEG-2 (*.mpg)” as output format.
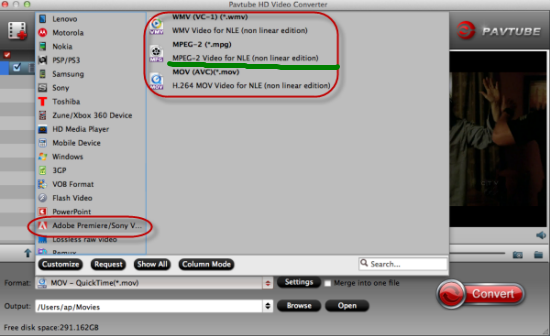 Step 3: Click “Settings” button to customize the output video and audio settings by yourself. But if you are not good at it, you’d better use the default parameters, they will ensure you a good balance between file size and image quality basically. You can change the resolution, bit rate, frame rate as you need.Step 4: Click “Convert” button on the bottom of the screen to start AJA Cion 4K video to MPEG-2 MPG conversion process. The amount of time it takes will vary based on your system’s hardware and the quality settings you selected.Conclusion: When the conversion is done, you can click “Open” button to get the generated video files. Now, you can edit AJA Cion 4K video in Premiere Pro CC freely.Further Reading:
Summary: This article provides tips on converting AVI for playing AVI on Mac OS X El Capitan smoothly. Keep reading and find something useful to you.
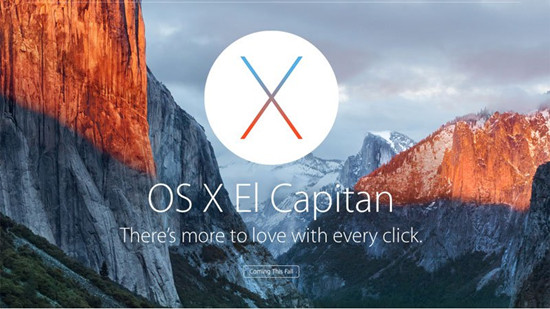 Hot search: convert MOV on OS X El Capitan | H.265 Converter for OS X El Capitan | edit video on OS X El Capitan |convert AVCHD MTS/M2TS on OS X El CapitanWhat’s the new features about OS X El Capitan?OS X El Capitan refers to the operating system exclusively unveiled at WWDC 2015 permitted to run on Mac computer by Apple Inc., after OS X 10.10 Yosemite. Aside from taking its name from California’s famous summit, El Capitan adds in more features such as gestures to make deleting messages in Mail quicker and easier than ever. On top of bringing new features to the Mac desktop environment, the new version of OS X will allow users to better manage their windows. Of course, El Capitan also brings performance increases. This includes a 1.4x acceleration in app launching, a two times improvement in switching apps, the time to receiving mail messages is twice as fast, and opening a PDF in preview is four times as fast. Additionally, OS X El Capitan also marks Metal’s introduction into the Apple’s desktop environment since it was first implemented with iOS 8 last year.What most people want from OS X El Capitan?According to research and survey on social media like Twitter, Mac users can’t wait to try the new window management, built-in apps and Spotlight® search, and Metal™, Apple’s breakthrough graphics technology. On the other hand, there is an increasing demand–converting, editing and playing video files like AVI and others on OS X El Capitan.Simple introduction of AVI:AVI, Audio Video Interleave video file format is developed by Microsoft mainly for Windows operating systems. Audio and video can be played in synchronous format without any halt in the video. AVI file format can be played with various media players like AVI media player, Media player classic, Plex and many others.As mentioned above, AVI is a file format mainly for Windows operating system. How about we play AVI on Mac OS X El Capitan default media player- QuickTime? However, QuickTime player on this new operation system are still restricted due to its limited media playback support for only certain file formats such as QuickTime Movie (*.mov), MPEG-4 (.mp4, .m4v), MPEG-2, MPEG-1, 3GPP, 3GPP2, AVCHD, AVI (Motion JPEG only) and DV.How to solve AVI playback problem on Mac OS X El Capitan? If you are not such a technical guy, it’s better to try out the easiest and quicker way; convert AVI to playable format on Mac OS X El Capitan. In order to save you from complex running steps, here suggest you Pavtube Video Converter for Mac (review), which is a professional tool to convert AVI to any popular format for all of your Mac applications or other digital devices. It has a good reputation online that can solve almost all the video format conversion troubles for our users. Even for the latest codec H.265/HEVC, it can hold well. Besides, it also supports encoding to M3U8. Other Download:- Pavtube old official address: http://www.pavtube.com/video-converter-mac/- Amazon Store Download: http://www.amazon.com/Pavtube-Video-Converter-Mac-Download/dp/B00QIBK0TQ- Cnet Download: http://download.cnet.com/Pavtube-Video-Converter/3000-2194_4-76179460.htmlHow to play AVI on Mac OS X El Capitan?Step 1: Download and have a quick installation. The trial version will have a watermark on your converted files. Except for that, there are no time limitation, no virus, and no unnecessary bundle apps while downloading. After that, click “Add Video” button to load your AVI files. You can load several files at once thanks to “Add from folder” button.
 Step 2: Select the right formats for playing AVI on Mac OS X El Capitan. Here we suggest you to go to the “Common Video” list, you will get the “MOV- QuickTime (*.mov)” as the best output.
 Step 3: It’s optional to edit video files before converting. If you want to do some edit work, just hit the clip first, and then click “Edit selected task” button. As it’s shown to us, the edit function is sufficient for you to make your videos wonderful.Step 4: Click “Settings” button to customize the output video and audio settings by yourself. But if you are not good at it, you’d better use the default parameters, they will ensure you a good balance between file size and image quality basically. You can change the resolution, bit rate, frame rate as you need.Step 5: Click “Convert” button on the bottom of the screen to start AVI conversion process. The amount of time it takes will vary based on your system’s hardware and the quality settings you selected.Conclusion: If you are a good reader, you’ll have no question about how to play AVI on Mac OS X El Capitan. Since there are many video programs on the market, if you are confused about which one to take, just try Pavtube Video Converter for Mac to ask for help cause disadvantages of it are not found yet.Further Reading: