Showing posts with label Panasonic. Show all posts

Wednesday, July 10, 2013

Best way to import Panasonic HC-X900 3D AVCHD videos to Final Cut Pro (X)

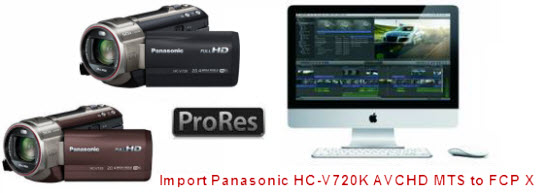
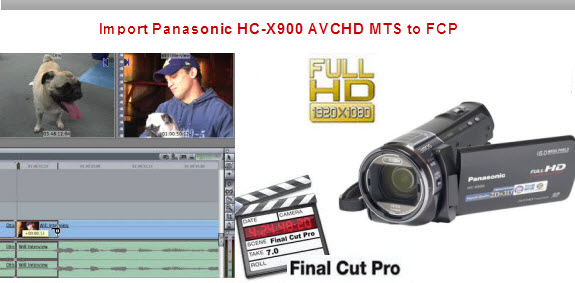
Follow this article you will know how to import Panasonic HC-X900 3D AVCHD to Final Cut Pro (X) for editing on Mac.

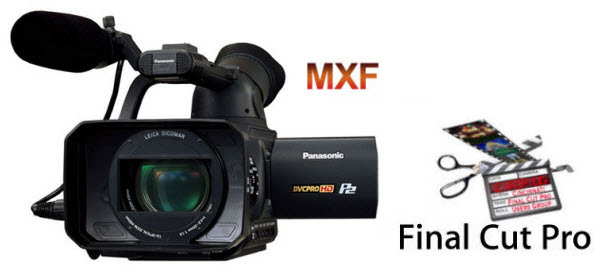
Panasonic HC-X900 is a full HD camcorder has three separate sensors for red, green and blue light; these help it capture more accurate colours and more detail, while reducing noise, compared to single-chip camcorders. The camera supports 1080 50/60p video as well as 1080i and PAL. The new model adds updated image stabilisation and an auto-stereoscopic screen for glasses-free 3D viewing with the optional 3D adaptor.


Now summer holidays are coming, users prefer to shoot videos or movies with this Panasonic HC-X900 when travelling or do some outdoor activities such as skating or riding a bike. Yes,  HC-X900 camcoder brings the sweet memory back to them, and for better effect they will choose Final Cut Pro to do the editing this 3D mts shootings from HC-X900. But when impoting, they may meet many problems.

Well, something’s wrong for with the unacceptable and incompatible AVCHD video format, so they can’t edit Panasonic HC-X900 3D AVCHD mts file in FCP (X) freely. The best way to deal with the problems is to do some conversion first. FCP (X) best supported video format is Apple ProRes 422 codec MOV format, so if you convert Panasonic HC-X900 3D AVCHD to ProRes 422 format, you can edit Panasonic HC-X900 3D MTS footages in FCP (X) smoothly without rendering.

Below is a guide for you to transcode Panasonic HC-X900 3D AVCHD to FCP (X) ProRes

At first, you need to Download the best 3D AVCHD Converter for Mac from Pavtube. 

This professional app helps you import native 3D stereoscopic AVHCD footage(2D as well) and export Apple ProRes 422 encoded .mov video, which can be imported to Final Cut Pro 7 and X without rendering. You can convert 3D MTS to 2D MOV video, or encode 3D AVCHD footage to Anaglyphic 3D that is also compatible with FCP X. Plus, this Mac MTS Converter also provides optimal presets for iMovie, FCE, Adobe Premiere Pro, Avid Media Composer, etc, ensuring smooth editing with different video editing programs on Mac OS X.

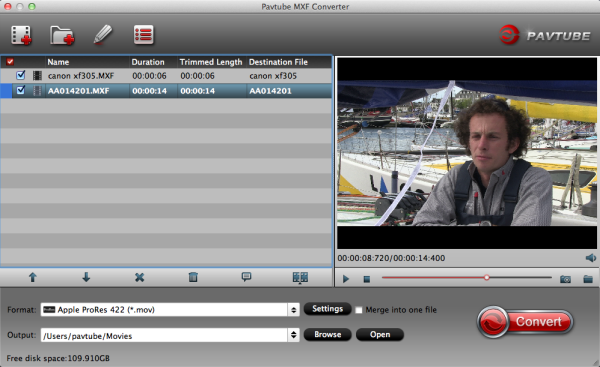
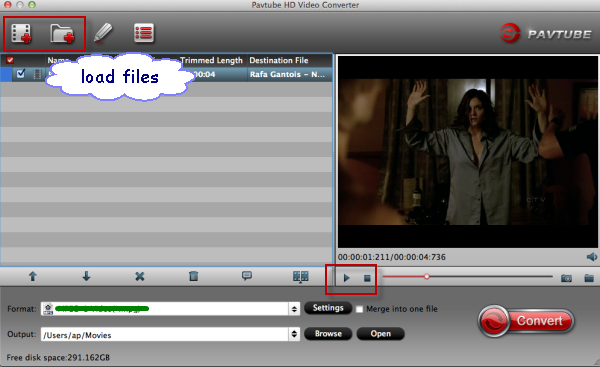
Step 1. Add Panasonic HC-X900 3D AVCHD footage
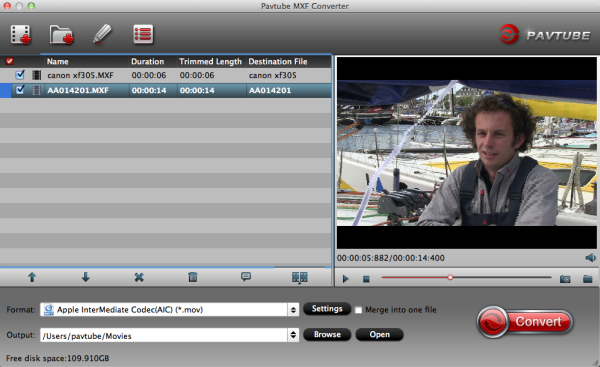
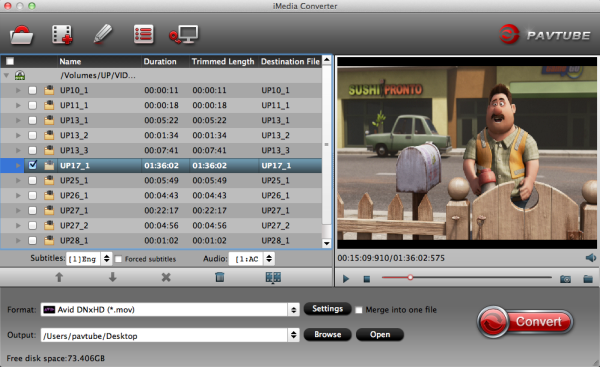
Install and run the Pavtube Mac 3D MTS to FCP Converter as the best Panasonic AVCHD to FCP (X) Converter, and directly drag and drop Panasonic HC-X900 3D AVCHD videos.


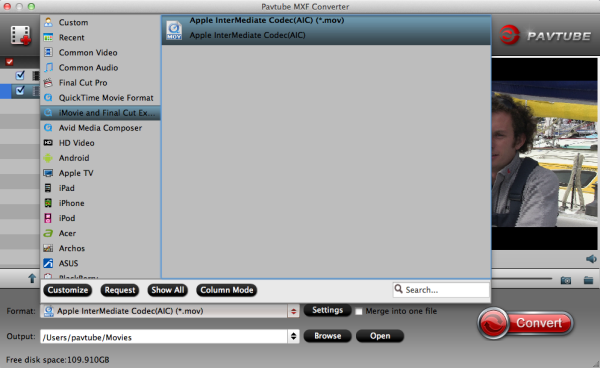
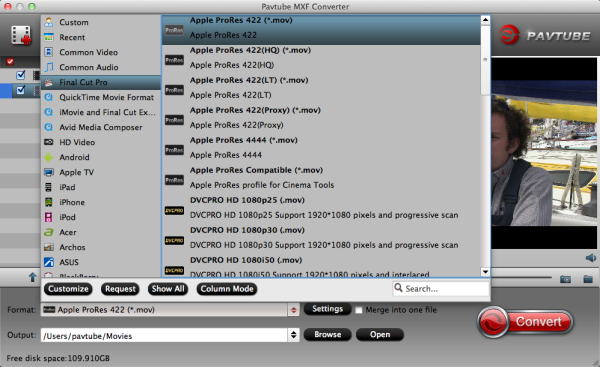
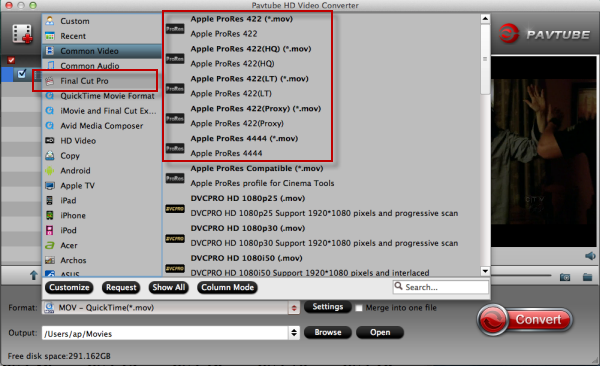
Step 2. Select "Apple ProRes 422" as output video format compatible with FCP (X).
Click the drop-down list in the Format line to get the format box. Then choose the Final Cut Pro -> Apple ProRes 422 (*.mov) for editing HC-X900 full HD 3D AVCHD files.


Step 3. Adjust the output video's parameters as you want.
Click the Setting button after the Format to get the Profile Settings. Change the Size to 1920*1080, the and set frame rate as 30fps.


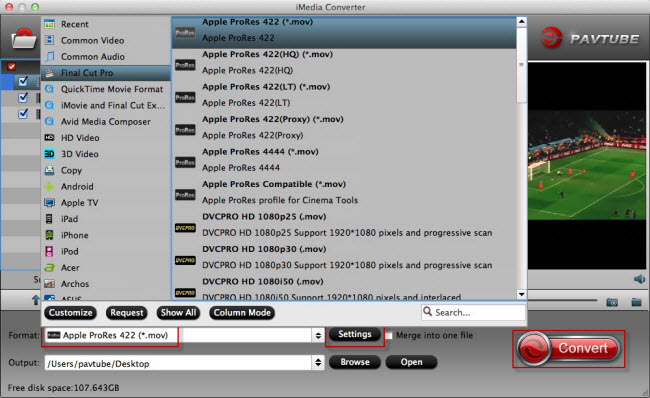
Step 4. Convert Panasonic HC-X900 3D MTS/M2TS to ProRes for FCP (X) for editing on Mac OS X.
Click the "Convert" button to start convert Panasonic  HC-X900  3D AVCHD MTS/M2TS to ProRes .mov for FCP (X).

With this Panasonic 3D AVCHD to ProRes Converter, you can edit Panasonic HC-X900 3D AVCHD video in FCP 6/7/X smoothly.

Red more Related gudie:

Tuesday, July 9, 2013

How to Import Panasonic AJ-HPX3100 P2 MXF footages into iMovie 11/9/8 on Mac

This article will help you to solve PanasonicAJ-HPX3100 MXF to iMovie importing problem, with a top MXF to iMovie Converter for Mac.

The AJ-HPX3100 may just change the way you view high-end broadcast camera recorders. Featuring three 2/3" high density 2.2 million pixel CCDs, the Panasonic HPX3100 acquires full-raster 1920 x 1080 resolution imaging with 4:2:2 10-bit sampling using the advanced AVC-Intra codec and its record video format is in MXF format.


After recording some files on the Panasonic AJ-HPX3100, and wanna edit Panasonic AJ-HPX3100 P2 MXF files in iMovie 11/9/8, you may meet some problems. The problems lie in that iMovie cannot support the original MXF files footages from AJ-HPX3100.

It is a common sense that the most compatible format for iMovie is Apple Intermediate Codec(AIC)(*.mov). So the first problem you have to solve this problem is to transcode  Panasonic AJ-HPX3100 AVCHD to AIC codec which is specially designed for editing in iMovie.

Here we recommend you to choose a top MXF Converter for Mac to help you convert panasonic AJ HPX3100 MXF to iMovie AIC .mov, with several simple clicks, and then edit  Panasonic AJ-HPX3100 P2 MXF with iMovie 11/9/8. The powerful P2 MXF Converter for Mac also can convert Panasonic AJ-HPX3100 P2 MXF for editing in FCP, FCE, Avid, Premiere Pro, etc on Mac for editing. Please just free download and try the easy-to-use Panasonic MXF Converter for Mac now!

Step by step guide to help you convert Panasonic AJ-HPX3100 P2 mxf file to AIC for editing in iMovie 11/9/8 

Step 1. Free download the Panasonic MXF to iMovie Converter for Mac, load your P2 MXF files into the program. As a top P2 MXF Converter, it also supports transcoding MXF to Apple ProRes Codec for editing with Final Cut Pro 6/7 and FCP X.


Step 2. Click the format bar, and move mouse cursor to "iMovie and Final Cut Express > Apple Intermediate Codec(AIC) (*.mov)" as output format.


Step 3. Click convert button in the main interface to start transcoding Panasonic AJ-HPX3100 P2 MXF to iMovie AIC MOV on mac.

Some more helpful features of the P2 MXF to iMovie Converter for Mac:

1. Settings- click to set video resolution(1920×1080/1440×1080/1280×720/720×480), bitrate(from 1Mbps to 20Mbps), frame rate (24p/30p)

2. Editor (next to "Add" icon)- click to set deinterlace, denoise, mute, volume up, trim, crop, etc.

After the workflow, you can go to the output folder to find the converted video files. Now you are free to load/edit Panasonic AJ-PHPX3100 P2 MXF files in iMovie 11/9/8 under Mac without problems.

Read More:

Monday, June 24, 2013

Import & Edit Panasonic HC-V720K 1080 60p/50p MTS files in Final Cut Pro X

In this post, you can get the info of Panasonic HC-V720K camcorder and learn how to import and edit Panasonic HC-V720K 1080 60p/50p AVCHD MTS in Final Cut Pro.
 
The Panasonic HC-V720K Live Streaming HD Camcorder features a 1/2.33" MOS sensor for recording Full HD 1080/60p video in the AVCHD format. The 21x zoom lens has a fast f/1.8 max aperture and a 35mm equivalent of 28-729.6mm, and the optical zoom is supplemented by an 50x Intelligent Zoom. Built-in Wi-Fi enables real time broadcasting via Ustream, and Near Field Communication technology allows users to connect a smartphone or tablet in one touch. Other features include a 3" LCD touchscreen monitor, Five Axis Hybrid OIS, 5.1-channel surround sound, and iA Plus Mode.


Panasonic HC-V720K camcorder works great, takes good video, and now I can easily create and share videos instantly from just about anywhere with it. Discover the power of instant sharing with Ustream, the ability to add excitement to your videos with built-in creative effects, and the delight in making high quality HD videos with ease. After making some footage with Panasonic HC-V720K camcorder in 1080 60p/50p AVCHD format, I'd like to edit the video from HC-V720K with Final Cut Pro X and upload the edited video to MySpace, but I was frustrated that HC-V720K 1080 60p/50p .mts file could not be imported into FCP X.

After googling, I was recommended to transcode V720K 1080 50/60p videos to Prores MOV for FCP X along with some help from a 3rd-party Pansonic AVCHD Converter for Mac.

If you looking for a solution for this problem likewise, check out Pavtube's iMedia Converter for Mac which is entitled as a top Panasonic MTS to FCP Converter. It supports encoding all Panasonic 1080p 50/60P AVCHD MTS files to Apple ProRes 422 so that you can easily and smoothly edit Panasonic HC-V720K Camcorder 1080 60p/50p recordings in Final Cut Pro X for editing on Mac. This will help you import the file correctly and saving the rendering time. 

Here is the step-by-step guide for you to import and edit Panasonic HC-V720K 60p/50p MTS to Prores MOV for Final Cut Pro X editing with Mac OS X like Mountain Lion, Lion, Tiger, Leopard, Snow Leopard. 

Step 1: Free Download and install Panasonic 50/60p MTS to FCP Converter to your Mac. It's excellent Panasonic AVCHD Converter which can convert nearly all Panasonic camcorder videos to any formats you need, such as Apple Prores 422 MOV, Apple InterMediate Codec MOV, QuickTime MOV, etc.


Step 2: Click the format bar, and move mouse cursor to "Final Cut Pro > Apple ProRes 422 (*.mov)" as output format for editing in Final Cut Pro X.

Here we recommend the Apple ProRes 422. In the settings you will find Pavtube allows you to keep the original frame rate 50/60fbps in the final ProRes files.


Step 3. Click "Convert" button to start transcoding Panasonic HC-V720K AVCHD 50/60p videos to FCP Apple ProRes on Mac OS.

After a shot conversion, you will be able to import/load Panasonic HC-V720K 1080 50/60p videos into Final Cut Pro X for editing without rendering.

Tips: Before you try to do the conversion, if you are also a FCP X user, please make sure that you have installed the Apple ProRes Codec manually since the FCP X asks users to install it by themselves.

Read More:

Sunday, June 23, 2013

Fast and Easy way to Convert Panasonic AG-HPX300 MXF to Apple Aperture 3

In order to edit Panasonic AG-HPX300 MXF clips in Apple Aperture 3 smoothly without codec problems,, you can follow this post to laern the best and easy way.  

Panasonic AG-HPX300 is a 1/3″ CMOS camera featuring full resolution 1920×1080 chips. The camera’s ENG frame comes equipped with a Fujinon 17x lens, making it the most affordable full-sized shoulder mounted camera available. The HPX300 has a feature-set including timecode, genlock and HD-SDI, which is usually found only on more expensive cameras. More importantly, the HPX300 can record Panasonic’s premiererecording format, AVC-Intra. When shooting in AVC-Intra mode the camera has the ability to shoot full-raster 1080p footage at 10-bit 4:2:2 color, something unheard of at this price-point.


The HD Camcorder shoots recordings in MXF file format. After make some footage on the Panasonic AJ-HPX3700, you may find your Apple Aperture 3 can't support Panasonic AJ-HPX3700 footages well. Then you have to look for the easy and fast workaround for editing Panasonic AJ-HPX3700 MXF files in Aperture 3 on Mac OS X Lion.

After google search, I find Pavtube MXF Converter for Mac which is the best professional MXF Converter for Mac software tool to make the Panasonic AJ-HPX3700 videos compatible to le Aperture 3. It would Convert Panasonic AJ-HPX 300 P2 .mxf files to Apple Aperture best supported video formats, such as Apple ProRes codec MOV, so that I can import onic AJ-HPX3700 MXF to Aperture 3 smoothly,  then you can edit the AJ-HPX3700 video in Apple Aperture without any crashing problem ank keep the original quality.

Now, you can follow the easy step by step tutorial, you will get to know how to convert Panasonic HPX300 MXF to Aperture 3 on Mac OS X Lion by yourself.

Step 1: Download Pavtube Mac MXF to Aperture Converter and import your HPX300 .mxf file.


Step 2: Click format column and choose the output format. You are recommended to choose Final Cut Pro -> Apple ProRes 422 (*.mov), it's great for editing in Apple Aperture.


Step 3: Click settings button to adjust the output video's parameters, such as bitrate, resolution, etc.


Step 4: Start converting Panasonic AJ-HPX3700 1080p MXF videos to ProRes codec for Apple Aperture 3.

After converting, you can load Panasonic AJ-HPX3700 footage to Apple Aperture for editing as you want, now you can have a try. Good luck!

See also: 

Friday, June 14, 2013

4K Video Converter – Convert 4K Video for editing with Mac in FCP, Avid, iMovie, Premiere Pro, FCE

Follow the guide below and you will know how to import 4K Video to FCP, Avid, iMovie, Premiere Pro, FCE without rendering or any other problems on Mac OS X(Mavericks included).

At CES 2013, Panasonic and Sony is unveiled their 4K camcorder, they witness the power of science and technology again. For consumers, this is a good thing, but the 4K camcorder is so expensive. Sony calls it a consumer model, but it definitely looks more like a prosumer piece of gear.

Videomaker's Best Camcorder of NAB 2013 is the Blackmagic Production Camera 4K, and there are other video camcorders can record videos in 4K, such as Canon C500, Sony NEX-FS700, Sony PMW-F55/F5, etc. the videos formats include MXF, XAVC mainly. But the 4K video doesn't have good compatibility. Especially edit 4K video on Mac. Here I'll share the Mac 4K editing solution, that is, how to edit such 4K high definition videos on Mac in FCP, Avid, iMovie, Premiere Pro, FCE.


What's the 4K video format?

Different 4K camcorders record different formats, the formats including MXF, MOV, MP4, AVCHD, MTS, M2TS etc. To make 4K videos editable on Mac in FCP, Avid, iMovie, Premiere Pro, FCE, we need to know Mac compatible formats first and then do conversion with a professional 4K to Mac Converter software tool.

Find below a step-by-step tutorial on how to ingest 4K formatted footage through Mac in FCP, Avid, iMovie, Premiere Pro, FCE.

Recommended Software

Pavtube HD Video Converter for Mac supports three professional encoders, Apple Intermediate Codec, ProRes and DNxHD – ensuring maximum editing quality and efficiency when working with iMovie, Final Cut Pro, Adobe Premiere, Final Cut Express or Avid Media Composer, respectively. With 4K Video Converter Ultimate for Mac, you can edit Canon, Sony, JVC and Panasonic 4K video on Mac easily.


4K Video Converter supported devices and formats:

Support Devices:
  • Sony 4K camcorder: FS 700 
  • Canon EOS C500 4K camcorder: EOS C500, EOS-1D C 
  • Panasonic 4K camcorder
  • JVC 4K camcorder
Support 4K formats:

4K MOV, 4K AVCHD, 4K MXF(P2), 4K MP4, 4K MTS, 4K M2TS etc.

How to transcode 4K video on Mac via 4K Video Converter?

Step 1: Install and run this Mac 4K Video Eocoder on your Mac.

Click "Add Video" and import the 4K video into this software. 4K Video to Mac converter Mac can help you transcode 4K video to FCP, Avid, iMovie, Premiere Pro, FCE for 4K to Mac importing natively.


Step 2: Choose output format

Click on "Format" bar and locate the appropriate output profile. To import 4K files to Mac, you need to convert to Mac supported formats.

  • Final Cut Pro 7/X
Move mouse cursor to “Final Cut Pro > Apple ProRes 422 (*.mov)” to set a FCP 7/X best codec.


Apple ProRes 422 – Higher quality than Apple ProRes 422 (LT)

Apple ProRes 422 (HQ) – Keep original video quality for editing in FCP

Apple ProRes 422 (LT) – Get a smaller file sizes than Apple ProRes 422

Apple ProRes 422 (Proxy) – SD levels – 480i/p and 576i/p. Used in offline workflows.

Apple ProRes 4444 – Edit and finish 4:4:4 material

  • Final Cut Express and iMovie
Choose FCE and iMovie friendly format- “iMovie and Final Cut Express > Apple Intermediate Codec (AIC) (*.mov)


  • Avid Media Composer 5.5/6 
In order to take advantage of the plugin AMA, you have to make sure that you still keep the structure of the file folder recorded by your camera. If not, here you can set Avid DNxHD (*.mov) for natively editing in Avid MC.


Step 3: Just hit the Convert button on the bottom right to kick off 4K to Mac Conversion.

Step 4: Import 4K video into Mac through FCP, Avid, iMovie, Premiere Pro, FCE

After conversion, locate and select the file you want to import, then click Import for further editing in Final Cut Pro 7/X, Final Cut Express/iMovie, Avid Media Composer.

Now, you can edit 4K video on Mac in FCP, Avid, iMovie, Premiere Pro, FCE natively, smoothly without any problem. Video and audio quality and synchronization are perfectly guaranteed.

Related posts:
Edit Blackmagic Production Camera 4K in FCP 

Thursday, June 6, 2013

P2 Card Mac Converter- Convert Panasonic AG-HPX170 P2 MXF to FCP X

As FCP X won't import Panasonic AG-HPX170 P2 MXF footage, so this easy workaround aims to help you to import/edit AJ-HPX170 P2 MXF files into Final Cut Pro X flawlessly.

Panasonic AG-HPX170 is an ultra-mobile P2 HD handheld camcorder featuring full, 4:2:2 independent frame production quality HD and solid-state recording. Its newly enhanced 1/3'' progressive 16:9 3-CCD imager delivers an excellent signal-to-noise ratio, lower noise/smear, and exceptional low-light performance. And HPX170 has two P2 card slots and records in 20 HD and SD formats. Files are saved onto the P2 memory card in MXF format allowing direct data transfer to broadcasting and production system.


After recording some files on the Panasonic AG-HPX170, you may find your Mac FCP X can not recognize the HPX170 P2 .mxf videos as below:

"I have a project has 26 files and a total size of 5.7GB. The camera was the Panasonic AG-HPX170, I found that all the video record by Panasonic P2 camcorder is of .mxf format which Final Cut Pro X don't support. How can I import the P2 MXF project into Final Cut Pro X?"

Panasonic AG-HPX170 records MXF file using AVC-Intra codecs. Due to the unfriendly codec, it is not easy to import such a P2 MXF file directly into FCP X. To edit Panasonic AG-HPX170 P2 MXF footage with Final Cut Pro X smoothly, you have to import AG-HPX170 P2 MXF to FCP X natively with FCP supported video format like MOV in Apple ProRes Codec.

Here we recommend you the best Mac P2 MXF to MOV Converter, which can help you to  easily and losslessly convert Panasonic AG-HPX170 P2 MXF to ProRes 422 for FCP X on Mac. And the latest Mac OS X Mountain Lion 10.8.3 is supported; just feel free to try it!

http://download.pavtube.com/mxf-converter-mac/mxfconvertermac_setup.dmg

How to convert Panasonic AG-HPX170 P2 MXF to ProRes 422 for FCP X on Mac? 
Step 1. Connect your Panasonic  AG-HPX170 P2 Camcorder to Mac with USB cable or use card reader to transfer the P2 MXF files to Apple hard drive disk.


Step 2. Add Panasonic Panasonic  AG-HPX170 P2 MXF videos to MXF Converter for Mac.

Run this MXF to ProRes Converter for Mac, and click the "Add Files" button to load individuals mxf videos; or click "Add from folder" to load the entire folder.


Step 3. Choose FCP X compatible format.

Click the "Format" option and click to choose Final Cut Pro>Apple ProRes 422 for editing HPX-170 P2 MXF in Final Cut Pro X.


Pls note the "merge into one file" box above "Open", you can lossless merge Panasonic MXF footages a few clicks.

Step 4. Now click the big red "Convert" and wait for a while to get the fresh hot converted video. Click Browse the locate them directly.

Launch FCP X, and go to "File > Import > Files…" to import converted P2 footage to FCP X project.


Now you can smoothly import Panasonic AG-HPX170 P2 MXF to FCP X on Mac Mountain Lion.

Read More:

Monday, June 3, 2013

How to get Panasonic AG-HVX200 P2 MXF to Final Cut Pro 6/7

Here it mainly introduce you a top P2 Card MXF Mac Converter so that you transcode Panasonic HVX200 P2 MXF to Apple ProRes MOV for FCP 6/7.


AG-HVX200 is a P2-based camera that answers the demands of nearly any professional videographer. It builds on the overwhelming success of the original AG-HVX200, with the addition of some much sought-after revisions. The most important new feature is an updated sensor, which yields higher sensitivity, creating less noise in low-light situations. With its compact and feature-rich frame, the AG-HVX200 will never disappoint. The unit is compatible with DVCPRO HD, DVCPRO50, DVCPRO25 and consumer DV recording standards.

Have you got this professional P2 camcorder? If so, have you tried to download MXF fotoages from P2 card to FCP 6/7 for further editing? If so, you won't find anything in FCP because FCP 6 and FCP 7 can't recognise MXF format.

Question: How to make it easier for editing Panasonic AG-HVX200 P2 MXF in FCP 6/7?

Answer: Convert Panasonic AG-HVX200 P2 MXF to ProRes for importing to FCP 6/7.

P2 MXF to FCP Converter is the highly recommended here for you to quickly and easily convert/transcode HVX200 P2 MXF to FCP supported Prores .mov format. It supports encoding Panasonic P2 and Canon C300/XF105/XF100/XF300 MXF files to FCP for editing on Mac. This will help you import the file correctly and saving the rendering time. Below is the detailed guide.

Convert and Edit Panasonic AG-HVX200 P2 MXF in FCP 6/7 with Apple Prores codec

Step 1. Free download the Panasonic MXF to FCP Converter for Mac, load your P2 MXF files into the program. As a top P2 MXF Converter, it also supports transcoding MXF to AIC Codec for editing with iMovie 8/9/11.


Step 2. Click the format bar, and move mouse cursor to "Final Cut Pro > Apple ProRes 422 (*.mov)" as output format for editing MXF in FCP 6/7.


Step 3. Click convert button in the main interface to start transcoding AG-HVX200 Panasonic P2 MXF to FCP Prores .MOV on mac.

Some more helpful features of the P2 MXF to Prores Converter for Mac:

1. Settings- click to set video resolution(1920×1080/1440×1080/1280×720/720×480), bitrate(from 1Mbps to 20Mbps), frame rate (24p/30p)

2. Editor (next to "Add" icon)- click to set deinterlace, denoise, mute, volume up, trim, crop, etc.

After the workflow, you can go to the output folder to find the converted video files. Now you are free to load/edit Panasonic AG-HVX200 P2 MXF files in FCP 6/7 under Mac without problems.

Read Related Articles:

Wednesday, May 22, 2013

Panasonic Lumix DMC-G6 News, Reviews, Tips


Lumix DMC-G6  Hands on:

Panasonic has just announced a new member to their lineup of mirrorless digital cameras: the Lumix DMC-G6. This camera succeeds the G5 and adds to it an array of performance and imaging enhancements, many of which are focused around improved movie recording and the integration of built-in wireless connectivity. Enhancing the G6 is the new Lumix G Vario 14-140mm f/3.5-5.6 ASPH POWER O.I.S. lens, which is also an update of a former product and features an increased maximum aperture and lighter overall weight. 

G6 specification highlights: 
  • 16MP Live MOS sensor 
  • ISO 160-12,800 (extendable up to 25,600) 
  • 3.0", 1.04 million dot capacative LCD 
  • 1.44 million dot OLED electronic viewfinder with eye sensor
  • Full AVCHD 1080/60p video with full manual control (and 2.4X digital teleconverter option) 
  • 3.5mm external mic socket 
  • 7 frames per second continuous shooting, 5 fps with AF-tracking 
  • 23 Scene modes including 'Cute Desert' and 'Sweet Child's Face' 
  • iAuto mode can automatically detect when to use 9 scene modes 
  • 'Clear Retouch' touch gesture-based heal tool 

FAQs: 
  1. What is the body made of??

    The body of this camera is made out of a composite material.
  2. Is it compatible with batteries from older models, or is it a new battery design?

    The G6 uses a 7.2V, 1200mAh battery, Panasonic product number DMW-BLC12. As far as I can tell, this is the same battery used by the G5, GH2, and FZ200.

  3.  Is is possible to log & transfer G6 recordings to FCP 7?

    Many Panasonic users may encountered import AVCHD files to FCP 7 problem. It is due to the format and codec incompatiblity. FCP only works in specific formats and video resolutions. The material from this camera has to be converted to FCP friendly codec, such as apple prores. So converting G6 footage to ProRes is the best method.
  4. How to remove the rendering time and smoothly edit G6 MTS files in FCP X ?

    As we know, Apple ProRes 422 codec MOV format is best supported video codec and format for FCP X. And Pavtube iMedia Converter for Mac can help you easily transcode G6 MTS to Final Cut Pro ProRes 422 codec. 

Tips:

This Mac Panasonic AVCHD Converter can be your best partner to convert Panasonic AVCHD MTS for FCE/iMovie and make Panasonic AVCHD files editable in Avid Media Composer.

Sunday, May 12, 2013

P2 MXF to iMovie- How to get Panasonic AJ-HPX2000 P2 .MXF into iMovie 6/8/9/11on Mac

In this guide, you will learn the easy way to import/edit Panasonic AJ-HPX2000 P2 MXF files into iMovie flawlessly on Mac by transcoding MXF to iMovie Apple Intermediate Codec encoded mov format.


Panasonic AJ-HPX2000 is a multi-format HD production camera that records onto P2 cards. Using the same sensor as the popular VariCam and HDX900 cameras, the HPX2000 can shoot native 720p or switch to shoot 1080i with 24p, 25p & 30p capture. Standard definition NTSC or PAL recording is also available.

While, most of the users have found that the MXF format is not well-suited for some non-linear video edit software including the Apple tool- iMovie. Here is one of the problems we found on the forum. One of my clients just bought a used Panasonic AJ-HPX2000, and wants to edit P2 MXF footages in iMovie 11 on OS 10.6, but he found iMovie can not recognize the P2 .mxf footages. Any idea? From the quoted words, it’s not hard to learn that MXF videos can not be directly imported to iMovie. So, how to import Panasonic P2 MXF to iMovie 6/8/9/11 for editing without any problem? Here we offer you the easiest solution.


To import and edit P2 MXF files in iMoive with ease, you need transcode Panasonic P2 MXF to iMovie supported video format. And we learn that AIC(Apple InterMediate Codec) codec MOV format is the iMovie perfectly supported format. In this case, a professional and easy-to-use P2 MXF Converter is the key. Here Mac P2 MXF to MOV Converter is the highly recommended tool for you.

It supports encoding Panasonic P2 and Canon C300/XF105/XF100/XF300 MXF files to iMovie native format so that you can easily import the Panasonic Camcorder recordings to iMovie for editing on Mac including importing P2 MXF to Avid MC and converting P2 MXF to FCP Prores. This will help you import the file correctly and saving the rendering time.

Convert, Transfer and Edit Panasonic AJ-HPX2000 P2 MXF footages in iMovie with AIC MOV codec

Step 1. Free download the Panasonic MXF to iMovie Converter for Mac, load your P2 MXF files into the program. As a top P2 MXF Converter, it also supports transcoding MXF to Apple ProRes Codec for editing with Final Cut Pro 6/7 and FCP X.


Step 2. Click the format bar, and move mouse cursor to "iMovie and Final Cut Express > Apple Intermediate Codec(AIC) (*.mov)" as output format.


Step 3. Click convert button in the main interface to start transcoding Panasonic P2 MXF to iMovie AIC MOV on mac.

Some more helpful features of the P2 MXF to iMovie Converter for Mac:

1. Settings- click to set video resolution(1920×1080/1440×1080/1280×720/720×480), bitrate(from 1Mbps to 20Mbps), frame rate (24p/30p)

2. Editor (next to "Add" icon)- click to set deinterlace, denoise, mute, volume up, trim, crop, etc.

After the workflow, you can go to the output folder to find the converted video files. Now you are free to load/edit Panasonic AJ-HPX2000 P2 MXF files in iMovie under Mac without problems.

Read More:

Tuesday, May 7, 2013

P2 Mxf To Final Cut Pro- Edit Panasonic P2 MXF in FCP on Mac

Want to edit P2 MXF video in Final Cut Pro? Here we'll show you how to convert and import MXF video to FCP for smooth editing.
Final Cut Pro even FCP X won't import P2 MXF videos from Panasonic camcorder. The easy workaround is to transcode/convert P2 MXF footage to Apple ProRes codec on Mac. It's much easier to be done with a professional P2 MXF Converter Mac. Below is how. 

The Panasonic P2 HD camcorder use the latest AVC-Intra Codec for broadcasting (compatible with MPEG-4 AVC/H.264) at 1080 in 24p, 25p, 30p, 50i and 60i, and in SD (480i/586i) in DVCPRO50, DVCPRO and DV. But new users may face some frustrating result when importing the P2 MXF footage into Final Cut Pro, because the P2 .mxf file format is not fully supported by Mac non-linear editing software such as FCP and iMovie.

Question: How to Import P2 MXF files to FCP on Mac OS X Lion?

Answer: Convert Panasonic MXF to ProRes 422 for Editing in FCP .

How to convert P2 Card MXF footage from Panasonic to ProRes 422 HQ

Step 1. Connect your AVC-Intra MXF Camcorder to iMac with USB 2.0 cable or use card reader to transfer the P2 AVC-Intra .mxf files to Apple hard drive disk.


Step 2. Add Panasonic P2 AVC-Intra MXF videos to this top Mac Panasonic MXF Converter.

Run Pavtube MXF Converter for Mac, and click the "Add Files" button to load .mxf videos.


Step 3. Choose MOV with Apple ProRes 422 codec for Final Cut Pro 6/7/X.

Click the "Profile" option, and move mouse cursor to Final Cut Pro > Apple ProRes 422 HQ (*.mov) as output format. To get 1080 videos, we need to click the "Settings" button and choose 1920*1080 as output video resolution.


Step 4. Specify output file path. Click on "Browse" and browse to where you'd like to save target Apple ProRes 422 HQ video.

Step 5. Convert Panasonic P2 MXF to ProRes 422 MOV for Final Cut Pro 6/7/X.

Click the "Convert" button and the Mac MXF Video converter would start converting Panasonic AVC-Intra MXF videos to Apple ProRes 422 MOV immediately.

Step 6. Press "Open" to locate result video. Launch FCP 6/7/X, and go to "File > Import > Files…" to import converted P2 footage to FCP project.


The software also converts P2 MXF and Canon MXF video to compatible formats for FCE/iMovie, Avid, Adobe Premiere Pro, After Effects, etc. You can convert Panasonic P2 MXF to AIC .MOV for FCE and iMovie, or transcode Panasonic AVC-Intra MXF to H.264 MOV, DV, AVI, M4V, MPG for Avid, Adobe Premiere Pro, and After Effects.

Read More:

Sunday, April 21, 2013

Convert/import Panasonic GF3 and GF2 AVCHD to iMovie

This is a guide assisting you to import AVCHD MTS files from Panasonic GF3 and GF2 to iMovie for editing.


Recently Panasonic GF3 and GF2 are two kinds of popular cameras among so many cameras.GF Series are choosen by many photographers due to its high quality images, and GF3/GF2 is convenient for you to take when you commute or travel.

Although Panasonic has been trying to ensure the widest compatibility with existing industry infrastructure and non-linear editing (NLE) systems, you will still meet the incompatibility when you want to get the GF3/GF2 footage off this sd card into iMovie. What does the problem lie in? After googling, you will get the reason. It is because that the iMovie can not support .MTS files while AIC is the perfect codec for it. So the solution is clear now. You need to convert Panasonic MTS files to AIC. After the MTS to AIC conversion, you can easily import Panasonic GF3/GF2 AVCHD to iMovie for further editing.


All you need is Pavtube MTS/M2TS Converter for Mac, this software can transcode Panasonic AVCHD to iMovie best codec AIC with the best quality and make the converted files more smooth in iMovie.


Now please follow the steps below to convert Panasonic GF3/GF2 AVCHD to AIC for iMovie.

1. Go to download and install the best Mac Panasonic MTS Converter to make the transcoding AVCHD to AIC task without quality loss, which offers you particular not only AIC for iMovie/FCE, but also Apple ProRes profiles for Final Cut Pro and DNxHD for Avid. Then launch the software to import your GF3/GF2 AVCHD clips to it.


2. Click on the Format box to choose iMovie and Final Cut Express-> Apple InterMediate Codec (AIC) (*.mov) for iMovie.


3. You can click the Settings icon to do some audio/video settings. We recommend 1920*1080 as video size and 30fps as video bitrate for easier editing on Mac. If you are in PAL(50p) area, you are recommended 25fps as video bitrate.

4. Hit the Convert button; it will convert Panasonic GF3/GF2 1080p AVCHD to iMovie immediately.

When the conversion process shows in 100% with the top AVCHD to MOV Converter Mac, you can get the resulted videos from output folder easily for loading into iMovie on Mac.

See also: 

Natively Work with Canon HF R50/R500/R52 MTS/MP4 with FCP X

Thursday, April 18, 2013

GH1 and Final Cut Pro- No Native GH1 AVCHD support in Final Cut Pro

The article offers you a darn easy GH1 and FCP solution for importing your GH1 AVCHD MTS to Final Cut Pro.

The major difference between the Lumix G1 and Lumix GH1 is the latter's ability to record HD video. Panasonic is of course an established player in the HD camcorder market, so it's not surprising to find the GH1's capabilities ticking most of the boxes of demanding videophiles, while also addressing many of the issues facing existing models. In terms of raw specifications, the Lumix GH1's video is certainly an impressive proposition. Unlike most cameras which only offer either 720p or 1080p recording, the GH1 gives you the choice of both, encoded using the highly efficient AVCHD compression system; alternatively you can record in 720p or standard definition modes in the Motion JPEG format.

Through Google search, I also found that many people have the same problem – about "how to import Panasonic AVCHD files to FCP Editing without quality loss?" So I want to write a solution based on this problem, look forward to helping more people. The following is the detailed steps:

Step 1: Load Panasonic GH1 AVCHD files to converter.

Go to download and install the best Mac Panasonic MTS Converter to make the transcoding task without quality loss, which offers you particular Apple ProRes profiles for Final Cut Pro, AIC for iMovie/FCE, and DNxHD for Avid. Then launch the software to import your AVCHD clips to it.


Step 2: Choose Apple ProRes 422 as Output video format.

Click and Choose Format > Final Cut Pro> Apple ProRes 422 (*.mov) as output format to convert AVCHD to ProRes. It's the best GH1 video format for editing in Final Cut Pro.


Step 3: Convert Panasonic GH1 footage to ProRes 422 for FCP

Click "Convert" button, start Transcode GH1 AVCHD to ProRes 422 and keep high quality.

After conversion, you can import and Edit Panasonic GH1 AVCHD files in FCP without rendering on Mac.

Tips:

Pavtube iMedia Converter for Mac can also Convert AVCHD clips to ProRes 422 and then you can edit the converted AVCHD files in Final Cut Pro(X), iMovie, Avid etc. it can also convert DVD, Blu-ray discs and videos, the most powerful converter.

Tuesday, April 16, 2013

Rewrap P2 MXF to MOV-Import Panasonic AVC-Intra P2 MXF to Avid Media Composer

This article shows you the best way to convert Panasonic recorded P2 MXF files to MOV for editing in Avid Media Composer.
 
As we know, P2 media is recorded in MXF format, it offers a variety of formats to choose from (DV, DVCPRO, DVCPRO 50, DVCPRO HD, and AVC-Intra 50 and AVC-Intra 100), differing in bit depth (8 or 10 bits), scanning mode (Progressive or Interlaced) and also frame rate. The Panasonic's 10-bit AVC-Intra codecs (AVC-Intra 50 and AVC-Intra 100) are very demanding on your computer's processor.The AVC-intra codec is a very processor heavy codec. It's possible the computer doesn't have enough horse power to play the clips.

I would like to edit the recorded P2.mxf video on iMac with Avid Media Composer, which is a professinal and popular editor works on Mac. While looking for solutions to import Panasonic P2 MXF to Avid Media Composeron iMac, I downloaded and tried several converters. Only Panasonic AVC-Intra MXF Converter for Mac from Pavtube works for me. I like the batch processing and joining of multiple mxf videos into one file. The editing feature to trim the recorded videos is great, as I can control the content for conversion.

For guys who may find it difficult to import and edit Panasonic AVC-Intra P2 MXF files on Mac, here is the fast guide to merge and convert Panasonic MXF to DNxHD MOV for Avid Media Composer. The DNxHD files it output works great in our Media Composer, hope it helps you too.

1. Load P2 AVC-Intra 50/100 MXF videos into Pavtube MXF to Avid Converter for Mac via clicking "Add video" icon.


2. Click "Format" bar to determine output format. For natively editing in Avid, you are recommended to choose Avid Media Composer -> Avid DNxHD (*.mov), this format is best for Avid Media Composer native editing.


3. If you would like to customize the video and audio parameters, you can click "Settings", adjust the parameters as you want, like Video Codec, aspect ratio, bit rate, frame rate, Audio codec, sampling rate, bit rate, channels.

4. Click "Convert" to start to convert Panasonic P2 to Avid Media Composer DNxHD codec for native editing.

For some Mac users, with P2 MXF Converter for Mac, editing the P2 AVC Intra MXF videos in Avid Media Composer is very easy and you will have no problem with MXF and Avid importing and A/V syncing.

Read more MXF editing solutions and how to import Panasonic P2 files.

Read More:

Tuesday, April 9, 2013

Convert/Import/Edit MXF/P2 MXF recordings in iMovie '11

Shot footage in MXF format? This article tells you how import your .mxf files to edit in iMovie 11 by converting MXF to AIC codec.
 
Nowadays, the professional camcorders such as Canon XF series camcorders and Panasonic P2 card camcorders are becoming more and more popular. While, what's a pity that these professional camcorders shooting footage in MXF format cannot be recognized by the popular video editor iMovie, even the latest version iMovie '11. So, how to import MXF/P2 MXF files to iMovie '11 for editing without any trouble?


You need a MXF Converter to convert MXF to iMovie supported video format, iMovie best video format is Apple Intermediate Codec (AIC) MOV format, so it’s great choice to transcode MXF to iMovie AIC MOV format, you can follow the guide below.


1. Download Pavtube MXF Converter for Mac, this software supports MXF conversion well; you can choose many formats for output.


2. Install and launch the MXF to iMovie converter.

3. Click format bar to choose best output format. For editing MXF files in iMovie on Mac OS, you can click and choose “iMovie > Apple Intermediate Codec (*.mov)”.


4. You can click settings button to adjust output parameters.

5. Click convert button to start. Pavtube MXF Converter will help you import/edit MXF to iMovie on Mac easily. Then you can use converted MXF files in iMovie on Mac as you want.

Tips:

The MXF/P2 MXF to iMovie Converter is the best application for you to convert/transcode MXF files to iMovie'11. Besides, if you want to convert/import MXF to FCP X, iDVD, etc for editing, this MXF/P2 MXF to iMovie Converter can also do you a favor.

Read more:

Convert Canon C500 (PL) 4K MXF to FCP X
Transcode MXF/P2 MXF to Apple ProRes for FCP X