Showing posts with label iMovie. Show all posts

Tuesday, August 20, 2013

How to get iMovie to work with Canon Vixia HF G30 60p mts video?

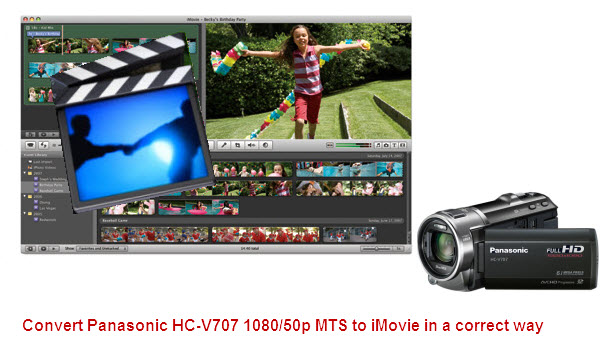
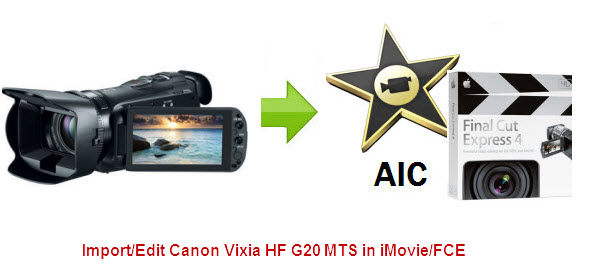
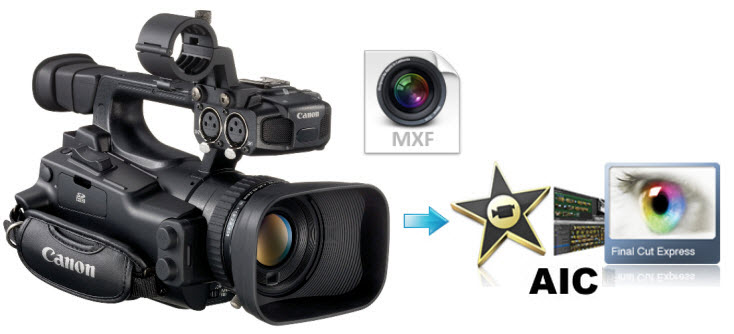
Here is a simple guide for you to convert Canon Vixia HF G30 60p mts video to AIC for iMovie editing.

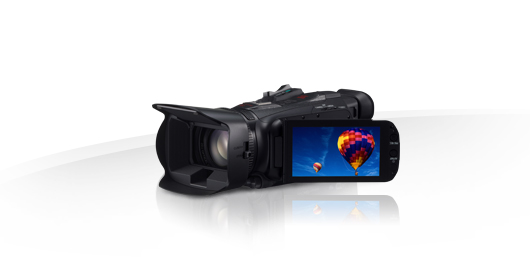
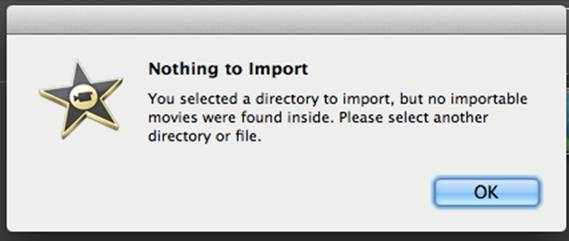
I just received the HF G30 and am still working my way through learning how it works. I'm using the iLife '11 version of iMovie on my MacBook Pro and MacPro desktop and neither is recognizing my Canon HF G30 camcorder when I connect it via the USB cable. The strange thing is the Canon icon and SD card icon both show up on my desktop but iMovie isn't recognizing the camcorder as connected and therefore won't import the 60p mts files.

When I try to manually import the AVCHD footage from the SD card, iMovie says there are no recognizable files, although the AVCHD files are definitely there (this is consistent with all my recordings and not just on one SD card). I wrote Canon and they have no idea why this occurring, claiming it's an Apple issue. Any idea what's going on and how I can solve it?

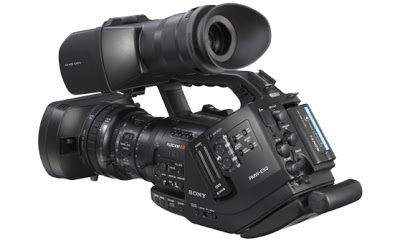
Canon VIXIA HF G30 Full HD Camcorder

Canon HF G30 supports MP4 recording at up to 35Mbps and AVCHD recording at up to 35Mbps. Both formats support Full HD 1080/60p resolution. Plus, images captured at 60 frames per second means that diagonal noise is mostly eliminated - even when shooting fast moving subjects. The camera also supports enhanced color and tonal gradation.

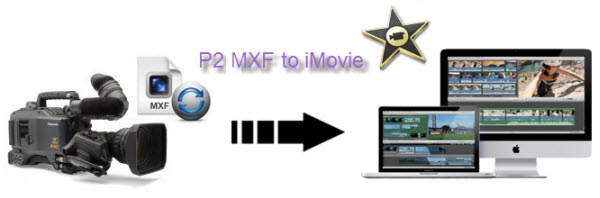
In fact, the 60p AVCHD MTS file is not an acceptable format by iMovie and then it has to convert them to a format it's able to edit in iMovie. So the best solution is to transcode Canon Vixia AVCHD to iMovie preferred format like AIC mov. If you have got one AVCHD camcorder Canon HF G30, and like editing with iMovie, below is a simple step by step guide for you to smoothly import and edit Canon HF G30 AVCHD 60p .mts files on iMovie editing with AIC codec.

Download Pavtube MTS/M2TS Converter for Mac

This best Canon AVCHD Converter for Mac offers optimal conversion by converting Canon HF G30 .mts to Apple Intermediate Codec, which works best in iMovie.
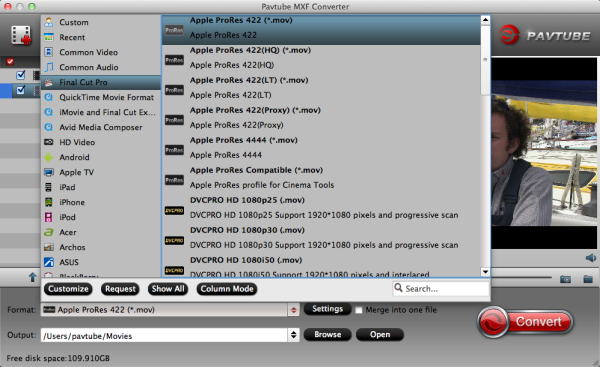
What's more, t
he software is a great choice for converting AVCHD videos to iMovie/Final Cut Express/Final Cut Pro editable formats. It works with Sony, Panasonic and Canon AVCHD .mts and .m2ts footage. There are various export format for users to choose from, including Apple’s ProRes 422 codec, Intermediate codec and QuickTime codec. It also lets users to convert AVCHD files into common video formats like AVI, MP4, WMV, MKV, MOV, M4V, etc.

How to convert Canon HF G30 60p AVCHD to AIC for iMovie on Mac

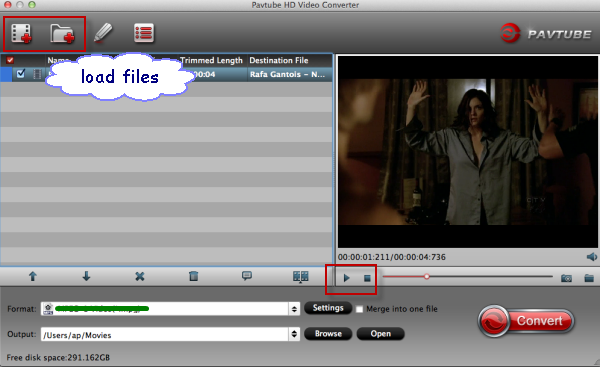
1. Connect Canon HF G30 Camcorder to Mac, and transfer the 60p mts files that you want to deal with onto Mac HDD.

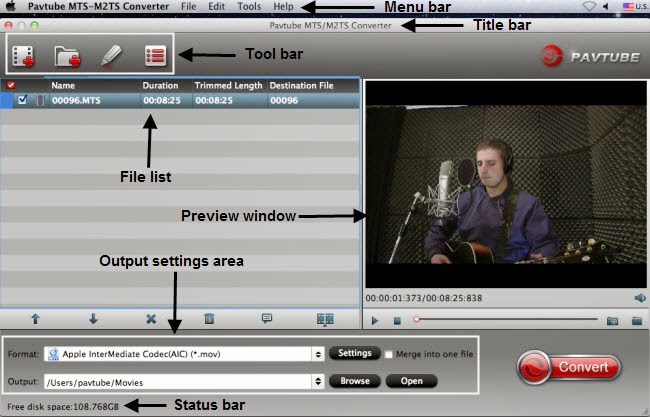
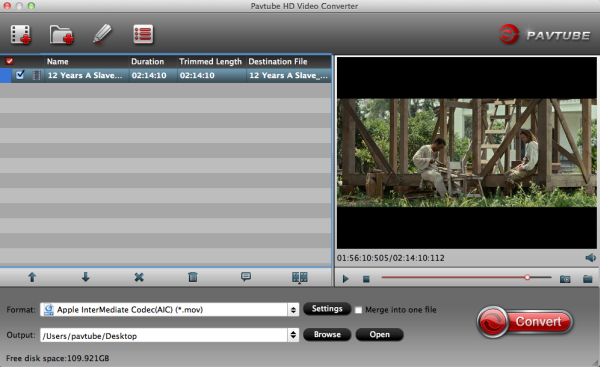
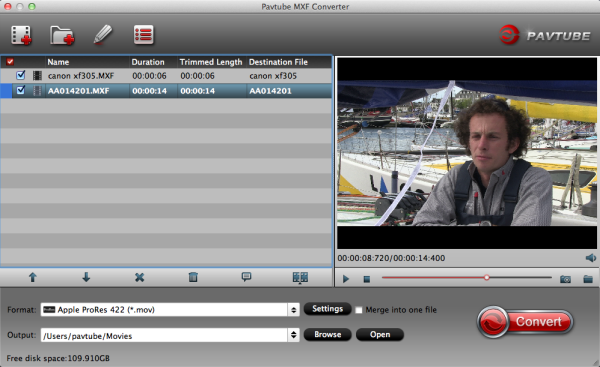
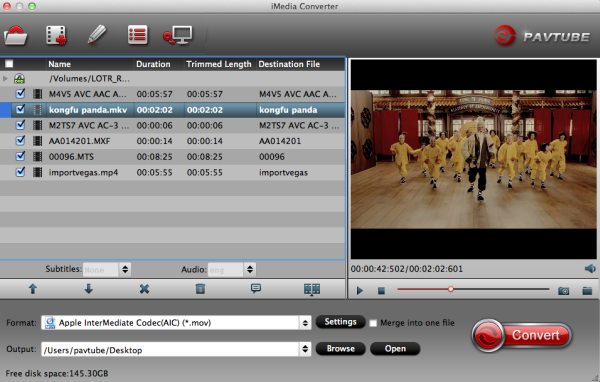
2. Run the Mac MTS to iMovie Converter, click the "Add" button to browse and import Canon HF G30 60p .mts files.


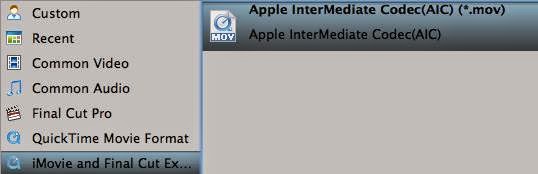
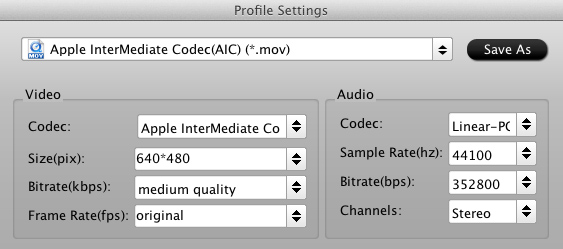
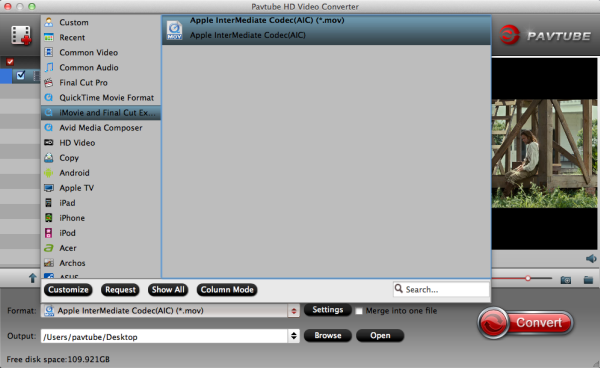
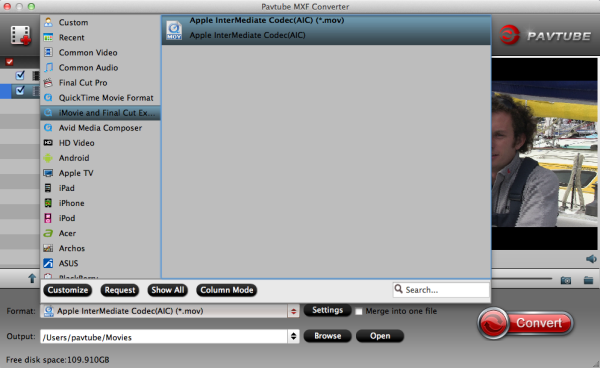
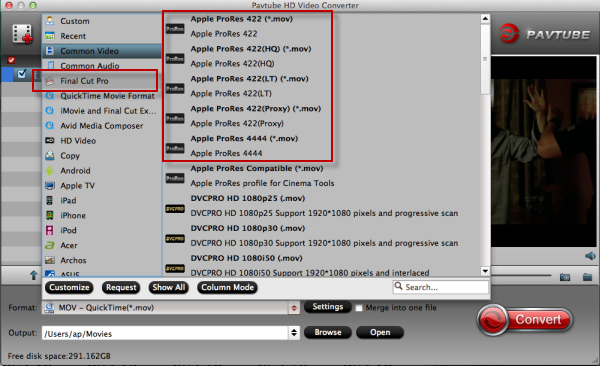
3. Click the "Format" bar, choose "iMovie and Final Cut Express>Apple Intermediate Codec (*.mov)" as output video format.


P.S. 

If you want to transfer Canon HF G30 MTS to Adobe Premiere Pro CS6 and After Effects CS6, choose Adobe Premiere/Sony Vegas> MPEG-2 (*.mpg) for editing.
4. Click the "Convert" button and the MTS Converter will start converting Canon HF G30 60p AVCHD MTS files to AIC .mov clips.

5. When the conversion completes, press "Open" to find encoded files. After Conversion, you can work with Canon HF G30 AVCHD MTS recordings in iMovie natively.
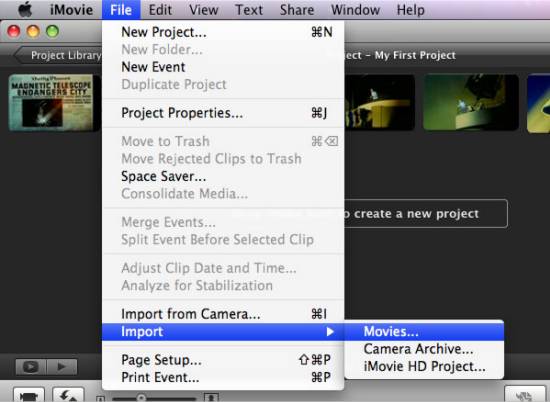

Tips:

1. For your original 1080/60i footages, you need to deinterlace 1080/60i AVCHD footages to remove all these interlacing artifacts from videos via ticking the “Deinterlacing” box in the Video Editor interface.

2. If the supposed size of the input files is 1GB, then the memory space should be up to 40GB.

3. Auto shutdown: Click Option and tick the box “Shut down the computer after conversion” before conversion starts.

4. 3D conversion. The Red-Blue/Red-Green 3D conversions are supported.

5. Crop: Edit --> Crop and you can get the imported videos cropped as you want.

6. Double click the imputed file, you can preview your footages in the software window.

Read More:

Wednesday, August 7, 2013

Convert Panasonic HC-V707 1080/50p MTS to iMovie in a correct way

Follow this guide below you will get to know the 50p MTS to iMovie solution. Now keep on reading the info about how to import Panasonic HC-V707 1080/50p AVCHD to iMovie for editing without rendering.

The Panasonic HC-V707 looks remarkably compact and shines in the test environment, especially with their manual functions. It offers the best manual control and Full HD recordings running at 50 progressive frames per second. 

  
I started the video project last year (with an old DV Camera that soon became defective) and since february this year I work with the Panasonic V707. I am working on a spiritual movie, that will be presented on my homepage only. After importing my 1080 50p/60p AVCHD films from V707 into iMovie, I get failed many times.

After a long search (google, forums) I understand the reason. For imovie editing workflow, the first clip you add to the project has a different frame rate from the project, iMovie prompts you to adjust the project frame rate to match. Therefore, the video clip from your Panasonic 1080 50p or 1080 60p camcorder doesn't match the project frame rate and as a result, imovie will not support my 1080/50p mts footage by my Panasonic V707. So the best workaround is to converPanasonic V707 50p Videos to iMovie in a correct way.

At first, I’ve been working with Xilisoft HD Video Converter, but my camera produces 1080/50p slow motion videos, which are not converted completely with Xilisoft. Fortunately, I find this professional Mac 1080/50p MTS Converter from Pavtube at last

With it, I have successfully converted 1080/50p AVCHD clips to compatible AIC .mov format with iMovie, and then I can import without rendering. In fact, I know this Pansonic AVCHD Converter for Mac still has a lot of functions, such as many optimized output formats for editing software or playable devices as well as its editing functions. In a word, I'm pleased with the software, very satisfied. 

If you have the same problem with importing Panasonic HC-V707 1080/50p AVCHD to iMovie, you can follow the step-by-step guide below to transcode 1080/50p Slow Motion Video from the  HC-V707 (MTS-File) to  MOV-File with AIC codec to use in iMovie.

1. Download Pavtube Panasonic AVCHD Converter for iMovie. Install and run to import your 1080/50p MTS footage from V707 to it.


2. Click format column to choose the output format for iMovie. Click and choose iMovie and Final Cut Express -> Apple InterMediate Codec (AIC) (*.mov), it's the best format for editing 1080/50p mts in iMovie.


3. You can click settings button to adjust output parameters, such as resolution and bitrate.


4. Click convert button to start.

The Mac 50p mts to iMovie Converter will convert Panasonic HC-V707 1080/50p AVCHD to iMovie compatible format quickly. After conversion, you can edit the converted video in iMovie as you want.

Pavtube MTS/M2TS Converter for Mac works as the companion for your Panasonic HC-V707 camcorder to convert 1080/50p AVCHD videos to AIC for editing in iMovie flawlessly. It keeps better color than compressor. What’s more, it can keep 50fps and 60fps in MOV, now you can have a try.  

Tuesday, July 30, 2013

Can I import RMVB into iMovie on Mac OS X 10.9 Mavericks ?

This is an article about how to convert rmvb file to AIC codec for importing to iMovie on Mac OS X Mavericks, along with the introduction of  RMVB Converter for Mavericks.


RMVB,short for a variable bitrate extension of the RealMedia multimedia container format developed by RealNetworks. RMVB is typically used for multimedia content stored locally. Files using this format have the file extension ".rmvb".

RMVB files are extremely popular for distributing Asian content, especially Chinese television episodes and movies. For this reason, they have become noticeably present (though not entirely popular, partly due to their incompatibility with other media players) on file sharing platforms such as BitTorrent, eDonkey and Gnutella. So RMVB files can be great for online downloads.

Mavericks brings more iOS features into the MAC along with other tweaks including iBooks, Apple Maps, Finder Tabs, and a number of other time-saving enhancements. However, it becomes even harder for you to get RMVB files into video editing program like iMovie on Mavericks due to the unsupported codec. You may know pretty well that iMovie can only import DV, MPEG-4, MPEG-4 and M4V, etc, but iMovie can't recognize RMVB naturally.

To import RMVB files to iMovie on Mavericks without any problem, you require this professional RMVB to iMovie Converter to convert Variable Bite Rate RMVB first to iMovie acceptable AIC codec and then import RMVB to iMovie with constant bit rate, with super fast conversion speed and excellent output audio and visual quality. Basic edition function supported, including crop, effect, merge, snapshot and rotate.

With this RMVB Converter for Mavericks, you can perfectly enjoy .rmvb videos on any common video players on Mac OS X Mavericks. Only change .rmvb format to accepted one by your video player, e.g. Apple QuickTime, convert .rmvb/rm files to .mov, .mp4, .3gp; Windows Media Player for Mac, covert .rmvb to .avi, .mpg. Just follow the steps below to transcode RMVB to AIC for importing to imovie for editing on Mavericks.

Preparation: 

1. Install and launch the Mavericks HD Video Converter. You can directly drag and drop .rmvb/.rm video files to this software.


2. Click Format bar to choose the output format. Click and choose iMovie and Final Cut Express>Apple Intermediate Codec(AIC) (*.mov).


4.You can click "Settings" to customize the output parameters, adjust the resolution, bitrate as you want.


5.Start convert RMVB to AIC for iMovie editing on Mac OS X 10.9 Mavericks.

Click the "Convert" button to start transcoding RMVB to AIC .MOV videos to be compatible with iMovie.

After the MP4 to Prores conversion finished, you can easily import video files and projects into iMovie for further editing without any trouble. Congratulations! You have successfully taken the first step to make your own masterpiece.

With this RMVB to AIC Converter, you can easily change RMVB .rmvb/.rm files to iMovie for editing on Mac OS X mavericks

More Related Guides:

Import Canon VIXIA HF G20 1080 60i AVCHD to iMovie/FCE
Get Panasonic AJ-HPX2000 P2 .MXF into iMovie 6/8/9/11on Mac
Convert Lumix GM1 MTS for Editing in iMovie 11/9/8

Tuesday, July 9, 2013

How to Import Panasonic AJ-HPX3100 P2 MXF footages into iMovie 11/9/8 on Mac

This article will help you to solve PanasonicAJ-HPX3100 MXF to iMovie importing problem, with a top MXF to iMovie Converter for Mac.

The AJ-HPX3100 may just change the way you view high-end broadcast camera recorders. Featuring three 2/3" high density 2.2 million pixel CCDs, the Panasonic HPX3100 acquires full-raster 1920 x 1080 resolution imaging with 4:2:2 10-bit sampling using the advanced AVC-Intra codec and its record video format is in MXF format.


After recording some files on the Panasonic AJ-HPX3100, and wanna edit Panasonic AJ-HPX3100 P2 MXF files in iMovie 11/9/8, you may meet some problems. The problems lie in that iMovie cannot support the original MXF files footages from AJ-HPX3100.

It is a common sense that the most compatible format for iMovie is Apple Intermediate Codec(AIC)(*.mov). So the first problem you have to solve this problem is to transcode  Panasonic AJ-HPX3100 AVCHD to AIC codec which is specially designed for editing in iMovie.

Here we recommend you to choose a top MXF Converter for Mac to help you convert panasonic AJ HPX3100 MXF to iMovie AIC .mov, with several simple clicks, and then edit  Panasonic AJ-HPX3100 P2 MXF with iMovie 11/9/8. The powerful P2 MXF Converter for Mac also can convert Panasonic AJ-HPX3100 P2 MXF for editing in FCP, FCE, Avid, Premiere Pro, etc on Mac for editing. Please just free download and try the easy-to-use Panasonic MXF Converter for Mac now!

Step by step guide to help you convert Panasonic AJ-HPX3100 P2 mxf file to AIC for editing in iMovie 11/9/8 

Step 1. Free download the Panasonic MXF to iMovie Converter for Mac, load your P2 MXF files into the program. As a top P2 MXF Converter, it also supports transcoding MXF to Apple ProRes Codec for editing with Final Cut Pro 6/7 and FCP X.


Step 2. Click the format bar, and move mouse cursor to "iMovie and Final Cut Express > Apple Intermediate Codec(AIC) (*.mov)" as output format.


Step 3. Click convert button in the main interface to start transcoding Panasonic AJ-HPX3100 P2 MXF to iMovie AIC MOV on mac.

Some more helpful features of the P2 MXF to iMovie Converter for Mac:

1. Settings- click to set video resolution(1920×1080/1440×1080/1280×720/720×480), bitrate(from 1Mbps to 20Mbps), frame rate (24p/30p)

2. Editor (next to "Add" icon)- click to set deinterlace, denoise, mute, volume up, trim, crop, etc.

After the workflow, you can go to the output folder to find the converted video files. Now you are free to load/edit Panasonic AJ-PHPX3100 P2 MXF files in iMovie 11/9/8 under Mac without problems.

Read More:

Thursday, July 4, 2013

Deinterlace and import Canon VIXIA HF G20 1080 60i AVCHD to iMovie/FCE

In order to get better importing and editing effect, you'd better deinterlace/convert Canon Vixia HF G20 1080 60i MTS video before importing to iMovie or FCE on Mac, just follow this article.


Canon VIXIA HF G20 Full HD Camcorder shoots 1920 x 1080 Full HD video at 60i, in native 24p and 30p. With the 24p frame rate option you can give your footage a cinematic look. Using Cinema-Looks Filters you can boost that film look with multiple built-in adjustable filters. The HF G20 features a Genuine Canon 10x HD Video Lens with an 8-Blade iris for more professional-looking video and stills. It has a 30.4 - 304mm (35mm equivalent) focal length. The camcorder is also equipped with a Canon HD CMOS Pro image sensor that supports improved low-light performance and a wide dynamic range.


Vixia HF G20 captures Full HD 1920x1080p videos in MPEG4 or AVCHD format. The AVCHD delivers stunning picture quality, but is not full supported by iMovie and FCE. So it is headache if you want to deinterlace and edit Canon Vixia HF G20 1080 60i MTS in iMovie or FCE. To successfully get Canon VIXIA HF20 1080i MTS files to iMovie/FCE for further editing, the best way is to transcode Canon Vixia AVCHD to iMovie/FCE most compatible format like AIC. mov.

Here we recommend you to choose the top Canon MTS to AIC Converter for mac, which can convert Canon HF G20 AVCHD recordings to AIC for editing in iMovie/FCE on Mac and keep the quality as original. Plus, 1080i videos are not perfectly readable for these video edit programs like FCP, iMovie and FCE. Thus, deinterlacing Canon 1080/60i MTS on Mac is imperative to be considered.

Steps: Deinterlace and Convert Canon Vixia HF G20 1080 60i MTS clips to iMovie or FCE.

Step 1: Install the best Canon AVCHD Converter for Mac on your Mac OS X, and run it to import your Canon Vixia HF G20 1080 60i MTS footages to it.

Tip: If you want to combine the files together, please tick the box "Merge into one" on the main interface.


Step 2: Click the Format box and select best output format on the dropdown list. You are advised to choose Apple Intermediate Codec(AIC)(*.mov) as the export.


Step 3: Click the “Settings” icon on the main interface and you’d better set the video size as 1920*1080, video frame rate as 30fps(or 25fps PAL) for importing Canon HF G20 1080i MTS to iMovie or FCE with the best quality.


Step 4: Click Edit button and you can deinterlace Canon VIXIA HF G20 1080i AVCHD file for iMovie via ticking the “Deinterlacing” box in the Video Editor interface.

Step 5: Click the "Convert" button on main interface to start converting/deinterlace Canon HF G20 1080/60i MTS recordings to AIC for editing in iMovie and FCE  immediately.

After the Canon MTS to iMovie/FCE Converter finished transcoding, you can run the iMovie or FCE to import the converted files and edit Canon Vixia HF G20 1080/60i MTS in iMovie and FCE without any rendering or incompatibility problem.

You may also learn how to convert AVCHD to ProRes 422 for FCP.

Read More:

Monday, July 1, 2013

4K workflow in FCP/iMovie-Edit Sony F65 MXF 4K video in Final Cut Pro and iMovie smoothly

Do you have some trouble with the "4K camera Sony F65 MXF editing workflow in Final Cut Pro and iMovie"? If so, just follow this guide to learn about how to import and edit Sony F65 4K .MXF in FCP and iMovie on Mac smoothly.


Sony F65 is a top-end motion picture camera. It features a true step-change in sensor technology, using a 20 Mega pixel 8K CMOS sensor. The F65 runs up to 120Fps, creates HD/2K or genuine 4K resolution images with a huge colour gamut, outstanding dynamic range, and high sensitivity.

Recording 4K(4096* 2160) video is very easy with this Sony F65, there is no need to talk much about the 4K video now. But one thing need to be mentioned, it is not so easy to edit raw 4K videos. for example , this Sony F65 records videos in MXF format, which is not friendly to Mac FCP, iMovie or other editing apps. If you get a F65 and want to edit the footage in FCP and iMovie, you need some third-party apps to convert the Sony F65 4K MXF files to Mac FCP and iMovie compatible formats first. Here is the solution.

Mac 4K MXF Converter - a professional Pavtube MXF to Mac Converter, it can help you to convert Sony PMW F65 MXF to FCP friendly Prores codec and acceptable AIC codec for editing with no quality loss.

According to the specs of FCP X, the latest FCP supports 4K video, and this top MXF Converter introduced here can output 4K videos with ease, that means, it can remain the original 4K resolution after conversion. Now get your program installed and let’s begin!

Convert Sony F65 4K MXF to Prores/AIC MOV for editing in FCP and iMovie on Mac?

Step 1. Install and launch the 4K MXF to Prores/AIC Converter, click ‘add videos’ to load individual videos, or click ‘add from folder’ to load the entire folder.


Step 2. Click "Format" bar to choose the output format.

If you want to edit video in FCP, click and choose Final Cut Pro -> Apple ProRes 422 (*.mov);


For editing in FCE, iMovie, you can choose iMovie/Final Cut Express -> Apple InterMediate Codec (AIC) (*.mov).

OptionalYou can click “settings” to customize the output parameters, adjust the resolution, bitrate as you want. 

Step 3. Click “Convert” and let it go!

After the Sony F65 SR 4K MXF footage into FCP and iMovie conversion, you will be able to get the output files via clicking on Open button effortlessly. Afterwards, you can transfer Sony F65 footages to Final Cut Pro and iMovie freely for further editing without any trouble.


Read More:

Tuesday, June 25, 2013

How to import XDCAM MXF files from Sony PMW-320 to iMovie 11/8/9

Encounter problems when import Sony PMW-320 MXF into iMovie 11/8/9 on Mac? Just follow this article to get the best tools and methods to edit PMW-320 MXF in iMovie.

Sony is pleased to announce the introduction of the new PMW-320 XDCAM EX Camcorder. This new shoulder mount camcorder joins the award-winning XDCAM EX product family of professional Solid State Recording acquisition tools. This new camcorder inherits all of the advanced creative recording features of the successful PMW-EX1, PMW-EX1R, PMW-EX3 and the PMW-350 camcorders, and also offers several enhancements such as improved low light capability as well as SD recording as a standard feature. Similar to the PMW-350, the PMW-320 supports multiple frame rate recording such as 59.94i, 50i, and native 23.98P and 25P as well as being 1080i/720P switchable.


When shooting some footage on the Sony PMW 320 and want to edit them in iMovie 11/8/9, you will meet the incompatiblity problem as below, since iMovie (including iMovie '11, iMovie '8 and iMovie '9) can not support the .mxf video files.

Just received some SD footage from a two camera shoot with PMW-320s, one camera had 4 audio lines and both cameras timecodes were synched. Is there a way to properly import the files to iMovie? since just moving them from the card gives me no timecodes and only 2 audio lines. plus the quality seems lower than i expected. Thanks.

How can the PMW-320 XDCAM EX Rewarapped MXF files be editable with the lossless quality? It is easy, as we know, the most compatible format for iMovie 11/8/9 is Apple Intermediate Codec(AIC)(*.mov). So to get your Sony PMW-320 MXF files and iMovie to play nicely, the quicker and easier way is to transcode those MXF to AIC MOV videos.Thus, the third party component is vital in achieving your goal.

Here we recommend you to choose a top MXF to AIC Converter for Mac to transfer Sony PMW-320 recordings for iMovie 11/8/9 editing. 

Steps for deinterlace Sony PMW-320 MXF clips to iMovie 118/9.

Step 1: Install the top Sony XDCAM MXF Converter for Mac on your Mac OS X, and run it to import your Sony PMW-3201080i/1080p MXF footages to it. Tip: If you want to combine the files together, please tick the box "Merge into one" on the main interface.


Step 2: Click the Format box and select best output format on the dropdown list. You are advised to choose Apple Intermediate Codec(AIC)(*.mov) as the export.


Step 3: Click the "Settings" icon on the main interface and you’d better set the video size as 1920*1080, video frame rate as 30fps(or 25fps PAL) for importing Sony PMW-320 MXF to iMovie 11/8/9 with the best quality.

Step 4: Click the Arrow button on main interface to start converting/deinterlace Sony PMW-320 MXF clips to AIC video immediately.

After the Sony PMW-320 MXF to AIC converter finished transcoding, you can run the iMovie 118/9 to import the converted files and edit Sony PMW-320 XDCAM MXF in iMovie 11/8/9 without any rendering or incompatibility problem.

Read More:

Monday, June 24, 2013

XAVC to AIC -Solution for Importing & Editing Sony PMW400 XAVC videos in iMovie11/FCE 4

Maybe you have come across Sony PMW-400 XAVC to iMovie/FCE imprting questions and here offers you the best solution for editing PMW-400 XAVC in iMovie 11 and FCE 4.

After the successful sale of PMW-F55 and PMW-F5 all over the world, Sony keeps on developing more new models so as to gain more market share and to solidify its position in the already-full HD cameras market. To our excitement, Sony is planning to launch another new shoulder-mount camcorder which’s likely to be called Sony PMW-400 in August, 2013.

According to Sony’s official website, PMW-400 is an “affordable” broadcast camera with three 2/3-inch high quality Exmor CMOS sensors – boasting good low-light sensitivity of F12 at 59.94Hz and F13 at 50Hz. It is said that it will be shipped with a a 16x zoom HD lens and a 960×540 color LCD viewfinder with high resolution. Just like PMW-55 and PMW-F5, this PMW-400 adapts and supports Sony’s peripheral XAVC codec to offer 10-bit HD422 recordings, including XAVC Intra frame 10-bit HD422 100Mbps and XAVC Long GOP 10-bit HD422 (low bit rate).

Speaking of XAVC, perhaps it is still new to some people. XAVC is a high-efficiency codec version designed to be used in a broader content production market. For mac users, iMovie and FCE are two kinds of easy-use tool to edit videos, however, you will find some XAVC footage from Sony PMW400 is not editable with iMovie11/FCE 4, such files will not be shown when you try to import. Keep reading and below is a quick and easy solution for solving the problem. 

To import Sony PMW400 XAVC files to iMovie 11 and FCE 4, the best way is to convert PMW400 XAVC to iMovie/FCE compatible AIC codec. To finish this job, a professional XAVC to AIC Converter for iMovie/FCE is necessary, and here, Pavtube XAVC Video Converter for Mac is highly recommended here.

How to convert Sony PMW400 XAVC/XAVCS media to AIC for iMovie11/FCE 4

Step 1. Install and launch the Pavtube HD Video for Mac, click "add videos" to load individual videos, or click "add from folder" to load the whole folder.


Step 2. Click "Format" preset and choose "iMovie and Final Cut Express-> Apple InterMediate Codec (AIC) (*.mov)" as best video format for editing Sony XAVC in iMovie and FCE as well as good video quality.


Step 3. now click "Convert" and let it go. The XAVC to AIC Converter for Mac supports batch conversion, so if you have lots of xavc videos to convert, check 'Shut down computer after conversion', and you can go away without keeping an eye on it.

Tips: When the conversion is finished, you can import the converted XAVC file to iMovie 11/FCE 4.

Now you are free to import/edit Sony PMW400 XAVC videos in iMovie 11 and FCE 4 under Mac without problems.

Related articles:

Edit F55/F5 XAVC in Sony Vegas
Burn XAVC to DVD

Tuesday, June 18, 2013

Easy way for Editing Sony PMW-EX3 XDCAM MP4 clips with Mac

In this post, you can learn the easy way to import .mp4 recorded from Sony PMW-EX3 to Mac in FCP, Avid, iMovie, Premiere Pro, FCE etc.


Sony PMW-EX3 follows on from the successful launch of the new PMW-EX1 and offers all the great features of the PMW-EX1 in a new semi-shoulder design. In addition to this new design the camcorder also features an interchangeable lens system, genlock, timecode and remote control capability for real added flexibility, offering a low-cost HD studio solution. It combines a state-of-the-art, non-linear XDCAM workflow with simply the best HD quality yet seen in a semi-shoulder camcorder.

PMW-EX3 camcorder records 1920 x 1080 HD images using the "MPEG-2 Long GOP" codec, which conforms to the MPEG-2 MP@HL compression standard, and the recordings are made as data files in the "MP4" format. "MPEG-2 Long GOP" is a mature codec which enables users to record stunning-quality HD video and audio with highly efficient, reliable data compression, but it is not an editing codec, so it is a big problem when loading or importing Sony PMW-EX3 mp4 clips into your Mac system.

Question: I recently purchased the Sony PMW EX3 and am loving it. My problem is this. I want to edit my footage. I have Final Cut Studio 1 which is apparently incompatible with the EX3 mp4 clips. I'm looking to make the jump to Avid Media Composer, iMovie and Adobe Premiere, but it doesn't works. Can anybody enlighten me?

The easy Solution: To make it easier for editing Sony PMW-EX3 MP4 videos on Mac, you can need to convert Sony EX3 mp4 clips to FCP, Avid, iMovie, Premiere Pro, FCE preferable format before importing to avoid crashing problem and waiting time. Mac Sony XDCAM EX Video converter is the best choice to do this. It can not only convert Sony PMW EX3 .mp4 videos to Mac compatible codec, but also make iteasy for merge videos.Below is a guide for you.

1. Download and install Pavtube iMedia Converter for Mac. This converter can help you transcode Sony PMW-EX3 mp4 video to FCP, Avid, iMovie, Premiere Pro, FCE.


2. Launch this Sony MP4 to Mac Converter, and import the EX3 recorded mp4 footages.


3. Click format bar to choose the format for output.

For editing EX-3 MP4 video on Mac, you can choose Apple ProRes 422 for FCP, DNxHD for Avid, AIC codec for iMovie, FCE, ProRes/MOVfor Premiere, etc.


4. You can click settings button in the main interface to adjust the output parameters, such as resolution, frame rate, etc, customize the parameters as you want.

5. Click convert button to start.

After Sony MP4 to Mac conversion, Optimize your workflow and save time with the Apple ProRes compression for Final Cut Pro. You can also import the output videos to Final Cut Express (FCE) 4, iMovie 11, Avid Media Composer or Premiere Pro for editing in full HD.

This Sony XDCAM EX Converter for Mac can not only convert Sony PMW-EX3 MP4 clips for FCP,  iMovie, Avid, Premiere Pro, FCE, but also rip your Blu-ray and DVD contents for editing with good quality.

Thursday, June 13, 2013

Mac Nikon MOV Converter-Compress Nikon D7100 HD MOV to iMovie 11

This guide will show you how to Convert Nikon D7100 HD MOV to iMovie 11 with AIC MOV , so that you can load your Nikon D7100 footages to iMovie/FCE for further editing on mac.

"I have 200+ raw mov files from a Nikon camera and want to edit these Nikon D7100 MOV in iMovie 11. Unfortunately, the file structure is gone and there's no way to edit this videos? I hope not. I am only hoping at this point to convert these files to useable formats and manually sync up the audio files and the video files. What can I do?" 


The MOV files Nikon D7100 outputs in encoded by H.264 high-def streams, which is different from QuickTime mov or others. Many traditional nonlinear editing programs on mac do not support H.264 codec directly, such as iMovie, FCP, Adobe premiere and so on. To load Nikon D7100 H.264 MOV to iMovie 11 or FCE, you need to convert them into iMovie preferred video format firstly. Besides, it's a pity if you don't keep the original file structure, but it's not unfixable – come and meet this Nikon D7100 Converter for Mac

This Mac Nikon to iMovie converter is not only able to convert organized videos files, but also able to deal with various videos and audios in batch. No need to install third party plug-in, no need to fix the settings manually; just import, choose iMovie preset, and click Convert. It's just as simple as that. The software does a good job in editing H.264 .mov files directly in iMovie/FCE and also easily convert Nikon D7100 video to FCP, AVI, WMV, MPG, etc. You can also remux, Trim, cut, split, mix videos, overlays, also add 3D effect to D7100 H.264 footages. Now mac 10.8.3 is supported, feel free to have a try! 

Now get this Mac iMovie AIC Converter installed; you can order a license directly or download a trial version here. 

Ok let's move on! 

How to Convert Nikon D7100 HD MOV to iMovie 11 with AIC MOV 

Step 1. Connect your Nikon D7100 camera to Mac with USB cable or use card reader to transfer the MOV files to Apple hard drive disk. 

Step 2. Add Nikon D7100 1080p H.264 MOV videos to Mac Nikon to iMovie Video Converter

Run HD Video Converter for Mac, and click the "Add Files"button to load individuals mov videos; or you can click "Add from folder"to load the entire folder. 


Step 3. Choose editing program compatible format. 

Click the "Profile"option, you will find various video formats sorted by different editing programs/devices. To get high video quality with least quality loss, you can choose iMovie and Final Cut Express>Apple InterMediate Codec(*.mov). 


Click Settings, you can fix the size to 1920*1080 to get better video quality; also you can fix the bitrate, frame rate as what you need. 


Step 4. Now click the big red Converter and wait for a while to get the fresh hot converted video. Click Browse to locate them directly. Ok now the transcoded files now are ready for editing Nikon D7100 MOV in iMovie 11 or FCE

Tips: 

This HD Video Converter is not only capable of converting Nikon footages, but also able to convert various video formats to each other. 

See also: 

Nikon D800E to FCP Converter 

Tuesday, June 4, 2013

Best XAVC Video Converter-Make Sony F55/F5 4K XAVC Video editable in iMovie and FCE

In this guide, I will show you some useful tips for importing Sony PMW-F55/F5 4K Digital Camera XAVC Footages to iMovie/FCE for smoothly editing.


Sony has announced that cameras that will support XAVC include two CineAlta cameras which are the Sony PMW-F55 and Sony PMW-F5. Both cameras record XAVC with a color depth of 10-bits and 4:2:2 chroma subsampling. The Sony PMW-F55 can record XAVC with 4K resolution at 30 fps at 300 Mbit/s and 2K resolution at 30 fps at 100 Mbit/s. The Sony PMW-F5 can record XAVC with 2K resolution at 30 fps at 100 Mbits/s.

XAVC can record 4K resolution at 60 fps with 4:2:2 chroma subsampling at 600 Mbit/s.A 128 Gigabyte SxS PRO+ media card can record up to 20 minutes of 4K resolution XAVC video at 60 fps, up to 40 minutes of 4K resolution XAVC video at 30 fps, and up to 120 minutes of 2K resolution XAVC video at 30 fps. As the lasted HD recording formats introduced by Sony, XAVC format is seldom used now, when you are planning to conduct post production to the PMW-F55 (or PMW-F5) XAVC footages with your Mac editor like iMovie and FCE, you may encounter with the problem like "the file cannot be imported/opened".

So how to solve the problem with loading Sony F55/F5 4K XAVC to iMovie/FCE? At first, you need to convert XAVC to AIC .mov which is best editing format for iMovie and Final Cut Express. Now please get the help of a professional 4K XAVC Video Converter for Mac and follow the guide below to transcode Sony F55/F5 4K XAVC to iMovie/FCE step by step:

How to make Sony F55/F5 4K XAVC Video editable in iMovie and FCE?

Step 1. Add XAVC MXF files

Install and launch Pavtube HD Video Converter for Mac, and click "Add File" to import your Sony PMW-F5/F55 XAVC files; or click "Add from folder" to load videos in batch.

This is a powerful XAVC video converting software which can not only easily convert XAVC footages to FCE/iMovie preferred formats smoothly, but also import Sony PMW XAVC into FCP without any problem.


Step 2. Choose AIC codec for iMovie and Final Cut Express.

Choose output video format from the 'Format' preset, and click 'Output' to change converted video path. Then pls click iMovie and FCE>Apple InterMediate Codec(AIC)(*.mov) to get Sony XAVC to FCE/iMovie preferred codec.


Step 3. Adjust output settings

If you want to locate your videos quickly, click Browse. The "Settings" icon will meet your requirements of adjusting video bitrate, frame rate and so on.

To get 1080 videos, we need to click the "Settings" button and choose 1920*1080 as output video resolution.

Moreover, you can edit your Sony XAVC videos before converting. By clicking the pencil icon on the top of Mac XAVC Video Converter, you can trim/crop the video clips, add or adjust video effect, or take snapshots from video as you like.

Step 3. Start converting Sony XAVC to AIC MOV for iMovie/FCE.

Click the big red circle to convert Sony PMW-F5/F55 XAVC videos to iMovie/FCE on Mac.

After conversion finished, you then are able to edit or share your XAVC HD videos on the go.

See more:

XAVC and Premiere Pro workflow
Convert XAVC to AVI/WMV/MOV/MP4/FLV

Monday, June 3, 2013

Top MXF to MOV Transcoder- Convert Canon XF300 MXF files to AIC .MOV for iMovie/FCE

This guide will show you how to convert Canon MXF files to AIC MOV on Mac so that you can smoothly import/edit Canon XF300 MXF files in iMovie and Final Cut Express without any problem. 

Canon HD camcorders are more and more popular and XF300 Professional Camcorder takes advantage of the latest HD technology, along with Canon's newly developed MPEG-2 4:2:2 codec to record Full HD video to affordable Compact Flash cards. So it is a good choice to shoot funny videos or record their interesting family life with it. But for the Canon XF300 output format is mxf, and most of video editors can not recognize mxf file format, like iMovie and Final Cut Express, this make many Canon fans be headache. Below, I will throw a quick guide up for those who wanna ingest/edit Canon XF300 MXF footages into iMovie and FCE smoothly.


Here is the easy way to fix it, namely, converting Canon XF300 MXF to AIC MOV on Mac. If you are interested doing likewise, check out Pavtube's iMedia Converter for Mac, the best Mac MXF to MOV Converter. The program is an easy-to-use and intuitive Mac tool for camcorder users. It is good at batch converting MXF recordings shot by Panasonic P2 camcorders, Canon XF series cameras to AIC MOV formats compatible with your Mac iMovie and FCE, becide it supports XF300 MXF to FCP transcoding.

Guide on how to convert Canon XF300 MXF files to AIC for iMovie/FCE on Mac

If you have the same problems about editing Canon XF300/XF105/XF100 or C300 MXF Videos on Mac, you may follow the step-by-step guide.

Step 1. Free download and run the best Mac MXF to AIC Transcoder for FCE/iMovie, add MXF captured by XF300 to the program. You can not only click "add video" button to import Canon mxf files, but also you can click "add from folder" button to add MXF folder.


Step 2: In order to convert/import Canon XF300 MXF files to AIC for iMovie/FCE, you just need select AIC (*.mov) as output format.

Please click on the dropdown menu of "Format", and then follow "iMovie and Final Cut Express > Apple InterMediate Codec(AIC)(*mov)."


Some more helpful features of the batch MXF to MOV Converter for Mac:

1. Settings- click to set video resolution(1920×1080/1440×1080/1280×720/720×480), bitrate (from 1Mbps to 20Mbps), frame rate (24p/30p)

2. Editor (next to "Add" icon)- click to set deinterlace, denoise, mute, volume up, trim, crop, etc.

3. This all-in-one toolbox can not only convert MXF files, but also transcode other HD video and rip Blu-ray/DVD  for playback, storage or editing.

Step 3: Click Convert" button to start transcoding XF300 MXF files to AIC MOV for iMovie/FCE  editing on Mac.

So there you have it. Once the MXF to MOV Conversion is done, you can go to the output folder to find the converted video files. Now you are free to import/edit Canon XF300 MXF files in iMovie/FCE under Mac without problems.

Read More:

Wednesday, May 22, 2013

Panasonic Lumix DMC-G6 News, Reviews, Tips


Lumix DMC-G6  Hands on:

Panasonic has just announced a new member to their lineup of mirrorless digital cameras: the Lumix DMC-G6. This camera succeeds the G5 and adds to it an array of performance and imaging enhancements, many of which are focused around improved movie recording and the integration of built-in wireless connectivity. Enhancing the G6 is the new Lumix G Vario 14-140mm f/3.5-5.6 ASPH POWER O.I.S. lens, which is also an update of a former product and features an increased maximum aperture and lighter overall weight. 

G6 specification highlights: 
  • 16MP Live MOS sensor 
  • ISO 160-12,800 (extendable up to 25,600) 
  • 3.0", 1.04 million dot capacative LCD 
  • 1.44 million dot OLED electronic viewfinder with eye sensor
  • Full AVCHD 1080/60p video with full manual control (and 2.4X digital teleconverter option) 
  • 3.5mm external mic socket 
  • 7 frames per second continuous shooting, 5 fps with AF-tracking 
  • 23 Scene modes including 'Cute Desert' and 'Sweet Child's Face' 
  • iAuto mode can automatically detect when to use 9 scene modes 
  • 'Clear Retouch' touch gesture-based heal tool 

FAQs: 
  1. What is the body made of??

    The body of this camera is made out of a composite material.
  2. Is it compatible with batteries from older models, or is it a new battery design?

    The G6 uses a 7.2V, 1200mAh battery, Panasonic product number DMW-BLC12. As far as I can tell, this is the same battery used by the G5, GH2, and FZ200.

  3.  Is is possible to log & transfer G6 recordings to FCP 7?

    Many Panasonic users may encountered import AVCHD files to FCP 7 problem. It is due to the format and codec incompatiblity. FCP only works in specific formats and video resolutions. The material from this camera has to be converted to FCP friendly codec, such as apple prores. So converting G6 footage to ProRes is the best method.
  4. How to remove the rendering time and smoothly edit G6 MTS files in FCP X ?

    As we know, Apple ProRes 422 codec MOV format is best supported video codec and format for FCP X. And Pavtube iMedia Converter for Mac can help you easily transcode G6 MTS to Final Cut Pro ProRes 422 codec. 

Tips:

This Mac Panasonic AVCHD Converter can be your best partner to convert Panasonic AVCHD MTS for FCE/iMovie and make Panasonic AVCHD files editable in Avid Media Composer.

Sunday, May 12, 2013

P2 MXF to iMovie- How to get Panasonic AJ-HPX2000 P2 .MXF into iMovie 6/8/9/11on Mac

In this guide, you will learn the easy way to import/edit Panasonic AJ-HPX2000 P2 MXF files into iMovie flawlessly on Mac by transcoding MXF to iMovie Apple Intermediate Codec encoded mov format.


Panasonic AJ-HPX2000 is a multi-format HD production camera that records onto P2 cards. Using the same sensor as the popular VariCam and HDX900 cameras, the HPX2000 can shoot native 720p or switch to shoot 1080i with 24p, 25p & 30p capture. Standard definition NTSC or PAL recording is also available.

While, most of the users have found that the MXF format is not well-suited for some non-linear video edit software including the Apple tool- iMovie. Here is one of the problems we found on the forum. One of my clients just bought a used Panasonic AJ-HPX2000, and wants to edit P2 MXF footages in iMovie 11 on OS 10.6, but he found iMovie can not recognize the P2 .mxf footages. Any idea? From the quoted words, it’s not hard to learn that MXF videos can not be directly imported to iMovie. So, how to import Panasonic P2 MXF to iMovie 6/8/9/11 for editing without any problem? Here we offer you the easiest solution.


To import and edit P2 MXF files in iMoive with ease, you need transcode Panasonic P2 MXF to iMovie supported video format. And we learn that AIC(Apple InterMediate Codec) codec MOV format is the iMovie perfectly supported format. In this case, a professional and easy-to-use P2 MXF Converter is the key. Here Mac P2 MXF to MOV Converter is the highly recommended tool for you.

It supports encoding Panasonic P2 and Canon C300/XF105/XF100/XF300 MXF files to iMovie native format so that you can easily import the Panasonic Camcorder recordings to iMovie for editing on Mac including importing P2 MXF to Avid MC and converting P2 MXF to FCP Prores. This will help you import the file correctly and saving the rendering time.

Convert, Transfer and Edit Panasonic AJ-HPX2000 P2 MXF footages in iMovie with AIC MOV codec

Step 1. Free download the Panasonic MXF to iMovie Converter for Mac, load your P2 MXF files into the program. As a top P2 MXF Converter, it also supports transcoding MXF to Apple ProRes Codec for editing with Final Cut Pro 6/7 and FCP X.


Step 2. Click the format bar, and move mouse cursor to "iMovie and Final Cut Express > Apple Intermediate Codec(AIC) (*.mov)" as output format.


Step 3. Click convert button in the main interface to start transcoding Panasonic P2 MXF to iMovie AIC MOV on mac.

Some more helpful features of the P2 MXF to iMovie Converter for Mac:

1. Settings- click to set video resolution(1920×1080/1440×1080/1280×720/720×480), bitrate(from 1Mbps to 20Mbps), frame rate (24p/30p)

2. Editor (next to "Add" icon)- click to set deinterlace, denoise, mute, volume up, trim, crop, etc.

After the workflow, you can go to the output folder to find the converted video files. Now you are free to load/edit Panasonic AJ-HPX2000 P2 MXF files in iMovie under Mac without problems.

Read More:

Sunday, April 21, 2013

Convert/import Panasonic GF3 and GF2 AVCHD to iMovie

This is a guide assisting you to import AVCHD MTS files from Panasonic GF3 and GF2 to iMovie for editing.


Recently Panasonic GF3 and GF2 are two kinds of popular cameras among so many cameras.GF Series are choosen by many photographers due to its high quality images, and GF3/GF2 is convenient for you to take when you commute or travel.

Although Panasonic has been trying to ensure the widest compatibility with existing industry infrastructure and non-linear editing (NLE) systems, you will still meet the incompatibility when you want to get the GF3/GF2 footage off this sd card into iMovie. What does the problem lie in? After googling, you will get the reason. It is because that the iMovie can not support .MTS files while AIC is the perfect codec for it. So the solution is clear now. You need to convert Panasonic MTS files to AIC. After the MTS to AIC conversion, you can easily import Panasonic GF3/GF2 AVCHD to iMovie for further editing.


All you need is Pavtube MTS/M2TS Converter for Mac, this software can transcode Panasonic AVCHD to iMovie best codec AIC with the best quality and make the converted files more smooth in iMovie.


Now please follow the steps below to convert Panasonic GF3/GF2 AVCHD to AIC for iMovie.

1. Go to download and install the best Mac Panasonic MTS Converter to make the transcoding AVCHD to AIC task without quality loss, which offers you particular not only AIC for iMovie/FCE, but also Apple ProRes profiles for Final Cut Pro and DNxHD for Avid. Then launch the software to import your GF3/GF2 AVCHD clips to it.


2. Click on the Format box to choose iMovie and Final Cut Express-> Apple InterMediate Codec (AIC) (*.mov) for iMovie.


3. You can click the Settings icon to do some audio/video settings. We recommend 1920*1080 as video size and 30fps as video bitrate for easier editing on Mac. If you are in PAL(50p) area, you are recommended 25fps as video bitrate.

4. Hit the Convert button; it will convert Panasonic GF3/GF2 1080p AVCHD to iMovie immediately.

When the conversion process shows in 100% with the top AVCHD to MOV Converter Mac, you can get the resulted videos from output folder easily for loading into iMovie on Mac.

See also: 

Natively Work with Canon HF R50/R500/R52 MTS/MP4 with FCP X