Tuesday, January 13, 2015

Smooth Workflow: GoPro Hero4 (Black) 4K Footage to FCP X/7

Looking for a nice way of encoding your GoPro Hero4(Black) 4K footage to FCP x/7? For a first step, do you know clearly how to convert your GoPro 4K to the FCP most suitable one ProRes codec? The following guide may tell you some solutions about it.


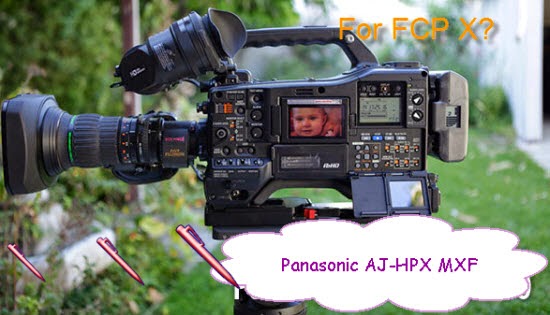
Pay more attention to GoPro Hero4(Black) camera.
With the sharpest footage and the most user-friendly version, GoPro’s new Hero 4 black edition camera features a standard waterproof housing for recording in up to 131' of water. And one of most stunning features is that it can capture stunning 4K footage in 30fps. But as we know, the majority of playback, editing work is not easy for NELs, such like Avid MC, or in some other ways, upload 4K videos to YouTube?

How to make 4K MP4 from GoPro Hero 4 accepted by FCP X/7?
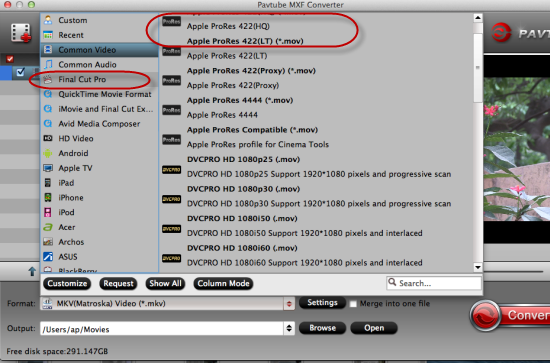
For all you know that there are several types of ProRes codec only supported for FCP, so is it necessary for us to find an assistant that can handle this trouble well? Although there are numbered tools and utilities can convert and compress the ultra HD videos, few of them can process at a fast speed. Well, Pavtube 4K MP4 to FCP Video Converter for Mac is considered to be the best 4K to 1080 converter. 

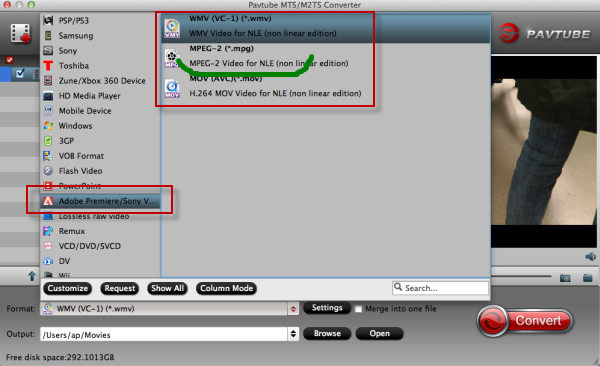
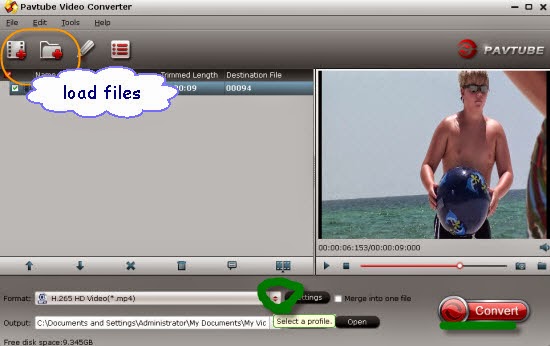
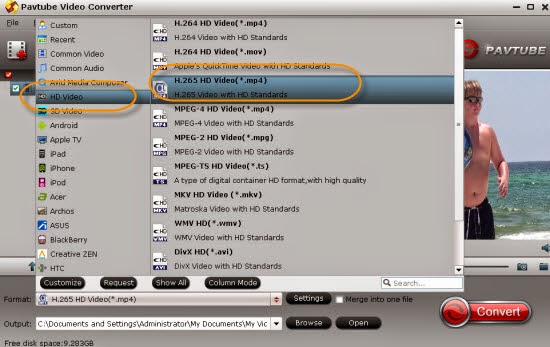
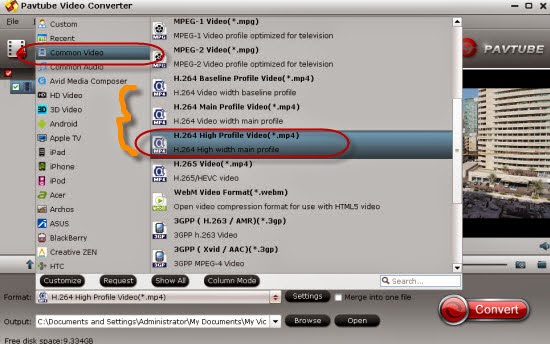
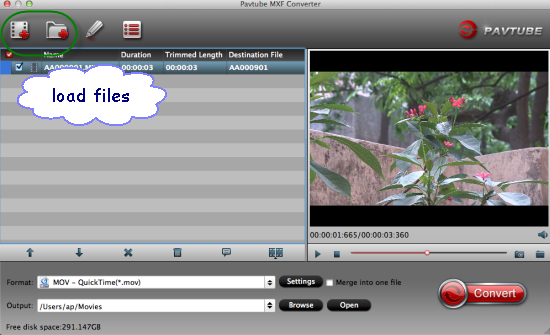
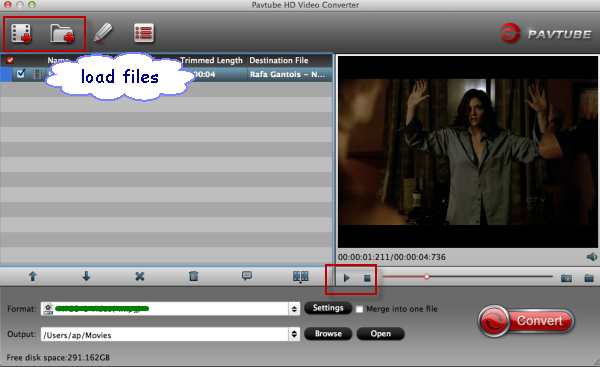
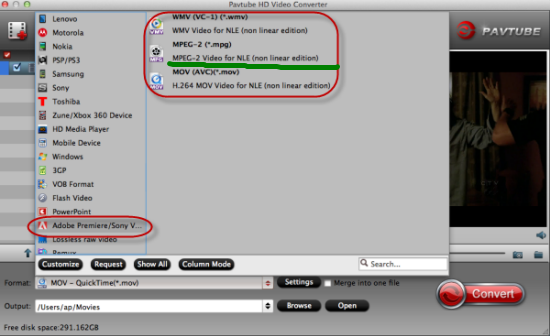
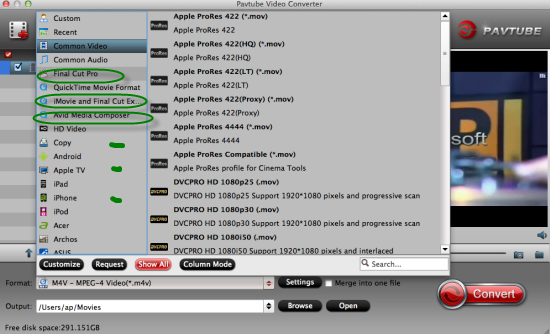
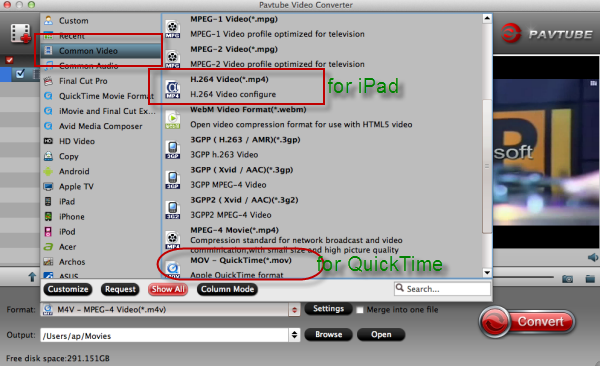
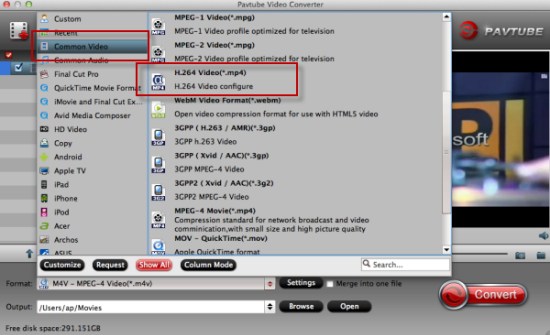
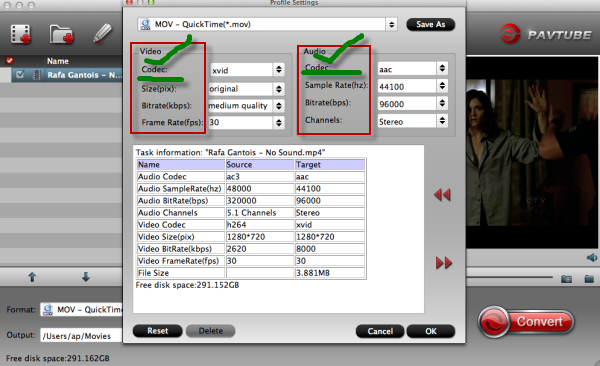
Import your GoPro 4K footage from camera to computer, launch the program, click the ‘Add Video’ or ‘Add from folder’, you can load then in. This program supports batch conversion, so you can add multiple files into it at a time. Click the "Format" drop down list to select output format like MOV, AVI, MPEG-2. If you want to play or edit GoPro Hero4 videos on decent media player or editing programs, you’d better set a preset profile that best meets your needs. For example, if you want to edit GoPro Hero4 MP4 in FCP X/7, “Final Cut Pro> Apple ProRes Codec 422 (*.mov)” would be the best choice. 


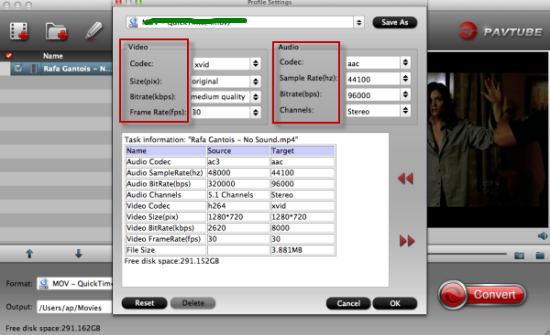
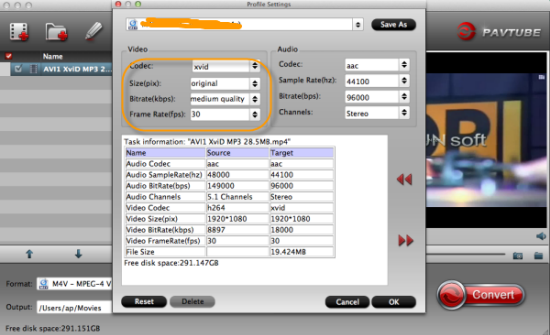
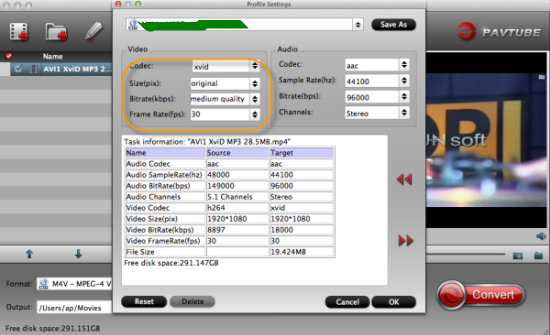
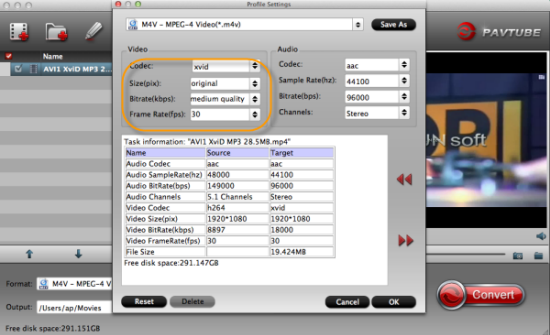
Set video resolution? Click the ‘Settings’ button on the main interface, you can adjust video and audio settings, including codec, aspect ratio, bit rate, frame rate, sample rate, and audio channel. To down-convert ultra HD 4K to 1080p, do remember adjusting video size to 1920*1080. That is the exact 1080p. 


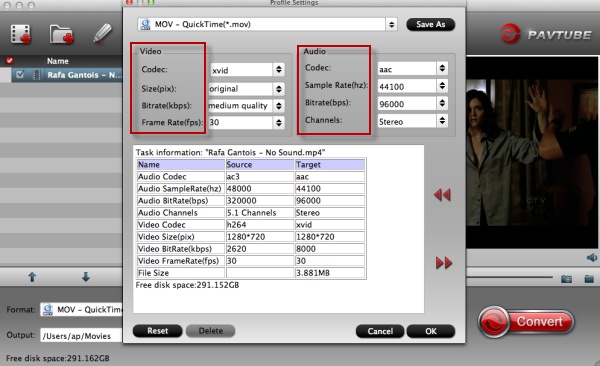
In the end, tap the ‘Convert’ item, you can wait for your output videos with a high speed. As you are the first time to work with FCP, you take the transfer tips here as the reference. So do you still worry about how to edit your GoPro 4K videos in FCP X/7? Just enjoy yourselves!

More:

Thursday, January 8, 2015

Ingest JVC HD Everio GZ-RX110BE 1080/50p AVCHD to Premiere Pro CC/CS

If you ask me how to import our JVC HD Everio GZ-RX110BE 1080/50p AVCHD MTS files to Premiere Pro CC or CS for editing, please read the following article.


Overview: If you get the recordings from JVC HD Everio GZ-RX110BE camera, have you ever met some questions on how to the 1080p/50p AVCHD MTS files in Premiere Pro CC/CS? During the following paper, you won’t miss the solutions. Additionally, for other JVC videos editing in iMovie/FCE, etc, we can also take a good reference.

First of all, I don’t know how what the features this JVC GZ-RX110BE camera attracts you so much, but there indeed some main hot points exist for those JVC fans. Something we should know like below:
  • Waterproof to 5m; 
  • 1/5.8-inch CMOS with 2.5Mpixels; 
  • AVCHD video format at up to 1080/50p; 
  • shockproof when dropped from up to 1.5m; 
  • 40x optical zoom; 60x dynamic zoom; 
  • Wi-Fi control via Android or iOS app 

The AVCHD format from JVC camcorders is not friendly for Mac. To edit, play or share JVC AVCHD footage on Mac, you will need to convert JVC MTS files to best compatible format for Mac OS. Only by converting can you avoid video playback, editing and importing problems due to the recorded AVCHD format. Fortunately, in the following paper, I can share the JVC AVCHD MTS to Premiere Converter for you, it’s the best workaround to handle this job well.


To get the work done, Pavtube MTS/M2TS Converter for Mac/Windows is highly recommended. It's a professional yet decent JVC GZ-RX110BE AVCHD to Premiere Pro Converter which can help you transcode JVC GZ-RX110BE .mts video to Premiere Pro supported video format (h.264 MOV/mpeg-2 MPG/ wmv3 WMV) with several simple steps. Just do some clicks on your mouse with your finger, you can easily convert JVC GZ-RX110BE files to Premiere Pro on Windows/Mac.

Notes: After tested so well, this program can work well with the latest Mac operation OS X Yosemite and Windows 10. So you will not worry about the updated versions there.

When download the program from the official website, do not forget to load your original JVC MTS files in as the first step. Then we could find the suitable ones as output list as we mentioned above. Drop down the list, select the ‘Adobe Premiere Pro/Sony Vegas’>>’MPEG-2 MPG’ as the most compatible one. Surely we can make the MOV and WMV as the other choices.


We also have the optional choices here, on the main interface, ‘Settings’ and ‘Edit’ are tow effective ones we should pay attention to. Adjust your video and audio settings in ‘Settings’ or make some output video effects in ‘Edit’. In other words, we sometimes call this program as Tiny Editor’. Today, I’d like to introduce the ‘Options’ there to you. There you can find some different optional functions that differs from some other related programs.


Of course the functions we mentioned above you can just only take a reference. If you have done all the preparation work, just click the ‘Convert’ we can let the program go. With a faster speed, we can get our output files for Premiere Pro as soon as possible.

Tips: No ideas of transferring files to Premiere Pro CC/CS? Some related transferring guides could help you out of the trouble. Do you wanna a try? Good luck!

Related:

Sunday, January 4, 2015

Top Windows H.265/HEVC Encoder and Video Converter on PC

Today here we are going to introduce you the best H.265/HEVC encoder or video converter on PC Windows. Would you like to join us to enjoy more?

Overview: For saving more storage space? In order to obtain a higher quality? H.265/HEVC can be a good codec assistant to help you a lot. So have you thought of converting your HD videos on Windows to H.265/HEVC to achieve the nice effect? However, due to this new codec, not so many third-party tools can handle this work well. In this article, we would like to introduce you a powerful H.265/HEVC encoder especially for Windows users. Here, let's get closer to H.265/HEVC encoder!


H.265/HEVC, what’s the true meaning?

HEVC, short form for High Efficiency Video Coding, is a video compression standard successor to H.264/MPEG-4 AVC. So HEVC also known as H.265. HEVC is targeted at next-generation HDTV displays and content capture systems which feature progressive scanned frame rates and display resolutions from QVGA (320×240) to 4K UHD 4320p (8192×4320), as well as improved picture quality in terms of noise level, color spaces, and dynamic range. 

Attractive advantage that can attracts you so much: Higher quality, smaller size
HEVC was designed to substantially improve coding efficiency compared to H.264/MPEG-4 AVC HP, that is to say, to reduce bitrate requirements by half with comparable image quality, at the expense of increased computational complexity. Given the same quality video, HEVC H.265 video can reduce file size of 52% for 480p video, 56% for 720p video, 56% for 720p video, 62% for 1080p video and 64% for 4K UHD video compared to H.264/MPEG-4 AVC.

Best H.265/HEVC encoder recommended: Pavtube Video Converter 4.8.2.0
Pavtube H.265/HEVC encoder, which is a professional video converter that can transcode almost all footage to others to be suitable for NELs or media players. With the recent upgraded version, it can support the H.265 encode and decode. so if you have some HEVC H.265 video, you may need to convert HEVC to H.264 or other video formats like converting H.265 to AVI, WMV, ASF, MKV, FLV, WebM, MP3, WMA, M4A, FLAC, etc for various uses.

Some main features you’d better know well:
  • 1.As a professional HEVC decoder, HEVC H.265 converter can decode and convert HEVC H.265 video in various resolution like 4K UHD 4320p, 8k to all most video formats such as convert HEVC to MP4, MOV, AVI, 3GP, FLV, H.264, MKV, WMV, RM, Xvid, DivX, MXF, ASF, WebM, ProRes, WTV, etc., and can extract audio, music from HEVC and save as MP3, M4A, OGG, FLAC, Apple Lossless ALAC, AAC, AC3, WAV, WMA, etc.
  • 2.As an excellent HEVC encoder, HEVC Converter can encode and convert HEVC H.265 from various video formats including convert to HEVC H.265 from MP4, MOV, AVI, 3GP, FLV, H.264, MKV, WMV, RM, RMVB, VOB, Xvid, DivX, HD, AVCH, MTS, TS, MXF, ProRes, etc.
  • 3.All in all, Pavtube Video Converter is complete video toolbox to convert, edit, enhance, download, burn, organize, capture, and watch video in over 150 formats including the latest HEVC H.264 video.
  • 4.Supported Windows System: Windows 10, Windows 8, Windows 7, Windows XP, Windows Vista, and Windows 2000.

Download and install this H.265/HEVC encoder on your PC Windows correctly according to its instructions. Step by step guide is allowed here for you guys to take a detailed reference:


Step 1. Add source video files
To add source video to the HEVC Video Converter, you can directly drag and drop them into the program window or go to “File” from menu bar and then choose’Add video/folder’ to import your original footage nicely.


Step 2.Transcode H.265/HEVC videos to other common suitable ones. All the choices you can select on the output list when you opened the ‘Format’ bar on the main interface. Look the screen shot below, you can learn how to encode files to H.265/HEVC as output. In the ‘HD Video’ button, you must find the compatible one there.’H.265 HD Video(*.mp4)’, why not have a try、


Notes; Cause this kind of codec can bring us the high quality and smaller size, so we need to wait much more time of waiting for the conversion result. 

Step 3. Adjust some output settings
From the ‘Settings’ button on the main interface, we can set the output videos as we need or favorite. Such as the video size, etc. Here we should mention you that the changes of default with bitrates or frame rate could decide the conversion speed. Of course you can just leave the default there.


Final step, go back to the main interface to press on the red big button ‘Convert’, we can start this job smoothly. From some HD camcorders, we already have some experience of encoding H.265/HEVC recordings here you can open for a reference such as Samsung NX1 H.265 etc. For any other suggestions or opinions, why not leave as the comments below?

More guides:

Tuesday, December 30, 2014

HEVC Workflow: Encode H.264 MP4 to H.265 MP4 on PC

In order to smoothly work H.265 files on PC, is there any best workflow to encode H.265 to H.264, which can be much more suitable for PC


Question 1: Why we need to encode h.265 video files to H.264 on PC? 

Cause the latest H.265/HEVC codec has not been fully spread well, sometimes we need to find some advanced video encoders to make some changes of this new codec in order to a further editing or enjoyment, etc. Briefly comparison of H.265 and H.264 is: Smaller size, higher quality. As the new codec standard beyond the common video technology in our market, we still need some time to make some improvements in this area. That’s the reason why it is usually necessary for us to encode the H.265 videos.

Question 2: Could you give more detailed definition of H.265/HEVC?

HEVC/H.265, the successor to AVC/H.264, more than triples the existing AVC intra-frame prediction modes to achieve significant bitrates savings, It is targeted to next-generation HDTV displays and content capture systems that feature progressive scanned frames and display resolutions from QVGA (320x240) up to 1080p and Ultra HDTV 4320p (7680x4320.) In addition, the intra-picture or inter-picture prediction types provide higher encoding flexibility. The result is a codec that can offer up to 50% reduced bitrate at the same quality when compared to AVC/H.264.

Question 3: Any best H.265 encoder you can offer to us?

What a coincidence! Do you know the Pavtube Studio? It has announced that their upgraded product version 4.8.2.0 of Video Converter can support the H.265/HEVC encode and decode. What a surprise here! With the added item ‘H.265 Video’ we can choose it as the output well! More upgraded information you can read here.

Question 4: Any specific guide to work this H.265 encoder well?
Of course! Launch the main interface when you download the program form the official website. Load your H.265 mp4 files in with ‘Add video’ or ‘Add form folder’ for individual clips or complete folder. From H.265 MP4 to H.264 MP4, just comt to the output list for next step. On the ‘Common Video’ list, three types of H.264 codec they have added in this version. Mostly, we are called to select the ‘H.264 High Profiles Video (*.mp4)’ as the best. 


Notes: The other two H.264 codec types, H.264 Baseline and H.264 Main. For some older players or devices, surly you can choose them to have a try. On the other hand, their quality will be worse than High Profile. On the other hand, from H.264 to H.265, we only change the output selection into ‘HD Viddeo’>>’H.265 HD Video (*.mp4)’. You won’t miss it!

No other requirements? Surely you can start your conversion work! Or for some advanced users, several functional items there you must be interested in, right? Such as the ‘Edit’ button, here we can be a good editor to adjust our videos for a better enjoyment on PC. Add what we want and get rid of what we unwanted. Take the following screen shot as a reference.


Back to the main topic of this guide, do you still feel it is hard to encode our H.265 MP4 to H.64 MP4 on PC? Of course not! With a good reputation, Pavtube studio is always keeping moving on and standing on the top of the video dispose area. Any other suggestions or opinions you can leave some comments below.

Others:

Monday, December 29, 2014

Surprise for Pavtube Upgraded Windows Products! H.265/HEVC or XVAC Codec Supported!

Pavtube Studio has upgraded their all Windows products to the newest versions which can support the H.265/HEVC or XAVC codec videos.


Good news for everybody! Thanks to the Pavtube Studio, we can realize our hope to enjoy the super high quality videos encoded by H.265 or HEVC. During this 2014 Christmas holidays, it is indeed a big Christmas gift for everyone who loves shooting high definition videos, right? Let’s find more details about this great job!

Tips: Development and prospect of Pavtube Studio---News for Upgraded H.265/HEVC Converter!

Main new features we may be interested in:
1. H.265/HEVC encode supported
2.H.265/HEVC decode supported
3.Support MXF in XAVC Video Codec
4.Add H.264 baseline/main/high output profiles

What Windows products are upgraded well?
For videos:
Pavtube HD Video Converter
Pavtube Video Converter
Pavtube MXF Converter
Pavtube MXF MultiMixer
Pavtube MTS/M2TS Converter

For DVD and Blu-ray:
Pavtube BDMagic
Pavtube ByteCopy
Pavtube DVDAid

Both for Videos and DVD/Blu-ray:
Pavtube Video Converter Ultimate

What is HEVC(H.265)? 
High Efficiency Video Coding (HEVC) is the latest generation video compression standard. This standard was developed by the ISO/IEC Moving Picture Experts Group (MPEG) and ITU-T Video Coding Experts Group (VCEG), through their Joint Collaborative Team on Video Coding (JCT-VC)
HEVC is also known as ISO/IEC 23008-2 MPEG-H Part 2 and ITU-T H.265
HEVC provides superior video quality and up to twice the data compression as the previous standard (H.264/MPEG-4 AVC)
HEVC can support 8K Ultra High Definition video, with a picture size up to 8192×4320 pixels

The benefits of H.265
H.264 has been a huge success. It’s a flexible codec standard that’s used by streaming services, satellite providers, and for Blu-ray discs. It’s scaled remarkably well since it was first proposed and is capable of handling 3D, 48-60 fps encodes, and even 4K. The Blu-ray disc standard doesn’t currently include provisions for some of these technologies, but the H.264 codec itself is capable of handling them.

The problem with H.264, however, is that while it can handle these types of encodes, it can’t do so while simultaneously keeping file sizes low. A new standard is necessary to push file/stream sizes back down while driving next-generation adoption, and that’s where H.265 comes in. It’s designed to utilize substantially less bandwidth thanks to advanced encoding techniques and a more sophisticated encode/decode model.

With the popularity of H.265(HEVC) and XAVC, more and more users are fond of enjoying this high resolution videos. So in this way, Pavtube Studio has offered us an efficient way when meeting troubles in editing incompatible H.265 videos in NELs or play on media players. Pavtube products I think that can do you a big favor.

Official website: http://www.pavtube.com/
Source From: http://digisns.com

More guides:

Thursday, December 25, 2014

Guide on Editing Panasonic AJ-HPX3700 MXF in FCP X

Looking for a guide on how to import your MXF recordings to FCP X for a nice editing which shot from a Panasonic AJ-hpx3700 camcorder? Here is one for you!


‘Seeking help! Last week, as a professional videographer works for television, I shot the whole recording progress of the Reality Show with my Panasonic AJ-HPX3700 camcorder. At present, I need to make them shorter for removing some advertisements to make it as a wonderful show to our audience with Final Cut Pro X. I’m not familiar with this editing app so the screen always shows me the ‘Error’ message when I importing my recordings. What’s wrong there?’

As the high-end HD workhorse, Panasonic AJ-HPX3700 offers a native 1920x1080 imager, including 10-bit, 4:2:2 full-raster recording with Panasonic's new codec, AVC-Intra 100, as well as Dual link RGB 4:4:4 output. This camera is excellent for green screen shoots, feature films, television episodes and commercials. However the output recordings are encoded by ‘MXF’, so some troubles we will meet there.

MXF is a "container" or "wrapper" format which supports a number of different streams of coded "essence", encoded in any of a variety of video and audio compression formats, together with a metadata wrapper which describes the material contained within the MXF file. So you must not know yet we cannot directly let our MXF files in FCP X except for converting them to the limited ProRes codec, right? For other NELs? Such as Premiere Pro, After Effects, etc? You may read there!

See Also: Top 4 Best MXF Converter for Mac Review

There will be no worries if you search online and found this MXF assistant called Pavtube MXF to FCP X Converter for Mac, (Windows version?). Such an easy operation converting program which has the concise interface, faster speed and various output for your selection. What’s the most important point is that this guy has such a good reputation and review online. Do you wanna a try?

From Panasonic MXF to Apple ProRes codec, let’s see how to make this conversion goes well:
Step 1.Add our Panasonic MXF files to this converting program with two effective ways.
A: Connect your Panasonic MXF camcorder to iMac with USB2.0 cable or use card reader to transfer the P2 AVC-Intra. Mxf files to Apple hard drive disk. Then drag them into the program directly.
B: Click the ‘Add files’ button on the left corner, we can easily load our MXF files there. Batch conversion can be supported well here.


Step 2.Click the ‘Format’ button beside the preview window, drop down the output list, move mouse cursor to ‘Final Cut Pro>>Apple ProRes Codec 422 (*.mov)’ as the best one. Several other ProRes codec types you should not miss too. Then click the ‘Settings’ button, let’s adjust the video size as ‘1920*1080’ as output video size. This is available for ProRes MOV as you know.


Tips: (Optional)Merge your Panasonic AJ-HPX3700 MXF video clips.
On the main interface, could you find the icon called ‘Merge into one file’ there? With a lot of video clips? Why not combine them into a single one?


Finally, the red big button ‘Convert’ there is waiting for our selection to make this conversion work end. Cause you are the first time to work with FCP X, we can also offer you the transferring steps for FCP X here. Just enjoy your editing in FCP X! Good luck!

More:

Tuesday, December 23, 2014

Any Idea of Importing Sony a7 II XAVC S footage to Sony Vegas Pro 13/12/11?

A nice talking on how to easily import our Sony a7II XAVC S recordings to Sony Vegas Pro 13/12/11 below, would you like to join us ?

This guide is mainly written for those who have cameras shoot the recordings encoded by XAVC S. I guess you all must get no ideas about how to edit XAVC S files for a further dispose in some popular editing tools. So today the topic is Sony Vegas Pro 13/12/11. Let’s learn some skills of importing XAVC S to Sony Vegas. Come on! 


No more talks on Sony a7II camera, with the capability of shooting 4K videos while delivering it to an external recorder in 8 bit 4:2:2. Unlike the a7 and a7r, the latest model is not constrained by the AVCHD standard, also offering the XAVC S system, with bitrates of up to 50Mbps. So with the newest features, it cannot fit some popular editing software. Such as the typical example Sony Vegas Pro. Someone said that the Sony Vegas 12 may support the XAVC S format but with the latest operation Mac OS X, it seems that something wrong happed there.

Wanna no troubles when importing XAVC S files to Sony Vegas Pro? So easy if you know how to convert your XAVC S files to MPEG-2 (*.mpg), we all know the best one for Sony Vegas. To achieve the goal, we need a professional XAVC S Converter to change the XAVC S format for the first step. Here the Pavtube XAVC S to Sony Vegas Converter for Mac is the right one you are looking for. (For Windows version?)To handle the work well, it can perfectly convert your XAVC S files to MPEG-2 with a high quality preserved.

Guide is allowed here to convert Sony a7II to Sony Vegas Pro MPEG-2 MPG.


Step 1: Run the program you set up on your computer. Drag and drop the source XAVC S files to this converting program. Also, ‘Add video’ and ‘Add from folder’ could drag them easily. 


Step 2. The top important step you should not miss here. On the output list, drop sown the list, nearly on the bottom of the list there, ‘Adobe Premiere Pro>>MPEG-2 (*,mpg)’ could be the most suitable one. Would you like to have a try? In another way, just tap the item in the searching box is okay.


Step 3: (Optional)If you wanna some advanced settings? Why not come to the ‘Settings’ interface to adjust your output videos? No matter for your videos or audios, just set what you like here. Video size, codec, bitrates, frame rate or audio channels, etc. Or just leave them as the original default is not a bad idea.


In the end, it’s time to tap the ‘Convert’ icon to start your conversion. For more related posts about Sony cameras? Why not read them on this Sony Topic Page? Then just enjoy your editing with Sony Vegas Pro 13/12/11. Good luck with you! 

More guides:

Wednesday, December 17, 2014

Why not Edit Panasonic HX-A500 ultra HD videos on Windows/Mac with MOV?

If you are now confused with the problems on how to edit Panasonic HX-A500 ultra HD video on Windows or Mac for editing as MOV format, just read the page below.

Summary: For so many editing tools no matter for Windows or Mac, if you got some footage and wanna do a further dispose with them. Due to the limitation or incompatible formats, some converting tools you should take as assistants right? Today here we are going to teach you how to transcode Panasonic HX-A500 ultra HD videos to MOV for further editing on Windows and Mac.


Causes we should know as well as we touch the Panasonic HX-A500 ultra 4K camcorder here: The HX-A500 shoots a resolution of 3840×2160; so ultra HD. Sub 4K resolutions include 1080 up to 50p, and 720 up to 100p. Unsurprisingly it shoots to an MPEG-4 AVC/H.264 codec in an .mp4 wrapper. However, some video recordings from Panasonic HX-A500 like MP4, may not a good editing format for NLE system including iMovie, Final Cut Express, Final Cut Pro, Avid Media Composer, Adobe Premiere Pro, etc. Then how to import Panasonic HX-A500 videos to iMovie, Avid, or even DaVinci Resolve for editing without any issue?

Cause we all know each editing program has its own supported format so if there is an almighty tool that can handle all these editing tools well on Windows and Mac. What a surprise, we have found this Pavtube Video Converter for Windows/Mac for you! It is designed for converting all kinds of video formats to suitable ones for NELs. Such as FCP, iMovie, Premiere, etc are all included.

As soon as you download this program on your computer, open the main interface. Two buttons there for us to import our files. ‘Add Video’ is designed to individual clips and ‘Add from folder’ can hold the complete folder. On the output list, we can see all the popular editing tools there, For FCP? We usually choose the ‘Final Cut Pro>>Apple ProRes Codec 422 (*.mov). For iMovie? ‘Apple InterMediate Codec (AIC) (*.MOV) could be the suitable one. While for Premiere? The ‘Adobe Premiere Pro/Sony Vegas’>>’MPEG-2 MPG’ can handle this work well. Any other ones you won’t miss there.


Tips: If you are annoyed with the batched video clips, why not click the button ‘Merge into one file’ to have a try? It is designed to join our video clips together and combine them into the complete folder.


Wanna more advanced adjustments? Come to the ‘Settings’ button, Just customize proper video/audio parameters if necessary. Video size, bitrates and fame rate are flexible and can be adjusted as you like. Usually 1920*1080 video size and 30fps video frame rate are recommended for editing tools.


Start to convert your videos after the preparation? Back to the main interface, just click the red button ‘Convert’ to make it possible. What’s more, some related guides here on how to transfer your Panasonic HX-A500 ultra HD  files to FCPiMovie and Avid, etc, you can read about.

Others you may be interested:

Friday, December 12, 2014

Handle Various Videos Nicely on QuickTime and iPad

Looking for a friendly converting assistant that can make all videos play smoothly on QuickTime or iPad? Here we go!

Summary: For the purpose of solving the problem of watching various videos on iPad and QuickTime, this guide mainly offered us the best video converter that can encode them to suitable MP4 or MOV individually for iPad and QuickTime. So do you have the interests in enjoying your movies on QuickTime or iPad, or other handle devices?

‘Guys there, Are you okay? I’m a video editor who is in charge of converting those short movies received from our customers. I need to make sure they can be played on iPad or QuickTime during the cooperation discussion. Unfortunately, so many different kinds of videos I received are not so friendly with iPad and QuickTime. I’m looking for an efficient assistant to work them well. Any good suggestions there?’

We actually know the MP4 and MOV are two compatible ones for iPad and QucikTime, right? If you searched online, you may find the Pavtube Video converter for Mac has a good reputation, right? Do you know why? On one hand, it can support the different video format as output for media players, QuickTime and iPad is so easy. On the other hand, some popular editing tools are also available here.

Notes: We also have the Windows version for those Windows users if they need. What's more, with the upgraded version 4.8.2.0, it can support the H.265/HEVC videos encode and decode well, do you know that?

Step 1.Add your files
Launch the video converter for QuickTime and iPad, of course you will find it is available for you to drag your files in directly. With other ways? Click the ‘Add video’ and ‘Add from folder’, we can import source files too. 

Step 2. Choose output format:
Individual output choices you should select for QuickTime and iPad. Firstly for QuickTime, we all suggest the ‘CommonVideo’>>’’MOV QuickTime (*.mov)’ to you. While for iPad? We all think the ‘Common Video’>>’H.264 Video(*,mp4)’ is the best one. You must know that clearly right?


Tips: If you got the needs for other editing tools like FCP, Premiere, etc. On the output list, you must have found them there. Now you may know why this program was so popular by those professional video editors.

Step 3. Optional function for settings:
What’s more, before we start our work, why not get into the ’Settings’ to know more? For a nice enjoyment? Just make some changes here! Video codec, video size, frame rate or audio channels, etc we could set on our own.


At the end of this paper, we’d like to recommend you the iPad Subject, which has so many related guides you may be interested in. Or tap the big red button; you can get our work started.

Wanna more?

Thursday, December 11, 2014

How to Import Canon XA20 60p MTS Videos to Aperture 3

My primary camera is a Canon XF300, and the XA20 is my backup. I shot in an indoor theatre, this footage at the link down below really shows off the amazing optical zoom range this new camcorder has. And it shows what sort of image quality you can get in both good light, and also under poor lighting. However, I find that I can't import short 60p clips recorded with .mts format from the XA20 into Aperture 3 on my Mac Book Pro. Reads the AVCHD as imcompatible file. Aperture 3 cannot accept the AVCHD MTS footage so nicely.


This is a question asked from one of my clients. I have tested some videos recorded by in 60/50 fps, but still unable to load them into Aperture 3. So I think that clips formatted at 1080p50 and 1080p60 are not supported by Aperture, and thus, it may cause the issue that Canon XA20 1080 60p/50p mts files are not visible in the Aperture Import window.

But now I have used a professional Mac MTS to Aperture Converter tool, it done well work with me and perfectly solve the problem with XA20 1080 60p/50p mts importing workflow in Aperture 3.

This Canon XA20 camcorder records in several ways, including full 1080p HD video at 60p in either AVCHD Progressive (28Mbps) or MP4 (35Mbps) format for crisp moving images, or record at a lower bit rate and transmit MP4 (3Mbps) format video to cover and quickly upload breaking news via wireless FTP file transfer. So if you want to edit Canon XA20 1080 60p/50p 28Mbps mts in Apple Aperture 3, you are recommended to use Pavtube MTS/M2TS Converter for Mac I have been using, which is the superior MTS/M2TS Converter for Mac. 

It does not only convert 1080 60p/50p AVCHD to Apple ProRes for Aperture 3 editing on Mac, but also convert AVCHD MTS to FCP, iMovie, FCE, Avid, Premiere Pro, Kdenlive, After Effects CS6, DaVinci Resolve etc. compatible format/codec on Mac (OS X 10.9 Mavericks included). 

What's more, With Pavtube AVCHD MTS/M2TS Converter for Mac, you can also add *.srt, *.ass, *.ssa subtitle to a video/movie files. Here I share a guide of how to add subtitles and some free subtitle files download website:

Easy way to import and edit Canon XA20 1080 60p/50p AVCHD in Apple Aperture 3

Download Pavtube MTS Converter for Aperture, install it on Mac.

Step 1. Connect XA20 to Mac and Load .mts files.
Run Pavtube AVCHD MTS to ProRes Converter and then click "Add video" button to load 1080 60p/50p MTS files from Canon XA20 AVCHD camcorder to the Mac program. You can tick the box in front of the file you want to convert.


Tip:If you have multiple MTS/M2TS files, you can select the "Merge into one file" box to merge/combine MTS files, so that you can import these files to Aperture 3 without interruption.

Step 2. Choose ProRes 422 MOV output format.

Click the drop-down list desides Format, choose Final Cut Pro > Apple ProRes 422 (*.mov) as the best video codec for Aperture as well as FCP. You can set the output folder by clicking "Browse" icon as you need. In other ways, do you wanna upload your MTS videos to YouTube or Vimeo? Or some NELs. like AvidFCP X?


Step 3: Add Anaglyphic 3D effect or Subtitle for your footage.

If necessary, click "Edit" icon to start video editing with your 3D files, such as adding Anaglyphic 3D effect(Red-Blue, Red-Green) as well as adding watermark, trim your videos and so on.

You can also click "Subtitles" option, add srt, ass, ssa suntitle you want.


Step 4: Convert Canon XA20 1080 60p/50p AVCHD MTS to Apple ProRes MOV for Apple Aperture 3.

Click the "Convert" button under the preview window, the Mac MTS to ProRes Converter starts converting Canon AVCHD 1080 60p/50p MTS to ProRes MOV for editing in Aperture 3 without quality loss on Mac.

Wait for a while, after conversion, you can freely transfer Canon XA20 1080 60p/50p AVCHD mts footage to Apple Aperture 3 for further editing.

How to import Apple ProRes MOV files to Aperture 3?

Launch Aperture 3, choose "File > Import > Files...", and browse to the folder you saved the converted video to. Choose the videos that you'd like to import.


Read More:

Tuesday, December 9, 2014

Convert Movies or YouTube Videos for a Playback on Note 3 and Tablet

Our guide has a topic on getting rid of the trouble of converting movies and YouTube videos to suitable one for play back on Android tablet.


Summary: During the following article, what we should pay attention to is how to play our  movies and YouTube videos on Android tablet or Note 3 with VLC media player on the way. I know most of you are interested in YouTube videos but do you all know clearly that how to upload HD videos to YouTube for nice sharing?

For a first step, I wanna know how will you guys do with the videos download from YouTube. Play on TV? Not really. With the popularity of bigger and bigger handle tablets, most of people prefer to watching YouTube videos on tablets or smart phones when they are waiting for train, bus or someone else. It seems that it will become a kind fashion in daily life. According to this way, some problems appeared there when we importing our video files to these media devices.

No doubt if you download videos from YouTube, usually we must do some changes with these footage to make it accepted by media players such as VLC. How did you do that if you got the incompatible videos? Today here, we introduced you a professional VLC video converter called Pavtube Video Converter for Windows/Mac individually for Windows and Mac users. 

Question1: What could this video converter do? 
As a professional video converter, it can accept all video formats and give you various videos you want as output. Besides, we can adjust our video settings and effects there. With an easy operation and functional editing, it can do this job well. 

Question2: Any more details on this conversion job?
Surely, we have the step-by-step- guide here for you. As long as you download and install the program according to its instructions. With ‘Add video’ or ‘Add from folder’, we can import our videos correctly. Especially for VLC, which one could we choose as the output? No worries about it. Click the ‘Format’ and come to the output list, just select the ‘Common Video’>>’H.264 Video (*.mp4)’ to be the best one. See the screen shot below.


What’s more, in order to obtain the perfect effect on your media player, we may do some adjustment in ‘Settings’ button. Wanna a suitable video size for your handle tablet? You can set the video size as ‘1280*720’, for other bitrates, audio channels, you can adjust them as you need.


Additionally, no matter for Android tablet or Note 3, drop down the output list, you can find the ‘Android’ item there, so it is unnecessary to be confused on which format you should choose as the best.


Finally, if you have done all the preparation work, why not go back to the main interface to click the ‘Convert’ button to finish your work. Is that cool we can enjoy various kinds of YouTube videos on Note 3 or orther tablets? For more related guides?

  • Related:
  • Thursday, December 4, 2014

    Move Panasonic GH4 4K video to FCP X---Choose Apple ProRes or ProRes HQ?

    Have no idea of choosing Apple ProRes or ProRes HQ when moving Panasonic GH4 MP4 videos to FCP X for a nice editing?


    Overview: Cause we all know that there are several types of Apple ProRes codec which could all be suitable for Final Cut Pro X. However, usually we don’t know how to make a right choice, right? In this article, as the example of moving Panasonic GH4 4K videos to FCP X, for Apple ProRes 422 and Prores HQ, which one could we choose as the better one? If you have aother NELs like DaVinci Resolve, Avid, etc for requirements, here we go.

    Detailed introduction of Apple ProRes and ProRes HQ we can learn below:

    Apple ProRes 422, the original and common one which was used frequently in our life, target data rate of approximately 145 Mbps (1920 x 1080 at 60i). Generally speaking, it can meet our requirements when transcoding our videos.

    Apple ProRes 422 HQ, for a first step, ‘HQ’ we can surely understand as ‘high quality’. It offers the utmost possible quality for 4:2:2 or 4:2:0 sources (without an alpha channel) and provides the following: Target data rate of approximately 220 Mbps (1920 x 1080 at 60i).

    Any converting assistant there we can convert our GH4 4K videos to ProPres for FCP X?


    Fortunately, today we here have a nice choice for you. Pavtube HD Video Converter for Mac, which can offer you the complete Apple ProRes codec for you. Such an easy assistant that each one could work well. Open the program, with ‘Add video’ and ‘Add from folder’ we can import our source files successfully. Drop down the output list, you can find all kinds of Apple ProRes there. In order to preserve the 4K definition, we here strongly recommend the ‘Apple ProRes Codec 422 HQ (*.mov)’ for you!


    Note: For these two kinds of ProRes codec, which one we should select depends on the original video definition you know. We should match them well to achieve the best effect.

    Also, in the ‘Settings’ button, we can additionally set our video codec , video size, frame rate or even the audio channel if we want, right? More details you can have a try on your own or watch the following screen shot.


    In the end, go back to the main interface, the red button'Convert'  is waiting for a click to start the job. With this Mac HD Video Converter, do you still worry about your Panasonic GH4 4K videos editing in FCP? Good luck!

    Want more: