Haven’t figured out how to import XAVC MXF to Premiere Pro CS6 for editing? If so, you may have interest in this article. It displays a workaround to convert XAVC MXF to Premiere Pro CS6 best accepted .mpg for editing with lossless quality. Question: XAVC MXF files can’t be read in Premiere Pro CS6“I’m currently feeling so frustrated over XAVC MXF import issues with Premiere Pro CS6. I’m intending to import one of my clients’ XAVC MXF footage from a Sony camcorder to PP CS6. Every time I try it read the various audio files fine, but refused to import the video stream, and gave me a ‘generic error’. Why does this happen? Is there anything that I missed? Does that mean I have to convert XAVC MXF to an intermediate codec so CS6 can recognize them? Any help of advice would be greatly appreciated.”As far as we know, only the latest Adobe Premiere Pro CC has added support for the XAVC format. To be able to import and edit XAVC MXF in its former version Premiere Pro CS6, you will need to download and install plug-ins like Rovi Totalcode, which has perfect support for your XAVC MXF recordings. Unfortunately, this plug-in costs a lot of money ($350) and only comes with PC version. If you are looking for an easy and affordable way to work XVAC MXF with Premiere Pro CS6, we do recommend convert XAVC MXF to MPG format with MPEG-2 codec for use in Premiere with optimum performance. This requires a reasonable priced third party program named Pavtube Video Converter for Mac. If you are running on Windows, you can choose the equivalent version Pavtube Video Converter.
 How to import XAVC MXF to Premiere Pro CS6 for editing on Mac Pro?Step 1: Run the upgraded Mac Video Converter, and click the “Add video” button to load your original XAVC MXF recordings. If you want to load several files at one time, “Add from folder” button is available. Besides, you can also drag and drop the files to the main interface directly.
 Step 2: When you launch the program and load your XAVC MXF files in , then we can choose the suitable output formats. You’d better click “Format” bar and select “Adobe Premiere/Sony Vegas>>MPEG-2 (*.mpg)” as output format.
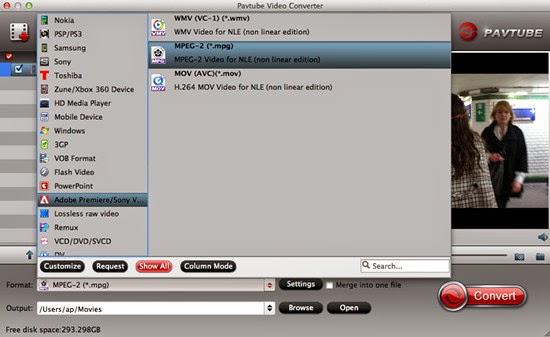 Step 3: Click “Settings” button to customize the output video and audio settings by yourself. But if you are not good at it, you’d better use the default parameters, they will ensure you a good balance between file size and image quality basically. You can change the resolution, bit rate, frame rate as you need.Step 4: When everything is done, you can take a preview by hitting “Play” button. If you are satisfied with the final result, you can click “Convert” button to finish the conversion work.Conclusion: When the conversion is finished, you can click “Open” to get your generated files. Now, you can edit XAVC MXF in Premiere Pro CS6 without any hassles. Surprise! All of us can get 40% discount off before May, 1st, 2015!Further Reading:
Good news for everyone! Thanks to the Pavtube Studio, we can realize our hope to enjoy the super high quality videos encoded by H.265. With the stronger and stronger function of the upgraded Pavtube Video Converter for Mac, XAVC MXF supported and VPx series decoder can be done excellently. Pavtube Video Converter for Mac- upgrade to the version 4.8.5.0This upgraded Pavtube Video Converter for Mac is the professional and easy-to-use Mac Video Converter, which is specially designed for Mac users to easily convert between various video formats including H.265/HEVC, H.264, MP4, MOV, MKV, AVI, MPEG, Xvid, DivX, 3GP, WMV, FLV, MOD, TOD, WTV, MXF, MVI, F4V, WebM, VP8, 720p, 1080p, 1080i HD, AVCHD videos and more, convert between various audio formats including APE, MP3, AAC, AC3, WAV, WMA, and even extract audio from movie files. You can know more details on the official website.What’s new of Pavtube Video Converter for Mac (version 4.8.5.0)?1.Support H.265 decoder and refine asm.2.Support XAVC codec contained in MXF.3.Better support for VPx series decoder.Key features of Pavtube Video Converter for Mac (version 4.8.5.0):1. Convert various videos/audios as input and output.2. So many popular editing tools and media players are available.3. Easy operation workflow and faster conversion speed.4. Extra acceleration function for Mac users.5. Strong ability of setting and editing output videos. Tips: Before May 1st, you can get a discount on Pavtube Video Converter for Mac. Why not click the link to know more about this 40% off event and seize the chance to buy excellent products with such pretty attractive price?Simple guide on how to convert videos with this Mac Video Converter:Step 1: Run the upgraded Mac Video Converter, and click the “Add video” button to load your original recordings. If you want to load several files at one time, “Add from folder” button is available. Besides, you can also drag and drop the files to the main interface directly.
 Step 2: When you launch the program and load your files in , then we can choose the suitable output formats. For example, if you want to convert XAVC MXF to FCP X/7/6 for editing, you can click the “Format” bar and choose “Final Cut Pro>>Apple ProRes 422 (*.mov)” as target output. There are many presets in the software, you can choose the output format according to your requirements.
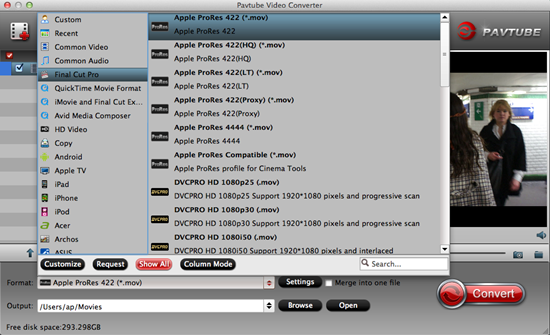 Tips: If you want to convert your recordings to H.265 codec, let’s go to the “Common Video” to get the “H.265 Video (*.mp4)” as the best. You can also choose “HD Video>>H.265 HD Video (*.mp4)” to get higher definition.
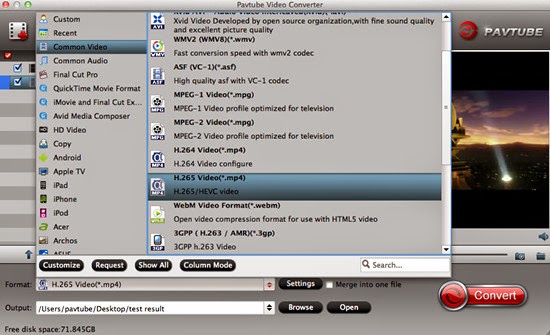 Step 3: Click “Settings” button to customize the output video and audio settings by yourself. But if you are not good at it, you’d better use the default parameters, they will ensure you a good balance between file size and image quality basically. You can change the resolution, bit rate, frame rate as you need.
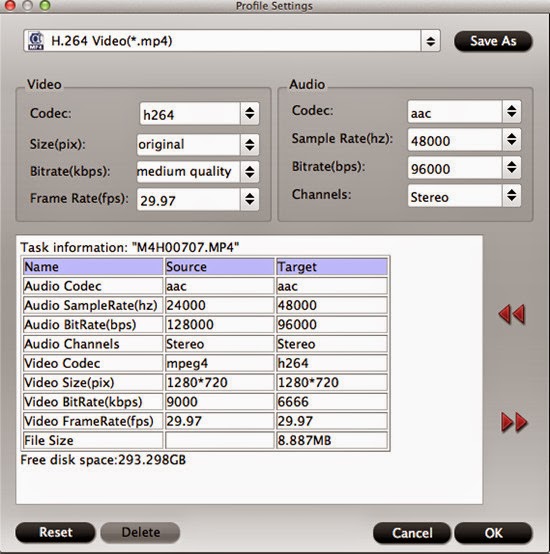 Step 4: Most of you guys must have the desire of a further editing with your output videos, right? On the main interface, “Edit” is waiting for you. “Trim” to decide where to start and where to end, “Crop” to cut some unwanted clips, “Subtitles” to add some explanations to your audience.
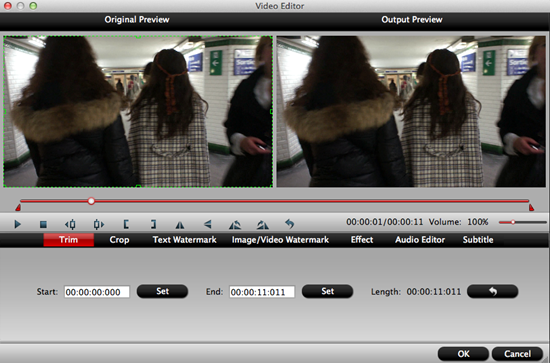 Step 5: When everything is ready, you can take a preview by hitting “Play” button. If you are satisfied with the final result, you can click “Convert” button to finish the conversion work.Conclusion: When the conversion is done, you can click “Open” to get your generated files. Now, you can use them for editing, playing, uploading, sharing and all you want.Download Address:Official download:http://download.pavtube.com/video-converter-mac/videoconvertermac_setup.dmgAmazon download:http://www.amazon.com/Pavtube-Video-Converter-Mac-Download/dp/B00QIBK0TQ/ref=sr_1_3/175-5152965-3528837?ie=UTF8&qid=1430103806&sr=8-3&keywords=pavtubeFurther Reading:
Any way to import H.265 videos to Windows Movie Maker? Here is the quick tutorial for you that will show you the simplicity of importing H.265 videos to Windows Movie Maker flawlessly. Follow it now. Samsung NX1 is a native 4K Mirrorless Digital Camera for users. Have you got one? As many users get NX1, more problems are coming up: some of them have the need to import Samsung NX1 H.265 videos to Windows Movie Maker for editing, but they always meet the importing issues. H.265 is a cutting-edge, high efficiency video codec that’s particularly useful for streaming 4K video. If you’ve got some 4K H.265 videos like from Samsung NX1, how to make a smooth post production?In fact, H.265, a highly compressed format, is not easy for editing in Windows Movie Maker. In addition, you may also have difficulties in importing MP4, AVI, Divx, VOB and MKV files to WMM. Then how to edit H.265 videos in WMM without any issues? Well, if you make the recordings editable before taking to the program, the incompatible error won’t happen any more. As far as I know, WMV is the best format for Windows Movie Maker, which ensures both efficiency and quality.After testing countless freeware and commercial software, I highly recommend Pavtube Video Converter to you which is the best H.265 Converter for you to encode and decode H.265 videos for Windows Movie Maker smooth editing on Windows. It ranks top on the H.265 Converter application list. Besides, it is an all-in-one H.265 encoder, decoder, converter and player. With it, you can convert H.265 to any other formats with several mouse clicks.
 How to import Samsung NX1 H.265 videos to Windows Movie Maker for editing?Step 1: Download, install and run H.265 to WMM Converter. Click the “Add video” button to import Samsung NX1 H.265 videos to the program. If you want to load several files at once, you can click “Add from folder” button. You can also use the drag-and-drop method to load the media files to the application UI.
 Step 2: Click “Format” pull down list to select “HD Video>>WMV HD (*.wmv)” as output format for importing Samsung NX1 H.265 videos to Windows Movie Maker for editing.
 Step 3: Click “Settings” to fix the frame rate, bit rate, video size, and etc. to your needs. To have a smooth editing with Windows Movie Maker, you need create the files with the appropriate resolution and frame rate that matches your source footage.Step 4: Click “Convert” button to start Samsung NX1 H.265 videos to Windows Movie Maker conversion.Conclusion: With NX1 H.265 to Windows Movie Maker Converter, you can easily convert Samsung NX1 H.265 videos to Windows Movie Maker WMV format in few steps; video quality are guaranteed by the best H.265 to WMM Converter. Just try and enjoy yourself.Further Reading:
If you are looking for the best way to convert XDCAM IMX to NLEs on Mac for editing, this article is worth reading. It explains how to import Sony XDCAM HD IMX files for working with non-linear editing system on Mac platform. Sony XDCAM camcorder is professional camcorder which has excellent video quality for us to take high quality full HD videos. Sony XDCAM PMW-EX3, PMW-EX1R, PMW-200, PMW-100, and PDW-F800 are hot products in the camcorder market. Besides the HD quality, a heated discussion about how to stream XDCAM media to NLEs is around so many Sony XDCAM owners.XDCAM is a series of products for digital recording using random access solid-state memory media, in the product lines, XDCAM HD is one of them, differ in types of encoder, frame size, container type and recording media. IMX, created by Sony, which can be stored on tape, optical disc, or hard disk within an MXF container is a high-quality, standard definition, MPEG-2-based video format.“I’m having trouble importing IMX files shot on a Sony XDCAM HD camcorder to NLEs. So I guess I need to figure out how to convert this IMX files to something that will work well with NLEs. Any help is much appreciated.” To be able to import Sony XDCAM IMX to NLEs on Mac for editing, it is necessary to understand how to convert XDCAM HD IMX to NLEs especially supported format on Mac. So is there any approach to deal with XDCAM HD IMX compatible with Mac problem to make the NLEs editing easier?If you are in the same situation as mentioned above, we would recommend you use Pavtube HD Video Converter for Mac to do format conversion. Working excellently as a Sony IMX Converter for Mac, this program comes with great ability to convert XDCAM IMX to optimal files for use in NLEs like FCP, iMovie, FCE, Avid Media Composer, Adobe Premiere, Sony Vegas and so on with invisible quality loss. In addition to access IMX conversion on Mac, it is also able to handle video files in a wide variety of file formats, including MXF, AVCHD, MTS, M2TS, M2T, TiVo, MOV, MKV, MOD, TOD, MPG, FLV, WMV, MP4, AVI, VOB, and more. How to work with Sony XDCAM HD IMX files on Mac NLEs?Step 1: The only difference between the trail version and the retail version is the watermark “Pavtube” in the middle of the converted files by trail version. After the installation, click “Add video” to load your original XDCAM HD IMX files to the program. You can also load several files at once thanks to “Add from folder” button. You can highlight it for a preview.
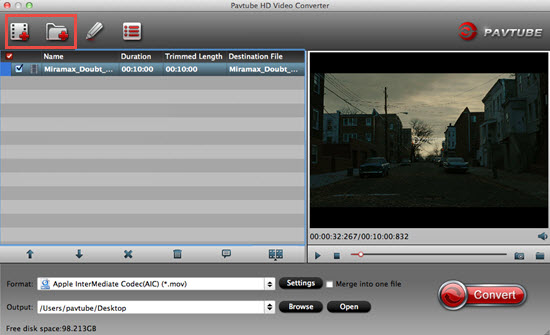 Step 2: For editing on Mac, you have plenty choices and it depends on your NLEs. This wonderful software has presets for all those NLEs to assist new users continue their editing workflow smoothly, and don’t have to struggle with the setting parameters thing. Save time and ease the conversion for users. For example: if you want to edit Sony XDCAM HD IMX files in FCP X/7/6, you can hit the format bar and then choose “Final Cut Pro>>Apple ProRes 422 (*.mov)” as best output format. For higher qualities, you can choose “Apple ProRes 422 (HQ) (*.mov)”; for smaller sizes, you can turn to “Apple ProRes 422 (Proxy) (*.mov)”.
 Tips: For editing in iMovie/FCE, you can choose “iMovie and Final Cut Express>>Apple InterMediate Codec (AIC) (*.mov)”.
For editing in Avid Media Composer, you can choose “Avid Media Composer>>Avid DNxHD (*.mov)”.
For editing in Adobe Premiere/Sony Vegas, you can choose “Adobe Premiere/Sony Vegas>>MPEG-2 (*.mpg)”.Step 3: Click “Settings” button to customize the output video and audio settings by yourself. But if you are not good at it, you’d better use the default parameters, they will ensure you a good balance between file size and image quality basically. You can change the resolution, bit rate, frame rate as you need.Step 4: Now everything has been settled, and don’t forget to set the file location. Click “Convert” button to start the conversion work and click “Open” when you finish your conversion to check your converted files.Conclusion: For some users, they say that when preview the clips, there is no audio showed up which can correctly playback on the local media player. Here is one way you can try, click the “Properties” button, and then select the Audio Stream ID to another one, this may help.Further Reading:
If you are having issues importing and editing Nikon 1 J5 4K/60p video in iMovie/FCE on Mac, you may wish to read this post. It explains an easy way of converting Nikon 1 J5 4K/60p video to an “edit” friendly format for use in iMovie and FCE with optimum performance. Announced as the latest powerful addition to the Nikon 1 System of compact interchangeable lens cameras, the Nikon 1 J5 comes with a more traditional shape and feels with a contoured grip and secondary command dial. It’s 1″20.8MP BSI-CMOS sensor offers a boost in resolution over its predecessor, and is capable of 4K video capture at 15 fps (15p), as well as 1920 x 1080 video recordings at 60p/30p and 1280 x720 video capture at 120p/60p/30p.After you got the Nikon 1 J5 camcorder, you may have recorded some videos with it. This camcorder can help you to record videos in 4K format. If you have the need to import Nikon J5 4K/60p video to iMovie/FCE, you will find that your video files are not supported by iMovie/Final Cut Express, what’s the reason? Because iMovie and FCE can’t edit some special video formats, such as MOV, AVCHD MTS, MXF, etc. so it means you can’t import Nikon J5 4K video to iMovie/FCE for editing directly.In this case, how can we solve Nikon 1 J5 4K/60p video to iMovie/FCE issue? We are afraid that you will need third party converter software to process file conversion before editing. Considering the ease of use and lossless quality, we would recommend Pavtube Video Converter for Mac, which will help you to convert Nikon 1 J5 recorded 4K/60p video files to iMovie/FCE native supported Apple Intermediate Codec. How to edit Nikon 1 J5 4K/60p video in iMovie/FCE?Step 1: When you download and install the Mac Video Converter, open the main interface and choose the “Add video” to load your Nikon 1 J5 4K/60p videos in. For the multiple video clips we can hit the “Add from folder” button.Step 2: Click the “Format” bar to get the drop-down menu and you can get “iMovie and Final Cut Express>>Apple InterMediate Codec (AIC) (*.mov)” as the best output format.
 Step 3: Click “Settings” button to customize the output video and audio settings by yourself. But if you are not good at it, you’d better use the default parameters, they will ensure you a good balance between file size and image quality basically. You can change the resolution, bit rate, frame rate as you need.Step 4: Now, click “Convert” and let it go. The Mac Video Converter supports batch conversion. So if you have lots of 4K/60p videos to convert, check “Shut down computer after conversion” and you can go away without keeping an eye on it.Conclusion: Once the conversion process shows in 100%, click “Open” to get the output videos. Create a project and start Nikon 1 J5 editing 4K/60p videos in iMovie/FCE with light speed.Further Reading:
“I recently did the switch to Yosemite. I now find some WAV files to be no longer readable through FCP X, Preview App, QuickTime, and etc. But, I can open them through VLC, and also Soundtrack Pro.” Any good suggestions there we can take to make FCP X read WAV files on Yosemite? Most computer multimedia programs play music stored in the WAV file format, which has been around since the early days of personal computing. The Mac comes standard with the FCP X program, which recognizes WAV files as well as several other file formats. In this case, why someone there still ask for the answers to smoothly play WAV files on FCP X on Yosemite?“An FCP X project with this WAV files has already been edited, with multiple cuts (46 to be exact) throughout the 35 minute timeline. The file is still visible on timeline with all cuts but is now silent.” “I have a translation track on a WAV file which I previously imported into FCP X and then removed. For some unknown reason to me it will not allow me to reimport it. I've tried both drag and drop and using the “import” menu method. I do not receive any error messages but it does not show up in the events.”It is important to understand the various issues that may come up when dealing with different formats. First of all, a WAV file is basically an audio file for Windows used for storing audio on a PC, similar to the AIFF format used on a Mac. WAV is the main format used on Windows systems for raw and typically uncompressed audio. It can hold compressed audio, but the most common WAV format contains uncompressed audio.Even though WAV files are compatible with FCP X in some cases, it is best to convert them to an AIFF format. This will save system resources when FCP X plays the audio files. Otherwise, you may encounter dropped frames or an annoying beeping sound even other incompatible issues while FCP X plays your WAV sequence.So how can we make all WAV files readable flawlessly on FCP X on Yosemite? That’s the key point. We here sincerely introduce you the professional audio transcoder- Pavtube Video Converter for Mac, which could also be a strong video converter for any video conversion work. We are glad to tell you how to work this audio transcoder nicely to import WAV files to FCP X on Yosemite with high audio quality preserved. How to stream WAV files to FCP X on Yosemite?Step 1: When you download and install the Mac Video Converter, open the main interface and choose the “Add video” to load your WAV audios in. For the multiple audio clips we can hit the “Add from folder” button.Step 2: Click the “Format” drop-down list, and choose “Common Audio>>AIFF-Audio Interchange File Format (*.aiff)” as best output format.
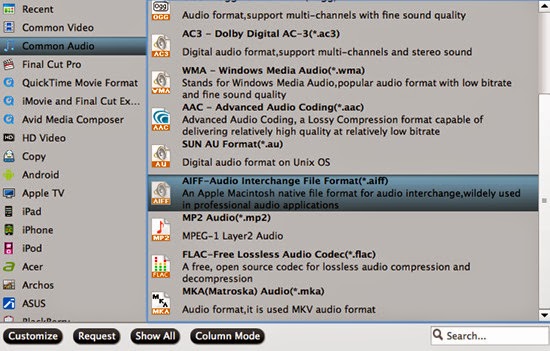 Step 3: Click “Settings” button to customize the output video and audio settings by yourself. But if you are not good at it, you’d better use the default parameters, they will ensure you a good balance between file size and image quality basically. You can change the resolution, bit rate, frame rate as you need.Step 4: Click the “Convert” button under the preview window and the Mac Video Converter starts converting. By the way, you can take a screenshot at your favorite frame.Conclusion: After converting, you can click the “Open” button to find your converted audio files. Now, you can read WAV files on FCP X without any worries! What are you waiting for? Just go ahead and have a try! Enjoy it!Further Reading:
If you have no ideas on how to play XC10 4K MXF on Yosemite/Windows 10, why not move on to know more details below. Several main solutions are offered below which we can take as reference for playing 4K MXF on Yosemite/Windows 10 smoothly.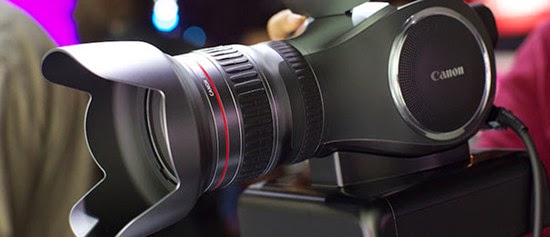 Take a usual phenomenon as example: when you tried to open XC10 4K MXF files on your Mac Yosemite QuickTime for playing, something wrong would happen there along the lines of “This is not a movie file.” This gets really annoying if you come across a 4K MXF files for a playback on Mac Yosemite, right? MXF is not associated with the QuickTime player or some other NLEs.The incompatibility issue also happens to Windows users: “The latest Canon XC10 XF-AVC 4K camcorder seems not bad to take the higher images but I got some troubles when importing the XC10 4K MXF recordings to VLC for playback. ‘Errors’ always appeared there on the screen. The files were broken or incompatible problems? I need some help.”If you familiar with HD video format, you may know the main reason is the MXF video codec. Most MXF files are encoded with a non-Microsoft codec or with a codec not installed on your Mac/Windows computer. You will fail to play this kind of MXF videos. For users who want to play XC10 4K MXF on different media players such like QuickTime, VLC, Windows Media Player or Playback Pro and etc. on Yosemite/Windows 10, fortunately, Pavtube MXF Converter for Mac and Pavtube MXF Converter can be the best MXF transcoding programs to help you a lot. You can choose the corresponding version according to your requirements. Steps on how to play XC10 4K MXF on Yosemite/Windows 10 (Take playing XC10 4K MXF on QuickTime on Yosemite as an example):Step 1: Download, install and run this Mac MXF Converter as a professional MXF to QuickTime Converter. If you are running on Windows 10, download, install and launch the corresponding MXF Converter. You can click “Add video” button to import XC10 4K MXF to it when the main interface pops up. Directly drag the files in is also not a bad idea.
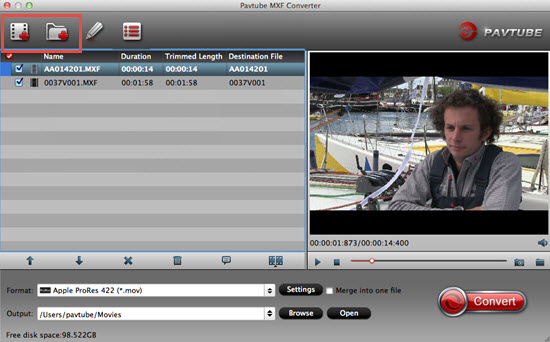 Step 2: Click “Format” bar and choose best output format for output. Click and choose “Common Video>>MOV-QuickTime (*.mov)”. You can also choose other formats according to your output devices and usage.
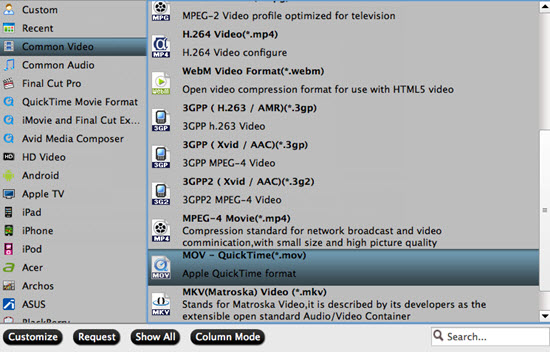 Tips: For playing XC10 4K MXF on VLC on Windows 10, choose “Common Video>>H.264 Baseline/Main/High Profile Video (*.mp4)” as output format. Why not have a try with free trial for playing XC10 4K MXF on other media players on Yosemite/Windows 10? You are definitely good readers!Step 3: (Optional Functions) Generally speaking, the default settings will ensure you a good balance between file size and image quality. But you can still click “Settings” button to modify video and audio settings like codec, resolution, bit rate, frame rate, sample rate, and audio channels in your own way.Step 4: When ready, click “Convert” button to begin format conversion. As soon as the conversion is complete, you can click “Open” button to get the generated 4K MXF files that are ready for playing with QuickTime, VLC and other media players on Yosemite/Windows 10. Conclusion: If you have plenty of 4K MXF to convert, you can choose bunch conversion. Select the files you want to convert at the same time, and then click the "Convert" button. The maximum number you can convert at a time is four; you can choose the conversion number by clicking “Option” button in the main UI. Maximum simultaneous running processes are for you to change.Further Reading: