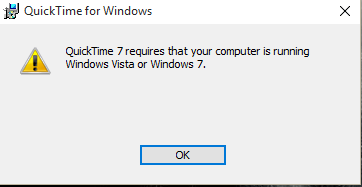
QuickTime is an extensible multimedia framework developed by Apple Inc., capable of handling various formats of digital video, picture, sound, panoramic images, and interactivity on Windows and Mac OS X. QuickTime lets you view Internet video, HD movie trailers, and personal media in a wide range of file formats. However, when trying to install the latest Quicktime v7.7.8 in the latest Windows 10, users are alerted “Quicktime 7 requires that your computer is running Windows Vista or Windows 7”.
The true fact is that QuickTime 7 is not compatible with Windows 10. It can affects lots of people’s experience with Windows 10 if QuickTime cannot be installed in Windows 10. Some online video sties require QuickTime installed for playing movies in internet browser; some free editing or player applications rely on the QuickTime framework, such as Adobe After Effects, Adobe Audition, Adobe Premiere Elements, GoPro Studio.
Though QuickTime 7 is incompatible with Windows 10, there are workarounds of installing QuickTime in Windows 10.
Solution 1 – Install the older version of QuickTime v7.7.6
If you are using Windows 10 and see an alert message saying that it’s impossible to install QuickTime on your system, please try QuickTime 7.7.6 instead.
 Solution 2 – Install the latest QuickTime v7.7.8 by tricks
1. Create a new folder like C:\QT or something similarly easy. All the content in this folder can deleted after QuickTime v7.7.8 is finished installation.
2. Download the latest QuickTime 7.7.8 from the official QuickTime for Windows page. And save it to C:\QT.
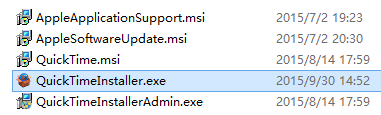
Extract QuickTimeInstaller.exe.
3. Right-click on the file QuickTimeInstaller.exe and choose “Extract here”. If you cannot see options of extraction, download and install WinRAR or 7Zip, then try to extract.
4. You should now have a folder that looks something like this, under C:\QT or whichever folder you chose.
Extract QuickTime
Solution 2 – Install the latest QuickTime v7.7.8 by tricks
1. Create a new folder like C:\QT or something similarly easy. All the content in this folder can deleted after QuickTime v7.7.8 is finished installation.
2. Download the latest QuickTime 7.7.8 from the official QuickTime for Windows page. And save it to C:\QT.
Extract QuickTimeInstaller.exe.
3. Right-click on the file QuickTimeInstaller.exe and choose “Extract here”. If you cannot see options of extraction, download and install WinRAR or 7Zip, then try to extract.
4. You should now have a folder that looks something like this, under C:\QT or whichever folder you chose.
Extract QuickTime
 5. install the easy prerequisites:
a. Double-click the AppleSoftwareUpdate.msi file and click “OK”, “I accept” etc. until the install finishes.
b. Do the same with AppleApplicationSupport.msi.
c. Ignore the file called QuickTimeInstallerAdmin.exe as we won’t be needing it!
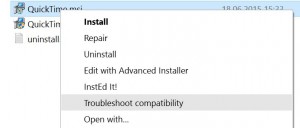
6. Right-click the QuickTime.msi file:
a. Select “Troubleshoot compatibility”.
5. install the easy prerequisites:
a. Double-click the AppleSoftwareUpdate.msi file and click “OK”, “I accept” etc. until the install finishes.
b. Do the same with AppleApplicationSupport.msi.
c. Ignore the file called QuickTimeInstallerAdmin.exe as we won’t be needing it!
6. Right-click the QuickTime.msi file:
a. Select “Troubleshoot compatibility”.
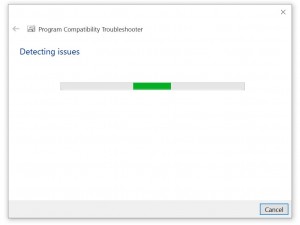 b. Wait for the wizard to scan the QuickTime.msi file for possible culprits (which we already know to be the Windows version check).
 c. It should say that it has applied a “Skip Version Check” workaround to enable the QuickTime.msi installer to run.
d. Click “Test the program” and run the installation. Then click “Next” and complete the installation.
e. If it worked without error, you’re now done! If not, or if all else fails, continue to refer to point 7 to point 11.
7. Download this TRANSFORM file and extract it to C:\QT. We will use this file to temporarily remove the OS checks preventing the installation. (A “transform” file or “.mst” is just a simple file that adds or removes things from an MSI-based installation (like QuickTime.msi).
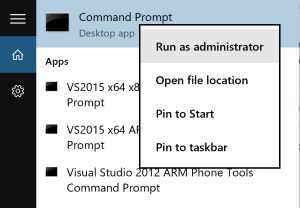
8. Click the Windows icon or Search icon and search CMD. Right-click the Command Prompt shortcut/icon and chooseRun as administrator.
c. It should say that it has applied a “Skip Version Check” workaround to enable the QuickTime.msi installer to run.
d. Click “Test the program” and run the installation. Then click “Next” and complete the installation.
e. If it worked without error, you’re now done! If not, or if all else fails, continue to refer to point 7 to point 11.
7. Download this TRANSFORM file and extract it to C:\QT. We will use this file to temporarily remove the OS checks preventing the installation. (A “transform” file or “.mst” is just a simple file that adds or removes things from an MSI-based installation (like QuickTime.msi).
8. Click the Windows icon or Search icon and search CMD. Right-click the Command Prompt shortcut/icon and chooseRun as administrator.
 9. Type the following command and hit ENTER:
msiexec /i QuickTime.msi /qn TRANSFORMS=FIX.mst ALLUSERS=1 /log C:\QT\install.log
10. Installation shouldn’t take more than a couple of minutes…
11.NOTE: A log file called install.log will be created in the C:\QT folder, which should end with something along the lines of “Return code 0”. If not, and QuickTime wasn’t installed, you may look in this file for any possible error codes (opens fine in Notepad or WordPad). You will need to install the older version QuickTime v7.7.6.
Solution 3 – Play QuickTime MOV in Windows 10 Without Installing QuickTime
In order to solve can’t play QuickTime MOV in Windows Media Player issue, a recommended solution is to convert QuickTime MOV to Windows Media Player compatible QuickTime MOV, WMV, ASF, MPG. Pavtube Video Converter is just the ideal QuickTime MOV to Windows Media Player which can fast convert QT MOV files to WMP supported video format without quality loss. Besides, no extra system component will be installed to your Windows and would probably slow down your computer. It’s fully compatible with Windows 10.
Free download it and follow the guide to convert QuickTime MOV to WMV format so you can import and play MOV files with Windows10 nicely.
9. Type the following command and hit ENTER:
msiexec /i QuickTime.msi /qn TRANSFORMS=FIX.mst ALLUSERS=1 /log C:\QT\install.log
10. Installation shouldn’t take more than a couple of minutes…
11.NOTE: A log file called install.log will be created in the C:\QT folder, which should end with something along the lines of “Return code 0”. If not, and QuickTime wasn’t installed, you may look in this file for any possible error codes (opens fine in Notepad or WordPad). You will need to install the older version QuickTime v7.7.6.
Solution 3 – Play QuickTime MOV in Windows 10 Without Installing QuickTime
In order to solve can’t play QuickTime MOV in Windows Media Player issue, a recommended solution is to convert QuickTime MOV to Windows Media Player compatible QuickTime MOV, WMV, ASF, MPG. Pavtube Video Converter is just the ideal QuickTime MOV to Windows Media Player which can fast convert QT MOV files to WMP supported video format without quality loss. Besides, no extra system component will be installed to your Windows and would probably slow down your computer. It’s fully compatible with Windows 10.
Free download it and follow the guide to convert QuickTime MOV to WMV format so you can import and play MOV files with Windows10 nicely.

 1. Launch the Pavtube Video Converter and import QuickTime mov files.
Drag & drop QuickTime mov files to the program directly. Or go to the “File” menu, choose “Add Video” to locate the QT mov files you want to add. You can add several files to do batch conversion.
1. Launch the Pavtube Video Converter and import QuickTime mov files.
Drag & drop QuickTime mov files to the program directly. Or go to the “File” menu, choose “Add Video” to locate the QT mov files you want to add. You can add several files to do batch conversion.
 2. Choose WMV as output format
Click the Format menu, select Windows Media Player friendly format as your output video format. There, you can take WMV as your output video format. If you prefer high definition videos, move your mouse pointer to “HD Video” and then choose HD WMV.
2. Choose WMV as output format
Click the Format menu, select Windows Media Player friendly format as your output video format. There, you can take WMV as your output video format. If you prefer high definition videos, move your mouse pointer to “HD Video” and then choose HD WMV.
 3. Start converting QuickTime MOV to Windows 10
Press the big “Convert” button to start the QuickTime MOV video converting process. After the conversion, you can add your QuickTime (MOV) videos in Windows 10 for playing at your will without hassle.
Read More:
3. Start converting QuickTime MOV to Windows 10
Press the big “Convert” button to start the QuickTime MOV video converting process. After the conversion, you can add your QuickTime (MOV) videos in Windows 10 for playing at your will without hassle.
Read More:
Windows Media File can be Windows Media Video File or Windows Media Audio file. Windows Media Video File (WMV) is a file type which can contain video in one of several video compression formats developed by Microsoft. WMV file contains video encoded with one of Microsoft’s Windows Media Video (WMV) proprietary codecs, WMV 7, WMV 8 or WMV 9.
To convert Windows Media File to MP4 is to convert WMV to MP4. This article will guide you on how to convert Windows Media File to MP4 in Windows 10, Windows 8, Windows 7, Windows XP or in Mac OS X 10.11 El Capitan, 10.10 Yosemite, 10.9 Mavericks, 10.8 Mountain Lion, 10.7 Lion.
How to Convert Windows Media File to MP4 in Windows 10/8/7/XP/Mac?
Prepare: Download Windows Media File to MP4 Converter
Download Windows Media File to MP4 Converter – Pavtube Video Converter / Mac Version. Install and launch the program.
 Step 1: Import Windows Media File WMV to the program
Simply click on “Add File” button to import Windows Media files WMV to the program. Or you can simply drag and drop your Windows Media files WMV to the program.
Step 2: Set output video as MP4
Click “Profile” Drop-down. Choose “MPEG-4 Video(*.mp4) or “H.264/MPEG-4 AVC Video(*.mp4)” as output video format from “General Video” Category.
To convert Windows Media file to HD MP4, Choose “HD MPEG-4 Video(*.mp4) or “HD H.264/MPEG-4 AVC Video(*.mp4)” as output video format from “HD Video” Category.
Step 1: Import Windows Media File WMV to the program
Simply click on “Add File” button to import Windows Media files WMV to the program. Or you can simply drag and drop your Windows Media files WMV to the program.
Step 2: Set output video as MP4
Click “Profile” Drop-down. Choose “MPEG-4 Video(*.mp4) or “H.264/MPEG-4 AVC Video(*.mp4)” as output video format from “General Video” Category.
To convert Windows Media file to HD MP4, Choose “HD MPEG-4 Video(*.mp4) or “HD H.264/MPEG-4 AVC Video(*.mp4)” as output video format from “HD Video” Category.
 Step 3: Convert Windows Media File to MP4
Click “Convert” button to start converting Windows Media File to MP4.
Read More:
Step 3: Convert Windows Media File to MP4
Click “Convert” button to start converting Windows Media File to MP4.
Read More:
Windows Media File can be Windows Media Video File or Windows Media Audio file. Windows Media Video File (WMV) is a file type which can contain video in one of several video compression formats developed by Microsoft. WMV file contains video encoded with one of Microsoft’s Windows Media Video (WMV) proprietary codecs, WMV 7, WMV 8 or WMV 9.To convert Windows Media File to MP4 is to convert WMV to MP4. This article will guide you on how to convert Windows Media File to MP4 in Windows 10, Windows 8, Windows 7, Windows XP or in Mac OS X 10.11 El Capitan, 10.10 Yosemite, 10.9 Mavericks, 10.8 Mountain Lion, 10.7 Lion.How to Convert Windows Media File to MP4 in Windows 10/8/7/XP/Mac?Prepare: Download Windows Media File to MP4 ConverterDownload Windows Media File to MP4 Converter – Pavtube Video Converter / Mac Version. Install and launch the program. Step 1: Import Windows Media File WMV to the programSimply click on “Add File” button to import Windows Media files WMV to the program. Or you can simply drag and drop your Windows Media files WMV to the program.Step 2: Set output video as MP4Click “Profile” Drop-down. Choose “MPEG-4 Video(*.mp4) or “H.264/MPEG-4 AVC Video(*.mp4)” as output video format from “General Video” Category.To convert Windows Media file to HD MP4, Choose “HD MPEG-4 Video(*.mp4) or “HD H.264/MPEG-4 AVC Video(*.mp4)” as output video format from “HD Video” Category.Step 3: Convert Windows Media File to MP4Click “Convert” button to start converting Windows Media File to MP4.Read More:
"How do I open and play, or edit, a '.mov' file? (ask: “Where can I find a .mov player for my device?") Here is a brief rundown on some of the best '.mov' capable software available for your devices.”MOV Player for WindowsQuick Time for Windows(FREE)Although, unlike the Mac, you won't find QuickTime already installed as part of the OS on your new Windows computer, you can easily locate and download a copy for free.Get QuickTime for WindowsVideoLan for Windows (FREE)Like many Open Source offerings, VLC has been developed for multiple operating systems. One of the most popular Video and Audio Players, thanks to its ease of use, small file size and minimum drain on computer, VLC for Windows is a reliable, robust and well supported multimedia player. As with the Mac, this is a solid alternative to QuickTime for Windows Users.Get VLC for WindowsPlay .Mov on AndroidTry the built in player: The great thing about Android is that it's an open source app, and as such, a lot of Android Apps seem to be built with compatibility at the forefront of the collective dev. mind. Additionally, the Android operating system is very similar to the Mac and Linux OS. What this means for anyone with an Android device such as a Galaxy phone or tablet, is that it's usually pretty easy to find software which is compatible with file formats for devices running on iOS or Windows. If you just want to play a '.mov' file, before you download anything, just try opening the file with the existing multimedia players. There is a good chance one of them will do it for you out of the box…. But if not:BSPlayer (FREE)Despite its unfortunate sounding name, BSPlayer has been well reviewed overall. It supports a large range of formats, including '.mov'. As well as the standard free version there is a version specially built for ARM processors (often the 'Cinderella of Android devices, when it comes to App availability). The free version has less functionality than the paid, and is supported by ads.BSPlayer Pro (PAID): Offers the same features as the free version without the ads, and with a number of extra features, including hardware-software tweaks such as a customisable audio amplification capable of up to 500% original audio and support for audio headsets, Bluetooth keyboards etc.Get BSPlayer for AndroidConvert MOV Videos to Play on Your Windows/AndroidIf you don't want to get so much players on your device, there's an alternative option for you: transcoding MOV videos to your device playable formats with a MOV converter. Pavtube Video Converter(read the review)is such a powerful, comprehensive but easy to use converter that deserves your attention. It directly converts MOV videos to your Windows PC and Android devices with original quality. Pavtube Video Converter for Windows:
- Convert MOV video whthout any quality loss
- Convert MOV videos much faster than other converters in the market
- Convert MOV to most popular video formats, including MP4, WMV, AVI, FLV, etc
- Some Android phones are preset as outputformat
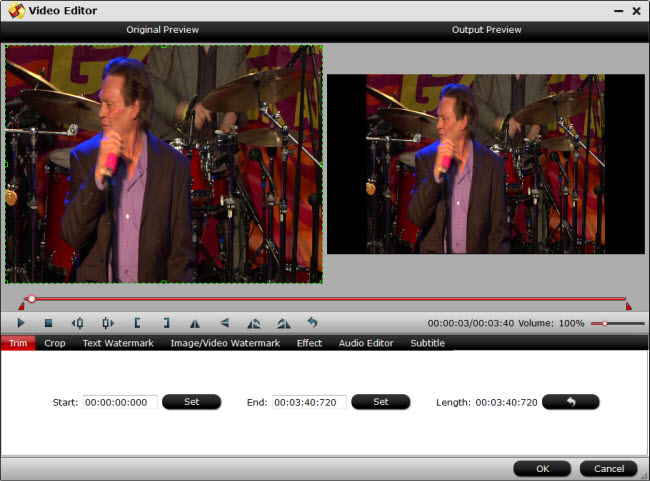
- Additional editor helps you to personalize your MOV videos with ease
Simple guides to encode MOV to H.264 MP4 on Windows/AndroidStep 1. Click "File" menu on the top tool bar, and select "Add Video/Audio" or "Add from folder" to import .mov source video to the program.Step 2. Click "Format" bar, you can choose "H.264 Video(*.mp4)" as the output format from the format list.Step 3. (Optional)Hit "Settings" on the main interface, you will open the "Parameters" window, here, you can set the output video codec, size, frame rate, bit rate, audio codec, bit rate, sample rate and channels to improve output video quality.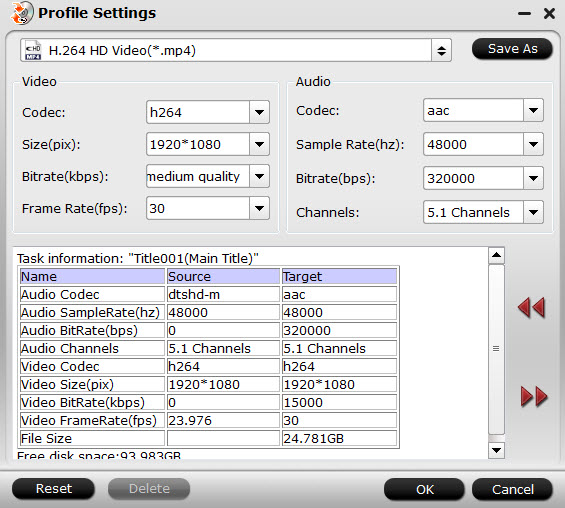 Step 4. Hit right-bottom "Convert" button to start .mov video to H.264 MP4 encoding process.When the conversion is over, you can smoothly stream .mov videos on your compute or to your Android devices via USB .Read More:
“Hi, guys, I’m shooting with a new Sony A7s II camera. It records 4K footage in XAVC S codec using MP4 container. I would like to edit these XAVC S files in Windows Movie Maker but couldn’t figure out an available way to import them. Does Movie Maker have native support for A7s II XAVC S files? If not, is there any workaround to make WMM work with Sony A7s II XAVC S 4k files? Any suggestions? I would really appreciate any help. Thanks.”
Sony A7s II can shoot 4K videos internally (3,840 x 2,160) at 24 or 30fps in the XAVC S format. XAVC S is intended as a more economic and simpler consumer codec, which is widely used in Sony's hottest 4K cameras like the A7s, FDR-AX100, HDR-AS100V/AS200V, A7II, etc.
You may have got such a 4K camera and shoot lots of XAVC S videos and now want to make a home movie in Windows Movie Maker. However, Movie Maker will not recognize your XAVC S files imported. The reason is simple: XAVC S is not in the supported video format of Windows Movie Maker. To achieve your goal, the easy workaround is to convert XAVC S to Windows Movie Maker compatible video format first.
To be able to import and edit A7s II 4K footage in Windows Movie Maker fluidly, we would recommend transcoding the A7s II XAVC-S footage to Movie Maker preferred WMV/DV AVI format first. This requires third party software like Pavtube Video Converter.
It supports creating high quality WMV video for your Windows Movie Maker on Windows 10/8/7/XP/Vista, no matter what's the format of your source video files. It can convert almost any video to WMV so you can import your XAVC S video to Windows Movie Maker for editing. Plus, it comes with all regular video editing tools like Trim, Crop, Effect, Watermark. For basic video editing tasks, you can even replace your Windows Movie Maker with it. What's more, the program also provides optimized presets for Adobe Premiere, Avid, Sony Vegas and many more.
First free download and install Pavtube Video Converter on your PC, here’s a quick guide explaining how to process A7s II XAVC-S 4K to WMV/DV AVI conversion for Windows Movie Maker via using this converter app.
1.Run this program, you will find the interface is very brief, this program is very easy to use, now please click add files button to import the video files that you want to convert, you can add batch files at one time.
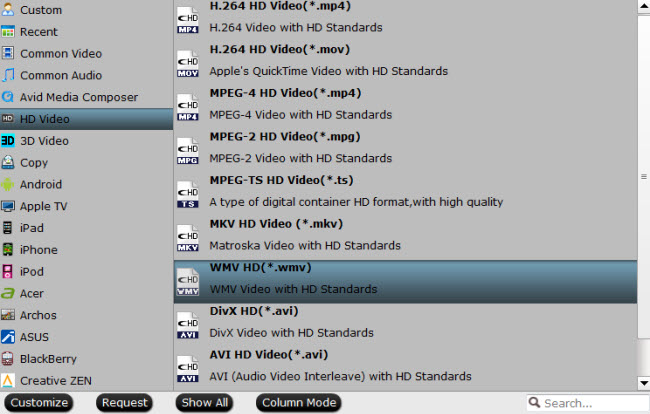
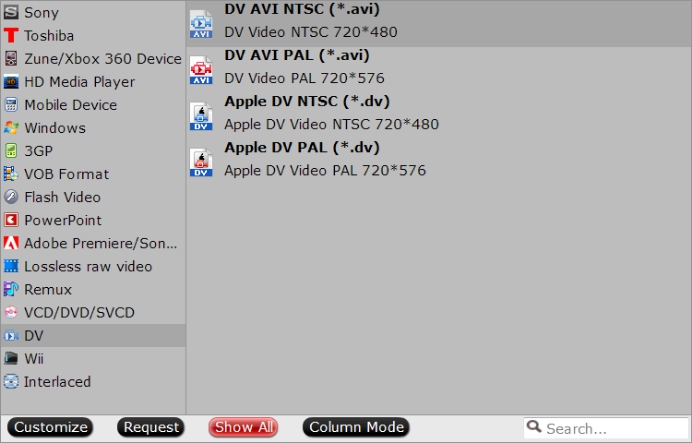
2.After you imported the Sony A7S II files, please choose a video format for output. To edit Sony A7S II files with Windows Movie Maker smoothly, you will need to choose Windows Movie Maker native supported video format, just click the format bar and choose "HD Video">"WMV HD (*.wmv)" as your output format.
 To edit torrent movies with Windows Movie Maker, select to output WMM supported DV AVI file format from "DV" > "DV AVI NTSC (*.avi)" or "DV AVI PAL(*.avi)".
 3.Click "Settings" button, then you will be able to adjust audio and video parameters on the popup window to customize the output file quality, these adjustable parameters include codec name, aspect ratio, bit rate, frame rate, sample rate, and audio channel.
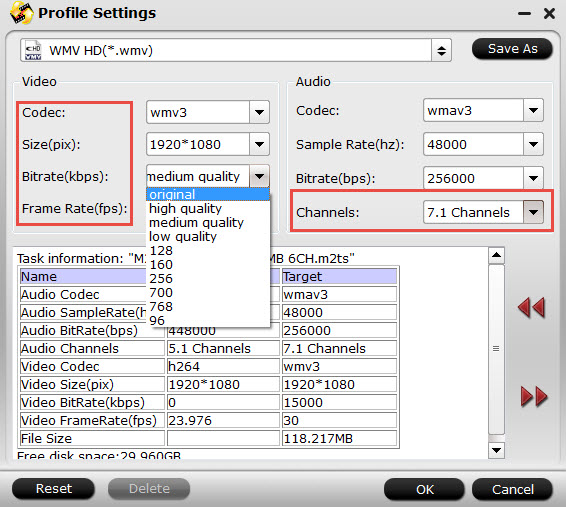 Tips: In the "Audio">"Channels" drop-down menu, you can select 7.1 audio channels to keep the original audio tracks.
4. When everything is done, you can take a preview by hitting “Play” button. If you are satisfied with the final result, you can click “Convert” button to finish the conversion work.
When the conversion is done, you can click “Open” to get your generated files. Now, you can import and edit Sony A7S II XAVC S 4K files in Windows Movie Maker smoothly.
Read More:
Tips: In the "Audio">"Channels" drop-down menu, you can select 7.1 audio channels to keep the original audio tracks.
4. When everything is done, you can take a preview by hitting “Play” button. If you are satisfied with the final result, you can click “Convert” button to finish the conversion work.
When the conversion is done, you can click “Open” to get your generated files. Now, you can import and edit Sony A7S II XAVC S 4K files in Windows Movie Maker smoothly.
Read More:
“Anyone know a good mxf batch converter? Want to convert a whole bunch of mxf files shot on the Canon C300 to mov files so that I can open them in QuickTime player. Anyone got any suggestions?
“Hi, all, I got a couple of mxf video files which I want to play with Windows Media Player. My issue is that the mxf format is not compatible with WMP. Do I need to convert these mxf files to another format or how do I import them into Windows Media Player so I can watch them?”
MXF is a container format for professional digital video and audio media defined by a set of SMPTE standards. It is not compatible with many media players and portable devices, thus you can't import your MXF file to Windows Media Player and Mac QuickTime naturally.
There are a lot of users have the need to play MXF files on Mac or Windows computer, you may also have the same need, in this case, you need a MXF Video Converter to convert MXF video files to your media player supported video format, it can help you to play Canon MXF videos smoothly on Mac and Windows.
Pavtube MXF Converter / Mac Version are high recommended for you--convert MXF video format to any formats you need, such as convert MXF to AVI, convert MXF to MOV, convert MXF to MP4, etc. No matter they are recorded by Canon, Sony, Panasonic, JVC, or Blackmagic devices. What’s more, it has powerful MXF video editing function, you can easily trim, crop, add watermark, remove/replace audio, or adjust effect to the video.(Here is the top review)
Free Download:
Convert MXF files on Mac or Windows Playable Format
Step 1. Download, install and run MXF Video Converter, then click Add or Add from folder button to load the MXF files.
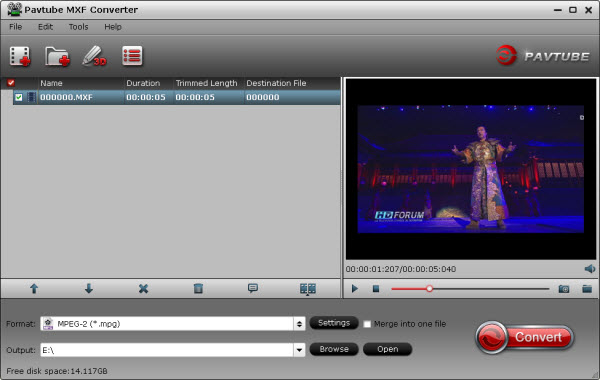 Step 2. To convert MXF files, please click format bar to choose the output format that you need, such as WMV for Windows meida player, MOV for QuickTime, MP4 for portable devices, etc. just select as you want.
Step 3. (Optional)After choosing the format, you can click settings button to adjust the output parameters, like resolution, bitrate, frame rate, etc. this MXF converter offers powerful customization feature.
Edit function is also available to use in this best MXF player/converter software, you can trim MXF video, crop MXF video, add watermark, add subtitle, remove/replace audio of MXF video, etc.
Step 2. To convert MXF files, please click format bar to choose the output format that you need, such as WMV for Windows meida player, MOV for QuickTime, MP4 for portable devices, etc. just select as you want.
Step 3. (Optional)After choosing the format, you can click settings button to adjust the output parameters, like resolution, bitrate, frame rate, etc. this MXF converter offers powerful customization feature.
Edit function is also available to use in this best MXF player/converter software, you can trim MXF video, crop MXF video, add watermark, add subtitle, remove/replace audio of MXF video, etc.
 Step 4. The final step is to click convert button to start the MXF video conversion. This MXF player/converter will convert MXF files at fast speed with top quality.
After conversion, you can freely watch your MXF file on Windows and Mac without any problem.
Read More:
Step 4. The final step is to click convert button to start the MXF video conversion. This MXF player/converter will convert MXF files at fast speed with top quality.
After conversion, you can freely watch your MXF file on Windows and Mac without any problem.
Read More:
If you are unable to play or edit H.265/HEVC files on Windows 10 smoothly, you may wish to read this post.
What is H.265/HEVC?
HEVC stands for high-efficiencyvideocoding. Also known as H.265, this new video codec will compress video files to half the size possible using the most-efficient current encoding format, MPEG-4, aka H.264 (used on Blu-ray discs and some satellite TV broadcasts). That will be one-quarter the size of files compressed using the MPEG 2 codec that most cable-TV companies still employ. More importantly, HEVC is used to compress video with 4K resolution — and possibly even 8K resolution in the future — so it can be efficiently delivered.
Present Situation of H.265/HEVC on Win 10.
Support for H.265/HEVC is now a part of Windows 10. You needn’t to install any codec or drivers to make H.265/HEVC files play on Windows 10. The default Windows media player plays the H265 clips natively. However, this support doesn’t guarantee that the H.265/HEVC videos will play smoothly on Windows 10 – that depends on your hardware. If you are running a computer with weak hardware, you may experience choppy and blocky playback.
How to Play/Edit H.265/HEVC on Win 10.
For whatever reason you are having problems playing/editing H.265/HEVC video files under Windows 10, we would recommend transcoding them to a format that is best suitable for Windows 10. Play H.265/HEVC video files on Windows 10, you need to transcode them to MP4, AVI, WMV, MOV, MPEG, etc suitable format, for edit H.265/HEVC video files under Windows 10, you need to convert them to the editor original supported codec, like DNxHD for Avid Medic Composer, MPEG-2 for Adobe Premiere Pro, MPEG-4 Movie for Edius Pro, etc.
Software Requirement for Smoothly Play/Edit H.265/HEVC
There are few third-party programs on the market that supports H.265 video decoding. Pavtube Video Converter(best H.265/HEVC Converter review)is arguably your ideal H.265 Video encoding and decoding application. It not only enables you to convert H.265 to Windows 10 supportable MP4, AVI, WMV, MOV, MPEG, etc and importing and editing with Edius Pro, Premiere Pro or transferring and playing with UHD TV. It also has the capabilities to encoding other videos to H.265 format to stream HD content with perfect quality and less bandwidth on multiple HD devices.
Step-by-step Guide of Converting H.265 Video to Play and Edit on Windows 10?
Step 1: Load files to the program.
Start the program on your computer and click"Add Video/Audio" from"File"drop-down list to add the files you desire to convert to the application.
Step 2: Choose output file format.
- Converting to Windows 10 and portable devices
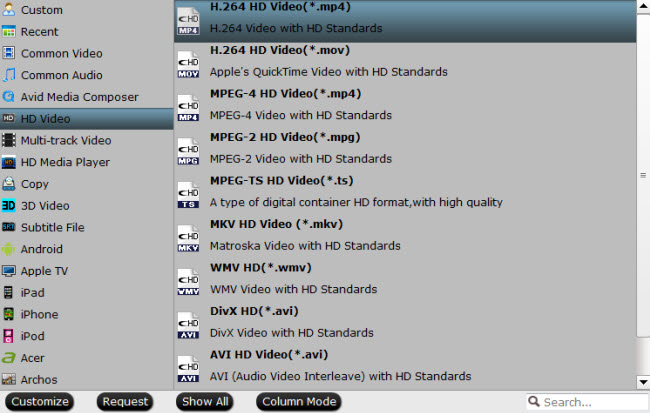
From the"Format" drop-down option, you can select a format that's widely support by many portable devices such as"H.264(*MP4)"video as the otuput profile format.
- Converting to Adobe Premiere Pro
Click the "Format" bar and switch to "Adobe Premiere/Sony.." option and select "MPEG-2(*.mpg)" as the output format for non-linear post work-flows in Premiere Pro CC.

- Converting to Avid
Click "Format" drop-down option, choose Avid Medic Composer best editing codec from "Avid Media Composer" > "Avid DNxHD(*.mov)

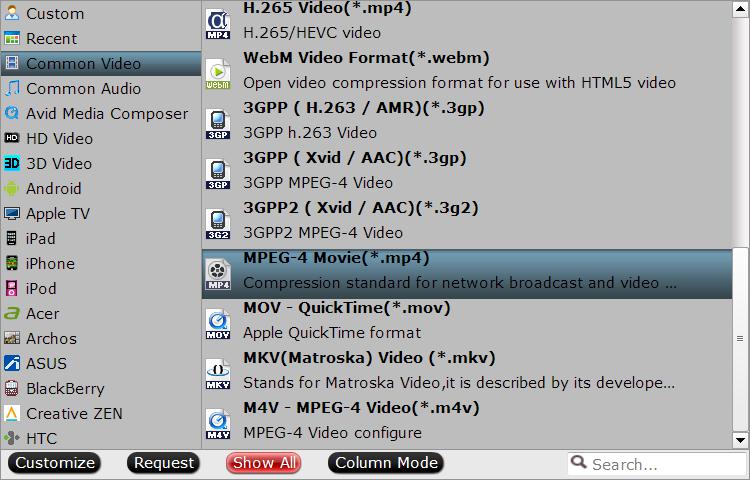
- Converting to Edius Pro
From "Format" bar drop-down option, choose one of Edius Pro 4/5/6/7/8 supported file formats such as "Common Video" > "MPEG-4 Movie (*.mp4)" to output.
Step 3: Set output profile parameters.
For better playback quality on your devices, you can customzie the output profile paramerters such as video codec, size, bitrate, frame rates and audio codec, sample rate, bitrate and channels.
Step 4: Convert H.265 video to Windows 10.
Hit the right-bottom"Convert"button to start H.265 video to Windows 10 conversion process.
When the conversion is done, you can play H.265 video on Windows 10 with its default media players or import the converted video files to the Avid Medic Composer, Adobe Premiere Pro, Edius Pro with ease.
Read More: