Monday, May 20, 2013

Convert Sony PMW-F55/F5 XAVC Footages for DVD burning

This article mainly teaches you how to burn Sony PMW-F55/F5 XAVC files to DVDs with a professional and easy-to-use XDCAM to DVD burner.

Sony's newest recording format the XAVC can record footages in superb video quality at up to 4K (4096 × 2160 and 3840 × 2160) resolution. When you have such great quality well-done videos after shooting, you might wanna save them in DVDs. Because in that way, you can keep your videos well and watch them conveniently, and even lend it to friends. But as XAVC is a rare software, not many software can support converting XAVC footages to DVD disc, then burn XAVC to DVD for home watching will be a difficulty, especially for the Mac users.


Luckily, here is a third-party professional XAVC to DVD Creator from Pavtube which can burn XAVC files to DVD for saving or sent for sharing. With this efficient DVD burner, you can easily burn your XAVC files without any loss, quick in time, and output in amazing high quality for watching. Below is the simple steps for you to easy burn your HD XAVC files to DVD.

Step 1. Download DVD Creater.


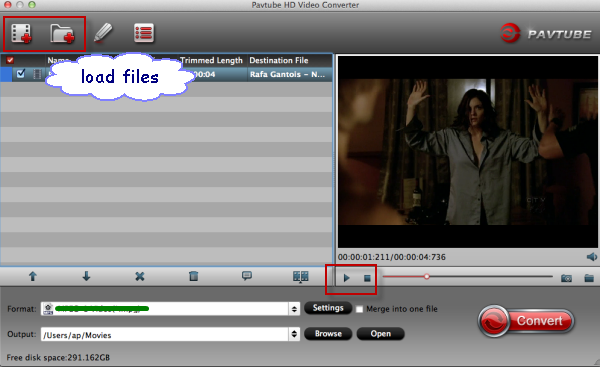
Free download this Sony XAVC to DVD burner. Follow the steps to install and run the free program. You can see the main interface.
canon mov to dvd maker run How to Convert and Burn Canon Video to DVD

Step 2. Load video files.

1. Drag and drop Sony XAVC video files to source area (details in Source Screen)

2. Select “Add Files” from the drop-down list of Quick Start menu.
add files How to Convert and Burn Canon Video to DVD

Each file is recognized as a chapter after being imported to DVD Creator. Press on “Add title” button to add more titles. And you can do some arrangement for titles or chapters.

Tip: You can enter Video Editor to Trim, Crop, Text Watermark, add Image/Video Watermark, set Effect, and Replace audio if necessary before burnning.

Step 3. Customize DVD menu.

Turn to Menu pane and double-click a DVD menu beneath the Menu Template to apply it to your DVD. You can change the background video/image, background music, text, title thumbnail and more for your DVD menu.
dvd creator menu How to Convert and Burn Canon Video to DVD

Step 4. Preview created DVD video.

Once the DVD menu has been decided, click on “Preview” tab and your DVD video will be played just like on a DVD player. The control buttons here are corresponded with the keys on remote control.
preview created dvd video How to Convert and Burn Canon Video to DVD

Step 5. Start burning Sony XAVC to DVD.

Click the “Burn” button to start fast making DVD from Sony F5/F55 Camera – video to a writable DVD (or ISO image) that will plays on standard DVD player after burning. Now you are able to watch the DVD on your home DVD player or TV.
dvd creator burn How to Convert and Burn Canon Video to DVD

With this professional Sony XAVC to DVD Maker, you will find it pretty easy to convert Sony F5/F55 XAVC videos to DVD for you to enjoy a quality time watching movies with your family at home. If you are Mac users, you can try convert XAVC to DVD on mac.

PS: For beginners, please switch to the online guide about how to use dvd creator 

Sunday, May 19, 2013

Import and Edit Canon C500 MXF in Adobe Premiere Pro CS 4/5/6 on Mac

In this article, I will shows the best method for editing Canon C500 MXF in Adobe Premiere Pro CS 4/5/6 on Mac. If you have problems when importing Canon C500 MXF to Adobe Premiere Pro on Mac Mopuntain Lion, please follow this post below to know how to import Canon C500 mxf footage to Adobe Premiere Pro CS 4/5/6 for editing without rendering.  


Canon has officially announced the EOS C500, the professional 4K video camera output that it promised at the NAB trade show in April. A continuation of the concept of the C500, it can capture Raw 4K video footage and offers frame rates of up to 120fps in compressed 4K. It also captures 2K footage (2,048 x 1,080 pixels) at 12-bit, with 4:4:4 Y'CbCr chroma sub-sampling for high colour resolution. For 4K and 2K recording, uncompressed output is delivered to external recording systems via built-in dual 3G SDI ports. Dual HD-SDI monitor outputs support external live monitoring. Simultaneously, HD content can be written to dual onboard CF cards to provide proxy video for offline NLE systems.

Read More: Canon XF300 | Canon XF105 | Canon XF100

Canon C500 is very excellent, you may have bought a C500 camcorder and need to edit C500 files in Premiere Pro CS 4/5/6, but C500 MXF files are not well supported by Premiere Pro CS, as you may encounter many audio and video problems, such as bitrate unsupported, and synchronization program. 

We did a test, we had only been able to get 35Mbps and 25Mbps files to work in PPro CS4, we have to use CS5 or above to edit natively 50MBPS 422HD recordings with AMA MXF or Canon XF Plugin. To edit C500 MXF videos, you’d better upgrade to CS5/CS6. But some users can’t upgrade to CS5/CS6, what will you do? 


In fact, it is an easy solution for many users, it can save money and same time. The most importnat is that the conversion won’t reduce the video qaulity. Here we run an top tool as the MXF to Adobe PPro Converter to take an example. Below is the simple guide on how to convert C500 MXF movies to Premiere Pro CS4/5/6 supported formats.


Step 1. After downloading, install and run this Mac MXF Converter for Premiere Pro, just copy the MXF files from the CF cards right to your hard drive, import the files to the software.


Step 2. Click "Format" bar to choose the output format. Click "Format > Adobe Premiere/Sony Vegas > MOV (AVC)(*.mov) or MPEG-2 Video (*.mpg)" as output format. The MXF to Premiere CS Converter for Mac will convert Canon C500 MXF videos to MOV/MPG with the original video resolution.


Step 3. You can click "Settings" button to adjust the parameters, such as resolution, bitrate, etc.

Step 4. Click "Convert" button to start converting Canon C500 MXF to MOV/MPG for importing to Premiere Pro CS4/5/6 on Mac.

After the conversion is finished, just run Adobe Premiere Pro CS4/5/6 and import the .mpg or .mov files for editing. You will find the output video work perfectly on Adobe Premiere Pro CS.


PS. If you do not know how to import video to Adobe, please reference the following guide:

Adobe Premiere Pro workflow: How to import Media Files to Premiere Pro on Mac

Canon MXF

Read More:

Thursday, May 16, 2013

Mac Canon MTS Converter-Working with Canon Legria HF20/HF200 MTS (AVCHD) Videos on Mac

Using a top Canon MTS Converter, you can make it easy to import and edit Canon Legria HF20/HF200 AVCHD files in Final Cut Pro, Avid, iMovie, Final Cut Express and Premiere Pro on Mac.


Canon's acquitted itself quite well with a nearly identical trio of flash-based AVCHD camcorders, the HF10/HF11/HF100, and follow-up models HF20 and HF200 manage to improve upon their legacy. Canon Legria HF20 and HF200 are hot Canon cameras, and the only difference between the two models is color and memory configuration: the HF20 has 32GB built in, while the HF200 has none. Aside from their stunning features, the compatibility of Canon Legria HF20/HF200 with Mac is the hot topic of discussion among the users.


As the AVCHD format is not good for Mac editing, it takes long time to render, and you can't edit the Canon HF20/HF200 AVCHD MTS files smoothly in Final Cut Pro (X), Avid, iMovie,FCE and Premiere Pro. To achieve you goal smoothly, below is simple tutorial for you.

Tips:Watch MTS Movies on Mac via iTunes?

Converting Canon Legria HF20/HF200 MTS files for editing in FCP (X), Avid, iMovie,FCE and Premiere Pro etc.

In order to process Canon HF20/HF200 footage fast and seamless on Mac, it requires that the AVCHD .mts videos to be transcoded into an editing friendly format before importing the HF20/HF200 video to non-linear editing apps. This is usually done with a Mac Canon Video Converter.

Recommended Tool: Pavtube HD Video Converter for Mac

The software converts Canon HF20/HF200 mts to Apple ProRes/DVCPRO/HDV/Avid DNxHD/AIC/AVI/WMV/MOV/MP4 and creates stunning high definition footage up to 1080p.

1. Download and run the perfect Mac Canon MTS Converter (If you are windows user, clik to download Canon MTS Converter), and then click "Add Video" button or "Add from folder" button to load HF20/HF200 AVCHD MTS source files.


2. Click format bar to choose the format for output.

For iMovie and FCE, you can choose 'Final Cut Express -> Apple InterMediate Codec (AIC) (*.mov)';


For FCP (X), you can choose 'Final Cut Pro -> Apple ProRes 422 (*.mov)';


For Avid, choose 'Avid Media Composer -> Avid DNxHD (*.mov)';


For Premiere, just choose Adobe Premiere -> WMV (VC-1) (*.wmv).

You can click "Settings" button to customize the output settings such as resolution and bitrate. Edit function is also available in this great Canon AVCHD Converter.

3.. Click "Convert" button to start transcoding Canon AVCHD MTS files on Mac for popular NLEs. Once the coversion completes, you can import and edit Canon HF20/HF200 AVCHD files natively with Final Cut Pro (X), Avid, FCE, iMovie, Premiere you want.

To make things much easier, please learn to know how to huge MTS files to DVD if you like, and learn More Canon MTS Video Converter Related Guide: 

Read More:

How to import Canon EOS T2i/550D MOV to FCP X for editing

Follow the guide to easily transcode your Canon T2i/550D 1080p H.264 MOV to ProRes 422 MOV format for smoothly editing on Mac.

EOS T2i/550D, a famous Canon DSLR that can offer HD video recording, is perfect for capturing clips or sequences which a consumer camcorder would otherwise find difficult or impossible. The T2i allows you to film at either 1920x1080, 1280x720 or 640x480 pixels with 30fps, 25fps, and 24fps. Video is an absolute highlight of the EOS T2i/550D and it's wonderful to have this degree of control in a camera. 

All of these are great, till you find it is a problem when you want to edit Canon T2i/550D footage in Final Cut Pro X. The thing is, I'm having an issue with the video clips during importing to FCP X: the output video from Final Cut Pro X is choppy, and there are lags or skipped frames even when exported to 30fps." The extension of the video file is mov, isn't this is a FCP friendly format? How can I import my Canon EOS Rebel T2i / 550D mov video to FCP X for editting?  
 

T2i record video in H.264 MOV, this format is supported by many editing software, but it can't be supported perfectly, take FCP X for example. Final Cut Pro X supported best video format is Apple ProRes 422 Codec MOV format, you can edit video with this format in Final Cut Pro X smoothly. That is to say, it's great choice to convert T2i/550D MOV to ProRes 422, then you can edit T2i/550D video well in FCP X on Mac. You can follow the steps below to convert T2i/550D footages for FCP X. 

Required software: Canon to FCP Converter for Mac 

Working as a Canon DSLR Camera to FCP Converter, it helps you import CanonT3i MOV to FCP, encode Canon 5D Mark III MOV for FCP X, edit Canon G12 MOV with FCP, as well as transcode Nikon D3200 MOV to ProRes for FCP X 

Step through: 

Step one. Run Pavtube Canon Video Converter for Mac. Click "Add" button, browse to the footages and load them to the converter. 


Step two. Select the items to be converted, and click on "Format" bar to set a FCP friendly format in Final Cut Pro template.

There are Apple ProRes family, DVCPRO and HDV codecs for your choice.

Basically, "Apple ProRes 422 (*.mov)" is the best format for 
converting 550D footage to FCP.


If you prefer smaller file size, choose "Apple ProRes 422 (LT) (*.mov)" instead. 


Step three. Click the "Settings" button and set proper video/ audio parameters.

My advice is to set the video size, bitrate and fame rate to be exactly as the footages so that you will suffer least quality degradation.

For example, when the video is shot at 1920*1080, 5mbps, 30fps, you could set Size-1920*1080, Bitrate-original, Frame rate-30.

If you would like to use default settings, simply skip this step. 


Step four. Click the "Browse" button next to the Output File Name field and select a location on your HDD for the output video file. 

Step five. Click the "Convert" button to start conversion. After conversion you can click the "Open" button to locate converted video files for importing to FCP without rendering.

Now can easily transcode T2i/550D 1080P H.264 files to FCP X compatible format for editing, this software runs fast, so you can convert your T2i/550D footages to FCP in less time.

Read Related Articles:

Sunday, May 12, 2013

P2 MXF to iMovie- How to get Panasonic AJ-HPX2000 P2 .MXF into iMovie 6/8/9/11on Mac

In this guide, you will learn the easy way to import/edit Panasonic AJ-HPX2000 P2 MXF files into iMovie flawlessly on Mac by transcoding MXF to iMovie Apple Intermediate Codec encoded mov format.


Panasonic AJ-HPX2000 is a multi-format HD production camera that records onto P2 cards. Using the same sensor as the popular VariCam and HDX900 cameras, the HPX2000 can shoot native 720p or switch to shoot 1080i with 24p, 25p & 30p capture. Standard definition NTSC or PAL recording is also available.

While, most of the users have found that the MXF format is not well-suited for some non-linear video edit software including the Apple tool- iMovie. Here is one of the problems we found on the forum. One of my clients just bought a used Panasonic AJ-HPX2000, and wants to edit P2 MXF footages in iMovie 11 on OS 10.6, but he found iMovie can not recognize the P2 .mxf footages. Any idea? From the quoted words, it’s not hard to learn that MXF videos can not be directly imported to iMovie. So, how to import Panasonic P2 MXF to iMovie 6/8/9/11 for editing without any problem? Here we offer you the easiest solution.


To import and edit P2 MXF files in iMoive with ease, you need transcode Panasonic P2 MXF to iMovie supported video format. And we learn that AIC(Apple InterMediate Codec) codec MOV format is the iMovie perfectly supported format. In this case, a professional and easy-to-use P2 MXF Converter is the key. Here Mac P2 MXF to MOV Converter is the highly recommended tool for you.

It supports encoding Panasonic P2 and Canon C300/XF105/XF100/XF300 MXF files to iMovie native format so that you can easily import the Panasonic Camcorder recordings to iMovie for editing on Mac including importing P2 MXF to Avid MC and converting P2 MXF to FCP Prores. This will help you import the file correctly and saving the rendering time.

Convert, Transfer and Edit Panasonic AJ-HPX2000 P2 MXF footages in iMovie with AIC MOV codec

Step 1. Free download the Panasonic MXF to iMovie Converter for Mac, load your P2 MXF files into the program. As a top P2 MXF Converter, it also supports transcoding MXF to Apple ProRes Codec for editing with Final Cut Pro 6/7 and FCP X.


Step 2. Click the format bar, and move mouse cursor to "iMovie and Final Cut Express > Apple Intermediate Codec(AIC) (*.mov)" as output format.


Step 3. Click convert button in the main interface to start transcoding Panasonic P2 MXF to iMovie AIC MOV on mac.

Some more helpful features of the P2 MXF to iMovie Converter for Mac:

1. Settings- click to set video resolution(1920×1080/1440×1080/1280×720/720×480), bitrate(from 1Mbps to 20Mbps), frame rate (24p/30p)

2. Editor (next to "Add" icon)- click to set deinterlace, denoise, mute, volume up, trim, crop, etc.

After the workflow, you can go to the output folder to find the converted video files. Now you are free to load/edit Panasonic AJ-HPX2000 P2 MXF files in iMovie under Mac without problems.

Read More:

Thursday, May 9, 2013

2013 Mother's Day Coupons-Pavtube iMedia Converter for Mac 30% OFF

HOOOOOOOOT NEWS: Mother's Day happens to be just around the corner, and we sincerely hope you've got plans to show as well as tell your mom how much you love her. If you haven't figured out a strategy, take a look at Pavtube 2013 Mother's Day Promotion. The most popular software Pavtube iMedia Converter for Mac, Video Converter Ultimate, Blu-ray Ripper and DVD Ripper is at 30% off Discount expiring on May 22, 2013Time-limited! Never Miss! 


This is Mother's Day best Gift Idea from Pavtube Studio

* If you like shooting, just use your lovely cameras and camcorders to record the best moment with your family and then edit AVCHD/MTS/M2TS/MXF video files on Mac FCP, FCP X, iMovie, Avid Media Composer, Adobe Premiere Pro, iPhoto 8/9/11 etc in pleasant quality. 

* If yu choose a computer, a tablet or a smartphone as Mother's Day gift, we do offer low prices software solutions for your mom to enjoy videos, TV shows, camera recordings and Blu-ray DVD movies on those devices anywhere and any time with Video Converting on Mac

Top Pick - 30% OFF Pavtube iMedia Converter for Mac (Ony $45.530% Saving

Pavtube iMedia Converter for Mac is an all-in-one video converter, DVD ripper and Blu-ray Ripper, which means it lets you convert Blu-rays, DVDs, TV recordings, HD (AVCHD) shootings, Flashes and many other video types into desire formats (MP4, MOV, M4V, TS, MKV, AVI, WMV, MPG, VOB, etc). 

Pavtube iMedia Converter for Mac can also convert Canon, Nikon, Olympus, Sony and Panasonic camera or camcorder recorded HD videos or 1080p footages to editable HD video formats for non-linear editing software like iMovie, FCE, FCP 7/FCP X, Final Cut Studio, Avid, Adobe Premiere, Sony Vegas, Pinnacle Studio, Cyberlink PowerDirector, Windows Movie Maker, etc. The HD footage can be compressed to SD video clips for storage when you wanna save storage space. 

Highlights of the software- Why Choose this Best HD Video to Mac Converter: 

* Rip Blu-ray/DVD to Mac HDD in MP4, AVI, MOV, M4V, MKV, MPG and more formats; 

* Convert HD MKV, AVI, WMV, etc for playback on iPad, iPhone, iPod, Apple TV; 

* Convert HD footages (AVCHD, MTS, M2TS, M2T,MXF, HDV, TOD, MOD, MOV) to iMovie and Final Cut editable codec (AIC, DV, ProRes, etc); 

* Restore DVR TiVo files to lossless MPEG files or convert TiVo to desired formats; 

* Convert among other common videos such as flash videos, Quicktime videos, CD files, digital video files, Matroska files, etc. 

* Extract audio tracks from the source discs and clips for personal use; 

* Edit the video and movie clips by trimming, cropping, watermarking, flipping, etc. 

Part II: Customer's Review: 

* I have to say your product seems very good, and as a professional film editor its ability to convert to Avid codecs was definitely a plus. 

* Yes, we're using it to convert mxf files taken off a P2 video card - and it works great - love it! We were using an iMedia Converter for everything, but it didn't do MXF files, so we had to find you - thanks again. 

* I Love This Product because I have been able to convert my whole entire movie collection including my Blu-rays to itunes, which I can now watch everything on my apple TV. It's great. 


More Giveaway on Pavtube 2013 Mother's Day Coupon: 

1. Pavtube Video Converter Ultimate (30% off) 

What does the software do? Basically it lets you put Blu-ray movies, DVDs and videos of various formats onto any portable device, so that you can use the copy-protected movies freely and watch movie anywhere. 

2. Pavtube BDMagic (Windows) (Mac) (30% off) 


The app lets you back up and convert Blu-ray& DVD collections into iPad/iPhone/Apple TV friendly format so as to enjoy movies. This is definitely a good gift for frequent travelers. The software exports up to 1080p full HD video with both stereo and 5.1 sound, so as to make full use of available surround sound system. Moreover, the latest update includes 3D Blu-Ray ripping feature! 

3. Pavtube DVDAid (Windows) (Mac) (30% off) 


It has outputs for almost all the Android models, so you can start getting DVD movie library ready for your Android devices like Kindle Fire HD, ASUS Transformer Prime, Nook (HD/HD+) Tablet, Samsung Galaxy Tab 2, Galaxy Note 10.1, Galaxy S4/S3, Google Nexus 7, Google Nexus 10, Nexus 4, Lenov ThinkPad tablet, Sony Tablet S, Toshiba Thrive, Motorola Xoom, etc... 

More than converting Blu-ray/DVD movies to Android tablet playing both on Mac and Windows, Pavtube DVD Ripper also pack perfect support for portable devices that run other OS, including iPad, iPhone, BlackBerry PlayBook, Microsoft Surface RT/Pro tablet, HP TouchPad, Nokia Lumia 920/822, etc. 

P.S. Never miss Pavtube's Mother's Day Lowest Promotion

Wednesday, May 8, 2013

Does Sony Vegas like handling the Canon EOS-5D h.264 MOV files well

This article will show the best way to convert Canon 5D HD MOV to WMV for Sony Vegas editing. 

The Canon EOS 5D is a digital sngle lens reflex (DSLR) camera that can capture high definition stills and movie clips. It saves movie clips in-camera using a Compact Flash (CF) memory card. Canon bundles a simple free software package with the camera. Canon's supplied software applications are named ZoomBrowser for Windows and ImageBrowser for Mac which can play movie clips, and also perform rudimentary movie editing, but it not for windows, and some people have been asking importing issues about Canon 5D into Sony Vegas on Windows. 

I'm new to DSLR editing and have a bunch of 5D footage for a music video I just shot, and now need to edit it. I use Sony Vegas and have a relatively not that high performance laptop (about 4 years old) that has seen me through other editing projects, but I always feel theres a bit of a loss in quality in the finished product. I thought I'd ask, or if anyone can point me in the direction of places to find information, on 5D workflow for editing in Sony Vegas. If theres no hope for Vegas and my slow computer I will look into other options such as getting new editing software or borrowing someones mac or something. 

I've been annoyed that sony vegas and most other apps on my PC can't play the 5D full HD .mov files smooth. I was so excited about not having to transcode any files from shooting to editing. I have settled to transcode. But failed many times. Hope this helps anyone out there. I guess PC doesn't like handling the h.264 codec very well. 

How to edit 5D H.264 MOV files in Sony Vegas smoothly? The best way is to convert 5D H.264 MOV to Sony Vegas supported format, like MEPG-2/WMV format, which is best for Sony Vegas, and then you can edit the converted videos in Sony Vegas without problems. 

Software you need: Pavtube Video Converter Ultimate.

This software will help you to get  t 5D H.264 MOV files working well in Sony Vegas. It is capable of converting a variety of hd video, blu-ray, and dvd movies to another format. And meanwhile it supports to convert to many mobile devices and editing software, like After Effects, Avid Media Composer, Adobe Premiere Pro, and more. CUDA acceleration will give you faster conversion speed. Below is a guide for you.

1. Free download and install this 5D MOV to Sony Vegas Converter, just copy the HD MOV files from the CF cards right to your hard drive, import the files to the program.


2.Click format bar to choose the output format. Click and choose  Adobe Premiere/Sony Vegas --> MPEG-2 (*.mpg) or WMV (VC-1) (*.wmv). This format is best for Sony Vegas editing.


3.You can click "Settings" button to adjust the parameters, such as resolution, bitrate, etc.

4.Click convert button to start converting 5D H.264 MOV to Sony Vegas.

This Ultimate Caon H.264 MOV Converter from Pavtube can convert Canon 5D H.264 MOV files to Sony Vegas with best quality and fast speed. 

Once the conversion completes, you can click "Open" button to get the output files effortlessly.

Now you have got it right, just to import and edit Canon EOS 5D H.264 MOV files within Sony Vegas Pro 8/9/10/11/12 at ease.  

P.S.

If you want to burn Canon 5D mov to a DVD or a DVD iso file, you can get the bundled software- Video Converter Ultimate($65) + DVD Creater($35) = Only $64.9, Save $35.1. Never miss!

More info for you:

Transcode Canon EOS 6D 1080p MOV to FCP
Import Canon EOS DSLR H.264 MOV to Avid MC
Does Canon EOS 5D mark 3 1080p mov Capable with iMovie